
Service
Service Intervals
Each Use
Beginning of Season
• Check and adjust lift height.
• Check skid shoes and scraper blade. Replace if necessary.
• Check V-belts, Replace if worn.
End of Season
Grease
The following greases are preferred:
• John Deere Multi-Purpose SD Polyurea Grease
• John Deere Multi-Purpose HD Lithium Complex Grease
If not using any of the preferred greases, be sure to use a general all-purpose grease with an NLGI grade No.2 rating.
Wet or high speed conditions may require use of a special-use grease. Contact your Servicing dealer for information.
Gear Case Oil
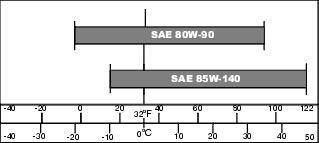
Use oil viscosity based on the expected air temperature range during the period between oil changes
The following John Deere gear case oil is preferred:
• GL-5 GEAR LUBRICANT® (SAE 80W-90)
The following John Deere gear case oil is also recommended if preferred oil is not available:
• GL-5 GEAR LUBRICANT® (SAE 85W-140)
Other gear case oils may be used if recommended John Deere gear case oils are not available, provided they meet the following specification:
• API Service Classification GL–5.
Checking Gearbox Lubricant
The gearbox does not have serviceable components. However, there is a removable plug for checking gearbox lubricant level, and adding lubricant, if necessary.
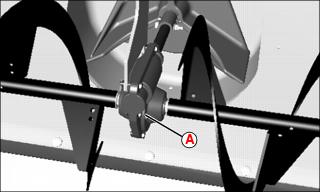
To check gearbox lubricant level:
1. This service should be performed with the snowblower removed from the machine.
2. With blower gearbox approximately level, remove plug (A) gearbox. Lubricant level should be to the bottom of the check plug hole. Add, 80W-90 GL-5 Gear Oil, if necessary.
Replacing Shear Bolts
IMPORTANT: Avoid damage! Replacement shear bolts must be same as original shear bolts on attachment: |
1. Lower snowblower to ground.
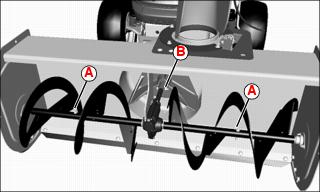
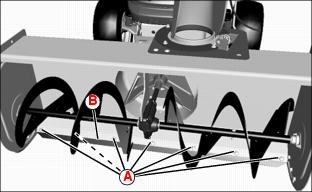
5. Inspect to determine which shear bolt has broken. There are four shear bolts:
• One M6x45 bolt (A) and M6 nut on each auger shaft.
• Two M6x45 bolts (B) and M6 nuts securing the impeller to the auger drive shaft.
6. Find and correct the cause for shearing.
7. Lineup auger and / or impeller properly. Install new shear bolts that are same size as original, M6x45 in Impeller and M6x45 full thread in the Auger.
Replacing Scraper Blade
Replace scraper blade when blade is bent, or blade edge is rough or worn. Scraper blade is not reversible.
1. Remove and retain seven M8x20 carriage bolts (A), secured at the backside with M8 locknuts.
2. Remove and replace scraper blade (B).
3. Secure scraper blade with hardware removed earlier. Tighten hardware.
Replacing Drive Belt
1. Remove snowblower from machine. See “Removing Snowblower” from Removing section.
2. Rest snowblower frame on the ground.
Replace Primary Drive Belt
Picture Note: Secondary drive components partially hidden for clarity.
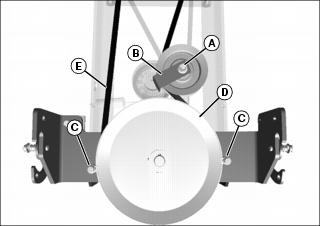
1. Remove nut (A) and belt guard (B) from primary tensioning idler sheave.
2. Remove two retaining nuts and belt guard bolts (C) at primary drive sheave (D).
3. Remove primary drive belt (E).
5. Install belt guards and hardware removed earlier.
Replace Secondary Drive Belt
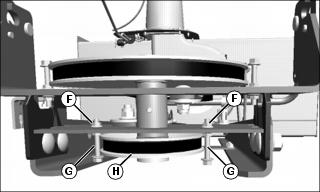
1. Remove two nuts (F) and belt guard bolts (G) at secondary drive sheave (H).

Picture Note: Upper drive components partially hidden for clarity.
2. Remove nut (I) and belt guard (J) from idler sheave (K).
3. Disengage secondary drive belt (L) from tensioning sheave (M) and remove from secondary drive sheave.
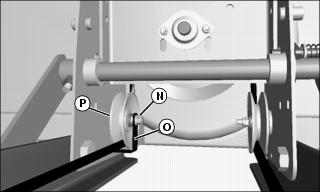
4. Remove nut (N) and belt guard (O) from front left idler sheave (P) at rear of snowblower housing.
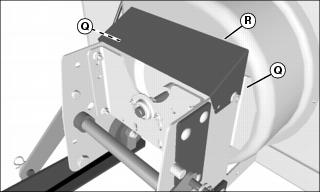
5. Loosen, do not remove, two nuts (Q) that retain belt guard bracket (R) to snowblower housing. Remove belt guard bracket, which is slotted for easy removal and installation.
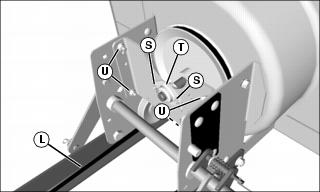
6. Remove two nuts (S) and auger shaft bearing (T) from gearbox plate.
7. Remove four nuts (U) and carriage bolts that retain the gearbox plate to the snowblower housing. Remove gearbox plate.
8. Remove old secondary belt (L) and begin installing new one. Make sure that twist in belt is correct when routing from the front sheave past the side idler sheaves.
9. Install gearbox plate and secure with hardware removed earlier.
10. Install auger shaft bearing and secure with hardware removed earlier.
11. Install belt guard bracket and tighten retaining nuts to secure.
12. Install belt guard on front left idler pulley, with locating tab in belt guard inserted in small hole in snowblower housing. Secure with nut, removed earlier.
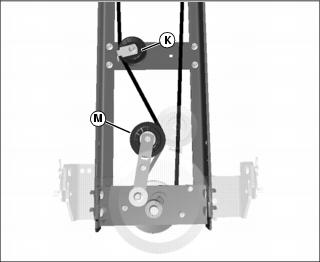
Picture Note: Upper drive components partially hidden for clarity.
13. Rout belt back to outside of idler sheave (K), and install belt guard and nut, removed earlier.
14. Route belt to inside of tensioning sheave (M), then back over the secondary drive sheave to complete belt routing.
15. Install belt guard bolts and nuts, removed earlier, at secondary drive sheave.


