Operating
Air Flow For Bagger
Bagger needs strong airflow from mower to bags for best performance. Follow these suggestions to help airflow:
• Keep bagger chute, hopper top, screen, bags and underside of mower clean.
• Keep throttle lever at fast position but travel slow.
• Level mower front-to-rear so rear of mower is no more than 13 mm (1/2 in.) higher than front of mower.
• Operate mower in higher cutting positions.
• Replace worn or damaged mower blades.
• Attach optional lips (if available).
Checking For Plugging While Bagging
If there is a trail of clippings behind mower, check for plugged chute or full bags.
If grass builds up in front of discharge chute outlet, check for plugged bagger chute.
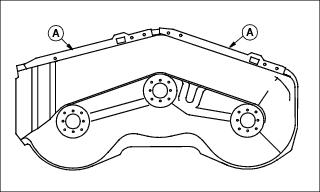
Inspect And Unplug Chute Or Bagger
2. Wait for all moving parts to stop moving before dismounting.
3. Remove debris from the following inspection points:
• Open hopper top. Check chute outlet.
• Remove chute from Power Flow. Check chute inlet.
• Check under mower deck and Power Flow outlet for debris.
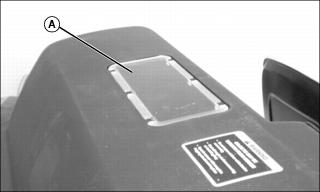
Filling Bags
• Check level of clippings often. Use top hopper window (A) to check level of clippings.
• Empty bags when full to prevent plugging of chute.
• Left bag normally fills first.
• Right bag may not fill completely when you are cutting thin stand of grass. Bag will fill if you slow engine to reduce air flow.
• Fill bags 1/2 full when operating on slopes to avoid tipping.
Bagging Tips
Run engine at full speed. If engine slows down, reduce travel speed.
Bag grass only when grass is dry. Wet grass will plug chute and bagger.
Pick up all rocks, stones, twigs and other debris before mowing and bagging. Cut grass higher than desired the first time so mower will clear unseen obstructions that could cause damage to the mower or bagging attachment.
Never leave grass or leaves in the bags overnight or for long periods of time. Dampness from leaves or grass will cause deterioration of the bags. Also, damp leaves or grass when contained in the bags are combustible and can create a fire. For this reason, never store garbage bags of leaves or grass bagging attachment with full or partially filled bags in a garage or other enclosure. Grass clippings make excellent compost. Clippings can be used also as mulch between garden rows or around flowers, shrubs and trees.
Plastic lawn and leaf or garbage bags can be placed inside the cloth bags to facilitate disposal of grass or leaves. Use 33 gallon size lawn and leaf bags.
NOTE: Be sure to drape enough of the plastic bag over the outside of the cloth bag on all four sides so the bags can easily be tied shut after filling.
To remove plastic bags, first tie the bag shut. Then remove cloth bag with plastic bag from support. Lay bag on its side on ground. Hold cord on bottom of bag and shake material out of bag to empty.
IMPORTANT: Avoid damage! Bagger may extend beyond machine or mower. Be careful not to hit tree or building, etc., with hopper when you make short turns. |