
Assembly
Assemble Front Handle
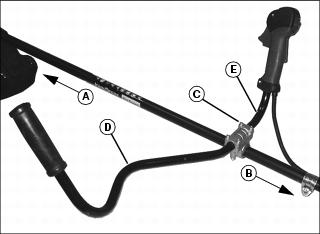
Picture Note: Orientation Shown; Cutting attachment end (A) and power head end (B).
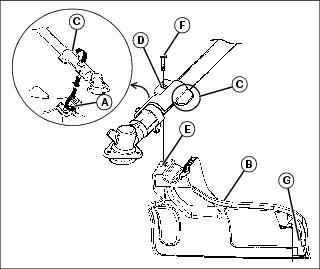
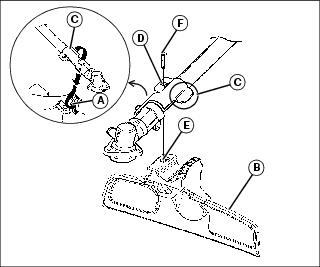
1. Loosen the four (4) bolts (C) on the handle clamp and slip handle ends into clamp so the ends meet in the middle. (Right side handle has throttle and stop switch assembly mounted on it.)
NOTE: Handle clamp position is pre-set at the factory. It may be repositioned for best balance and comfort. Left handle (D) should angle forward. Right handle (E) should be straight up.
2. Adjust handles for operator control and comfort, and tighten the four (4) clamp bolts evenly and securely.
Install and Adjust Throttle Cable
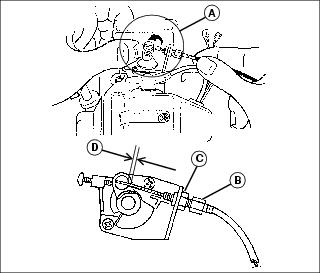
1. Open throttle as shown (A), and hook the end of the throttle cable to the carburetor. Carburetor lever swivel has a round hole to accept and capture cable end.
NOTE: If the play is too large, the starting performance with trigger at starting position will be poor.
If the play is non-existent, the carburetor lever may not return to idle position when trigger is released.
2. Adjust the cable by turning the turnbuckle (B) in or out and locking with the locking nut (C). The proper cable play is 0.5 - 1 mm (0.02 - 0.04 in.) (D).
Connect Ignition Switch Wires
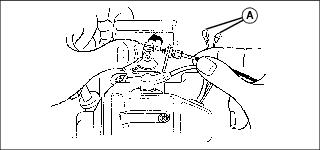
1. Connect two wires on throttle control to two wires (A) from trimmer engine. (Black and black w/white stripe wires from throttle control match colors of engine wiring. Connectors will only allow correct wires to be connected.)
Install Grass Deflector
NOTE: When converting from brushcutter to string trimmer, or string trimmer to brushcutter, make sure the correct guard/deflector is being used.
1. Place slot (A) in grass deflector (B) over the square tab (C) of mounting bracket.
2. Rotate the grass deflector around the driveshaft housing. Align the screw hole (D) in the mounting bracket with the screw hole (E) in the grass deflector.
3. Insert screw (F) through the mounting bracket and into the grass deflector and tighten securely.
NOTE: When assembling grass defector (B), be sure to remove cover from cut-off blade (G) on deflector before using string trimmer.
Install Blade Guard
NOTE: When converting from brushcutter to string trimmer, or string trimmer to brushcutter, make sure the correct guard/deflector is being used.
1. Place slot (A) in blade guard (B) over the square tab (C) of mounting bracket.
2. Rotate the blade guard around the driveshaft housing. Align the screw hole (D) in the mounting bracket with the screw hole (E) in the blade guard.
3. Insert screw (F) through the mounting bracket and into the blade guard and tighten securely.
Install Stringhead
NOTE: Installing the stringhead is easier if you place the unit upside down, or stand the unit up with the engine on a clean, flat surface.
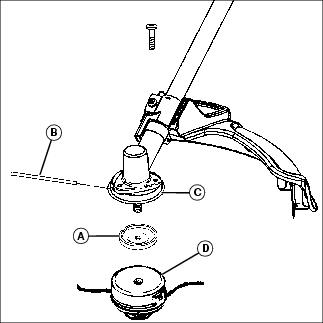
1. Install upper flange washer (A) onto gear shaft with hollow side toward gear head.
2. Place holding pin (B) through slot in grass cover (C), upper flange washer (A) and gear head.
3. Place stringhead (D) on upper flange washer (A). Turn stringhead counterclockwise and tighten securely.
4. Adjust string length to 43 cm (17 in.) diameter, or 16.5 cm (6.5 in.) on each side.
5. Remove the holding pin and spin the stringhead by hand to make sure there is no interference.
Install Blade
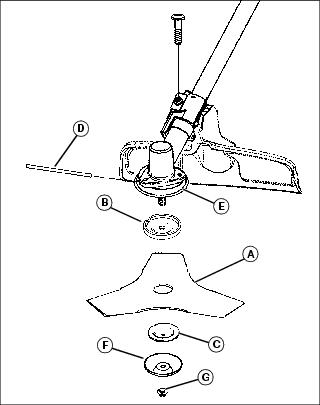
1. Install blade (A) on upper flange washer (B), making sure the blade is centered and lies flat. The shoulder on the upper flange washer must be inserted into the center hole in the blade.
2. Install lower flange washer (C) with the raised center away from blade.
3. Place holding pin (D) through slot in grass cover (E), upper flange washer (B) and gear head. Install nut guard (F) and blade nut (G) onto gear head and turn counterclockwise to tighten securely.
4. Remove holding pin and spin the blade by hand to make sure there is no interference.