
Operating
Inspection
· Always inspect all fasteners for tightness and/or missing parts. Tighten or replace before use.
· Make sure all parts are installed as instructed.
Preparing for Use
· Put on the double shoulder harness and adjust for comfort and safety.
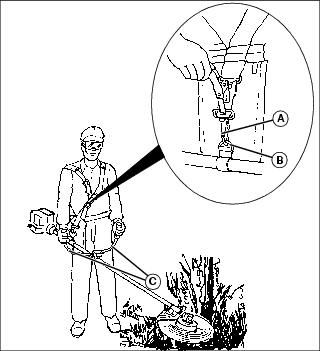
· Before starting the brushcutter, try the fit by engaging the harness spring clip (A) onto the hanger (B) on driveshaft.
· If necessary, readjust the harness and/or the bicycle handle (C) to achieve a comfortable working position. Disengage the spring clip before adjusting harness and/or bicycle handle.
Starting Engine
Starting Engine When Cold (Initial Engine Starting)
1. Lay trimmer on a flat, bare surface.
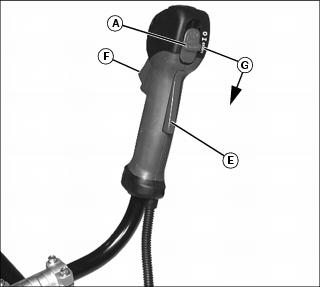
2. Move the switch (A) to the "I" position.
3. Push primer bulb (B) 8 to 10 times.
4. Move choke lever (C) to the "CHOKE" position (D).
NOTE: Trigger safety lock (E) must be depressed before squeezing trigger.
5. Squeeze trigger (F) to full throttle position and hold it, or set the switch (A) to the "START" (fast idle) position (G) and release the trigger.
6. Pull starter until engine tries to run. (No more than 6 pulls.)
7. Move choke lever to half choke position.
8. Pull starter until the engine runs.
9. Run engine 30 to 45 seconds at the "START" (fast idle) position on half choke position to warm up. Move choke lever to the "RUN" position (H).
Starting Engine When Warm (Restarting Engine)
1. Place choke lever in the "RUN" position (H), if it is not already there.
NOTE: It is not necessary to squeeze trigger or set the part throttle lock when engine is warm.
2. Pull starter rope until the engine runs.
NOTE: If engine fails to start, push primer until fuel appears in clear plastic return line.
Stopping Engine
2. Move switch (A) to the "O" stop position.
Using Stringtrimmer
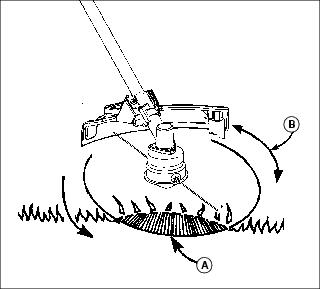
· Keep the trimmer tilted toward the area being cut. See illustration for best cutting area (A). Do not cut in dangerous cutting area (B).
· When cutting with string, cut from left to right with the engine at full throttle, so that clippings will be thrown away from you.
· Use the tip of string to do the cutting - do not force stringhead into uncut grass. Wire and picket fences cause extra string wear, even breakage. Stone and brick walls, curbs, and wood may wear string rapidly. Walk around trees and shrubs. Tree bark, wood moldings, siding, and fence posts can easily be damaged by the string.
· As the cutting line wears down, engine speed (RPM) will increase. Allowing the engine to run at high RPM (3 inch line length or less) for a prolonged period will shorten engine life.
· Adjust string length to 43 cm (17 in.) diameter or 16.5 cm (6.5 in.) on each side.
Extending Line
· As you perform your trimming tasks, the cutting line will wear shorter. It may be extended automatically with the engine running, or manually, with the engine stopped.
· Engine running: (At full speed) lightly tap (do not pound) the rotary head on the ground. Line will advance approximately 1 inch per tap. When tapping for line, it should be done on bare ground or a hard surface.
NOTE: Advance string whenever you hear the engine running faster than normal. This will maintain best performance and keep string long enough to advance properly.
If the string is worn too short you may not be able to advance the string by tapping. If so, STOP THE ENGINE, and manually advance the string.
· Engine Stopped: Line can be advanced manually, by turning the unit over so you are facing the bottom of the rotary head. While pulling outward on one of the cutting lines, push in on the spool. When the line stops, release the spool and continue pulling the line. Keep repeating this procedure until the desired amount of line is extended.
Using Brushcutter
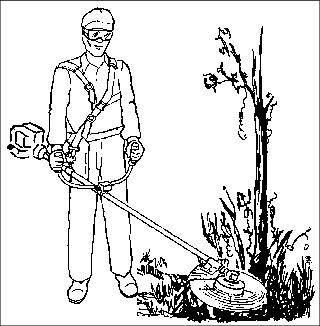
· Always hold brushcutter with both hands when operating. Use a firm grip on both handles.
· Maintain your grip and balance on both feet. Position yourself so that you will not be drawn off balance by the kickback reaction of the cutting blade.
· Inspect and clear the area of any hidden objects such as concrete, fencing, wire, wood, metal, etc.
· Never use blades near sidewalks, fencing, posts, buildings or other immovable objects.
· Never use a blade after hitting a hard object without first inspecting it for damage. Do not use if any teeth are bent or if any cracks are detected.
· Scythe (the broad sweeping of the unit back and forth from side to side) with the weed blade only.
Using Blade
WEED BLADE (Optional)
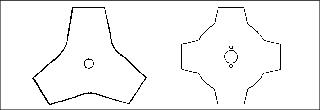
· Suited only for pulpy weeds, vines, etc. The blade can be turned over to extend useful life.
SAW BLADE (A) / XRT BLADE (B) (Optional)
NOTE: The blade guard supplied with this model is designed for use with blades up to 9" in diameter.
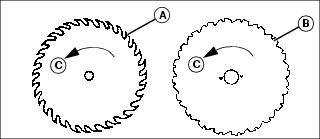
· The Saw and XRT Blades can be used for cutting saplings larger than 1.3 cm (1/2 in.) thick.
· The arrows (C) denotes the direction of rotation.
Converting Stringtrimmer/Brushcutter
Refer to the "Install Stringhead / Install Blade" sections earlier in this manual.
Convert Stringtrimmer to Brushcutter
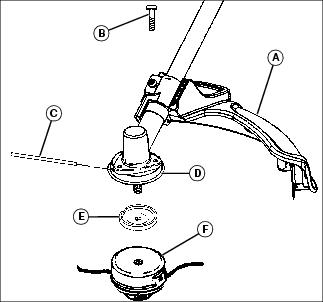
1. Remove grass deflector (A) by removing screw (B); then remove grass deflector from mounting bracket.
2. Place holding pin (C) through slot in grass cover (D), upper flange washer (E) and gear head. Remove stringhead (F) by turning clockwise.
NOTE: Put these parts aside and save for later use with the stringhead.
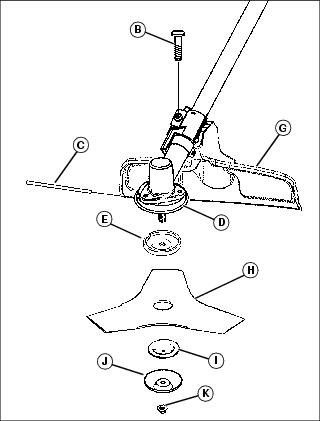
3. Install blade guard (G) and secure with screw (B). (See "Install Blade Guard.")
4. Install blade (H) on upper flange washer (E), making sure the blade is centered and lies flat. The shoulder on the upper flange washer must be inserted into the center hole in the blade.
5. Install lower flange washer (I) with the raised center away from blade.
6. While holding upper flange washer (E) and gear head with holding pin (C). Install nut guard (J) and blade nut (K) onto gear head. Turn counterclockwise to tighten securely.
Convert Brushcutter to Stringtrimmer
1. Remove blade guard (G) by removing screw (B); then remove blade guard from mounting bracket.
2. Place holding pin (C) through slot in upper flange washer (E) and gear head. Remove blade nut (K), nut guard (J), lower flange washer (I) and blade (H).
NOTE: Put these parts aside and save for later use with the blade.
3. Install grass deflector (A) and secure with screw (B). (See "Install Grass Deflector.")
4. While holding grass cover (D) and upper flange washer (E) with holding pin (C), install stringhead (F) on upper flange washer, turn counterclockwise and tighten securely.