
Service
Servicing Your Machine
Please use the following timetables to perform routine maintenance on your machine.
6-Hour Maintenance or Daily For Commercial Use
· Carefully inspect for any fuel leaks. Correct immediately.
· Remove all dust, dirt, and grass from the entire unit after each use.
· Check air filter. For proper performance and long life, keep air filter clean.
· Inspect the cutting attachment (stringhead or blade) for wear or cracks and replace if detected.
50-Hour Maintenance or Once a Week For Commercial Use
· All items under 6-hour maintenance plus:
· Replace the spark plug. The recommended electrode gap is 0.7 mm (0.028 in.).
· Check fuel filter in tank and replace if needed.
· A LEAKING FUEL CAP IS A FIRE HAZARD AND MUST BE REPLACED IMMEDIATELY.
The fuel cap contains a check valve. Clogged air passages will cause poor engine performance. If performance improves when the fuel cap is loosened, check valve may be faulty or air passages are clogged. Replace fuel cap if required.
· Clean out all dust and dirt from the cylinder fins.
100-Hour Maintenance
1. Remove screw on right side of gear head.
2. Hold nose of grease gun tightly over hole. Turn gear shaft while pumping grease into head.
3. Wipe excess grease from gear head and reinstall screw.
· Use a high quality multipurpose, lithium based, EP grease, NLGI No. 2.
Engine Warranty Maintenance Statement
Maintenance, repair, or replacement of the emission control devices and systems on this engine, which are being done at the customers expense, may be performed by any non-road engine repair establishment or individual. Warranty repairs must be performed by an authorized John Deere dealer.
Selecting and Mixing the Proper Fuel
This machine is powered by a 2-cycle engine and requires pre-mixing unleaded gasoline and 2-cycle engine oil. Premix the gasoline and engine oil thoroughly in a clean container approved for gasoline.
Use unleaded gasoline intended for automotive use with an octane rating of 87 or higher.
The engine on this model requires the use of John Deere Premium 2-Cycle Engine Oil. The engine was designed to reach its optimal performance output, maximum endurance, and minimum preventive maintenance by using this oil.
If John Deere Premium 2-Cycle Oil is not available at your dealership, use any brand of premium 2-cycle engine oil classified as grade ISO-L-EGD or JASO-FC.
Using any other oil will shorten the engine life and increase the required maintenance. The warranty might also be voided by using a lower quality oil.
Mix John Deere Premium 2-Cycle Engine Oil with gasoline according to the instructions on the package.
NOTE: John Deere fuel mix contains a fuel stabilizer and will stay fresh up to 30 days. Do not mix quantities larger than usable in a 30-day period.
Fuel Mixture (50:1)
Filling Fuel Tank
NOTE: It is normal for smoke to be emitted from a new engine during and after first use.
1. Loosen and remove fuel cap slowly.
NOTE: Do not mix gas and oil in fuel tank.
2. Make sure fuel mixture is adequately mixed in a suitable container before pouring in tank.
3. Carefully pour fuel mixture in tank. Avoid spillage.
4. Clean and inspect fuel cap gasket.
5. Immediately replace fuel cap and hand tighten.
Idle Speed Adjustment
· Your John DEERE engine has been adjusted at the factory for optimum performance and fuel consumption, and no further adjustment should be required. However, because of varying atmospheric and climatic conditions, some minor adjustment may be needed for your area.
· Adjusting idle speed should always be done with a tachometer to insure proper idle speed (2,500 rpm). If a tachometer is not available, the idle speed may be adjusted as follows:

1. Turn idle speed screw (A) clockwise until cutting head or lower drive begins to move.
2. Turn idle speed screw counterclockwise until lower drive stops.
3. Turn idle speed screw approximately 1/4 to 3/4 turn further counterclockwise.
· If the engine does not idle properly after this adjustment, contact your nearest John DEERE dealer for service.
· Condition of the air filter (B) is very important to the operation and life of the engine, and also has a major affect on carburetor adjustments. The air filter should be checked for cleanliness before each use, and before making any carburetor adjustments.
NOTE: For proper performance and long life, keep air filter clean.
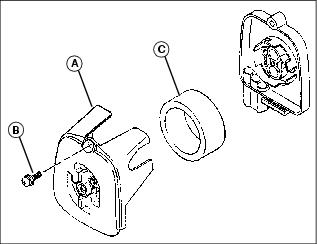
1. Remove the air filter cover (A) by removing screw (B).
2. Clean the air filter (C) in warm soapy water. Rinse and let dry completely.
3. Saturate filter with SAE 30 weight oil and squeeze out excess.
4. For best performance, replace annually.
Cleaning Spark Arrestor
The muffler is equipped with a spark arrestor (screen inside the muffler body). Through normal use the spark arrestor can become dirty and should be periodically cleaned or replaced.
NOTE: To avoid a fire hazard, never run the trimmer without a spark arrestor in place.
1. Remove the screw(s) holding the spark arrestor to the muffler body.
2. Remove spark arrestor by pulling straight out from the muffler body.
3. Clean with a wire brush to remove carbon deposits. Be careful not to deform or damage the spark arrestor.
4. Replace the spark arrestor if it is torn, deformed, or damaged in any way.
5. Reinstall the spark arrestor. Replace the screw(s) and tighten securely.
String Replacement
You can make adjustments and repairs described here. For other repairs, have the trimmer serviced by an authorized servicing dealer.
NOTE: Use only 2.4 mm (0.095 in.) diameter monofilament string.
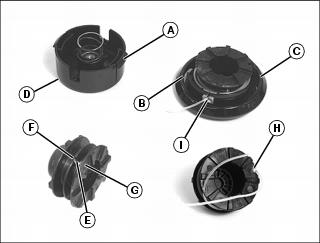
1. Stop engine. Push in the locking tabs (A) to release them from the retaining notches (B).
2. Remove the stringhead cap assembly (C) from the stringhead base (D). Spool can then be removed from the stringhead cap.
NOTE: Clean all dirt, dust, and grass out of stringhead, spool, and head cap before reassembling.
3. Remove any excess string from the spool.
4. Cut a length of cutting string that is approximately 25 feet long.
5. Fold the string at the half way point, leaving one half approximately 3 in. longer. Place the loop (E) around the notch (F) in the divider of the spool.
NOTE: Do not wind the string on; rotate the spool.
6. Hold the spool and feed the string on neatly by rotating the spool. String should be wound in the direction of the "LH" arrow (G) on the spool.
7. When finished, snap the string ends into notches (H) on the edge of the spool. Leave approximately 4 in. of string extended beyond the slot.
NOTE: Make sure string has not become trapped under the spool.
8. Once the string is wound onto the spool, place the spool and string into the stringhead cap. Pull the strings through the slots in the metal eyelets (I) on each side of the stringhead cap.
9. Install the stringhead cap assembly by aligning the locking tabs with their notches and pushing cap down until both locking tabs are securely locked.
10. Before operating the unit, make sure the strings have not become trapped and stringhead has been assembled correctly; you can do this by advancing the string manually.
NOTE: This trimmer is equipped with a cut-off blade on the grass deflector. For best cutting, advance string until it is trimmed to length by the cut-off blade. Advance string whenever you hear the engine running faster than normal. This will maintain best performance and keep string long enough to advance properly.