
Installing
Installing Handle
NOTE: If unit has been preassembled, check each step to insure the unit has been properly assembled.

1. Snap handle (A) on drive shaft housing (B).
2. Install bolt (C), flat washer (D), lock washer (E) and wing nut (F).
3. Adjust handle to a comfortable position. Tighten wing nut securely.
Installing Blade Guard/String Shield
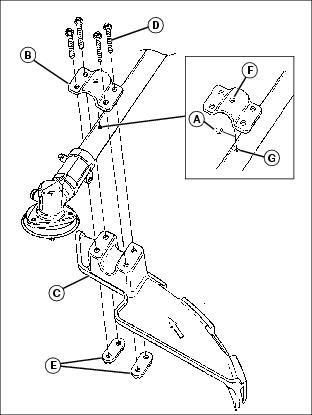
1. Remove hole plug (A) in drive shaft housing.
2. Attach clamp (B) and blade guard (C) to driveshaft housing, using four screws (D) and two threaded mounting plates (E).
3. Ensure that dimple (F) on bottom side of clamp (B) is positioned into locating hole (G) in driveshaft housing.
4. Tighten all four screws (D) evenly and securely on both sides of driveshaft housing.
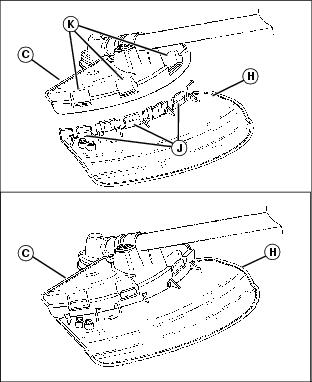
5. Attach the string shield (H) to the blade guard (C) by placing the three locking tabs (J) into the three notches (K).
6. Snap string shield (H) and blade guard (C) together to lock in place.
Installing Stringhead
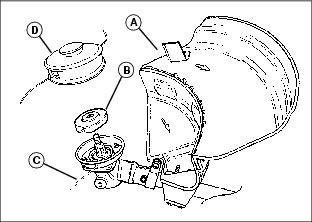
1. Install upper flange (B) on gear shaft with hollow side toward gear head.
2. Place holding pin (C) through slot in upper flange and gear head.
3. Place stringhead (D) on upper flange (B), turn counterclockwise and tighten securely.

4. Adjust string length to 43 cm (17 in.) diameter (E) [or 16 cm (6.38 in.) on each side (F)].
Installing Blade
The string trimmer can be converted to a brushcutter with the optional brushcutter kit. The brushcutter kit includes blade, blade nut, lower flange washer, barrier front handle, strap and instructions.
NOTE: If front handle bracket without barrier is installed on unit, replace it with barrier equipped bracket.
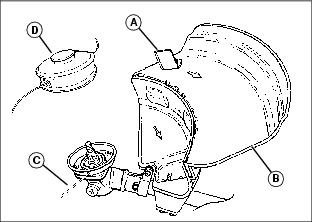
1. Remove string shield (B) by pushing in on three locking tabs while pulling to separate.
2. Place holding pin (C) through slot in upper flange and gear head.
3. Turn stringhead (D) clockwise and remove. Set aside for later use.
NOTE: Blade turns counterclockwise when viewed from operating position.
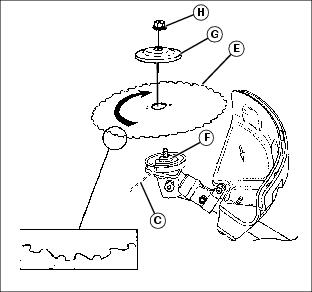
4. Center blade (E) on upper flange washer (F), making sure blade sits flat.
5. Install lower flange washer (G).
6. Place holding pin (C) through slot in upper flange washer (F) and gear head.
7. Install blade nut (H), turn blade nut counterclockwise (viewed from the bottom) to tighten. Tighten securely.
8. To install string head on trimmer, do the following:
· Place holding pin (C) through slot in upper flange washer (F) and gear head.
NOTE: Set these parts aside and save for later use of brushcutter.
· Turn blade nut (H) clockwise to remove.
· Remove lower flange washer (G) and blade (E).
· While holding upper flange (F) with holding pin (C), place stringhead onto upper flange. Turn counterclockwise to tighten.
Quad Blade
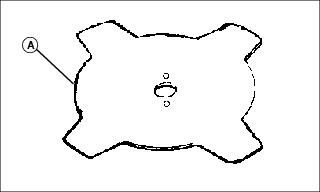
A quad blade (A) is also available and should be used for pulpy weeds and vines. It can be turned over to extend useful life.