
Operating
Daily Checklist
o Inspect machine for loose fasteners, leaks, cracks and wear.
o Clean machine after every use removing dust, dirt and grass from entire unit.
o Inspect fuel tank and cap for leaks, cracks and wear.
o Clean air filter. For proper performance and long life, keep air filter clean.
o Check idle. (String or blade must not move at idle.)
o Inspect gearcase for damage and wear.
o Inspect cutting attachment (stringhead or blade) for damage and wear. Replace if necessary.
Selecting and Mixing the Proper Fuel
This machine is powered by a 2-cycle engine and requires pre-mixing unleaded gasoline and 2-cycle engine oil. Pre-mix the gasoline and engine oil thoroughly in a clean container approved for gasoline.
Use unleaded gasoline/petrol intended for automotive use with an octane rating of 87 ([R + M])/2) or higher.
The engine on this model requires the use of John Deere Premium 2-Cycle Engine Oil. The engine was designed to reach its optimal performance output, maximum endurance and minimum preventive maintenance by using this oil.
If John Deere Premium 2-Cycle Oil is not available at your dealership, use any brand of premium 2-cycle engine oil classified as grade ISO-L-EGD or JASO-FC.
Using any other oil will shorten the engine life and increase the required maintenance. The warranty might also be voided by using a lower quality oil.
Mix John Deere Premium 2-Cycle Engine Oil with gasoline according to the instructions on the package.
NOTE: John Deere fuel mix contains a fuel stabilizer and will stay fresh up to 30 days. Do not mix quantities larger than usable in a 30-day period.
Fuel Mixture (50:1)

Filling Fuel Tank
NOTE: It is normal for smoke to be emitted from a new engine during and after first use.
1. Loosen and remove fuel cap slowly.
NOTE: Do not mix gas and oil in fuel tank.
2. Make sure fuel mixture is adequately mixed in a suitable container before pouring in tank.
3. Carefully pour fuel mixture in tank. Avoid spillage.
4. Clean and inspect fuel cap gasket.
5. Immediately replace fuel cap and hand tighten.
Starting the Engine
NOTE: If, after starting, the engine does not idle properly (either it dies when the trigger is released or it runs too fast and the cutting attachment does not stop rotating when the trigger is released), refer to Idle Speed Adjustment in the SERVICE section.
Cold/Initial Starting
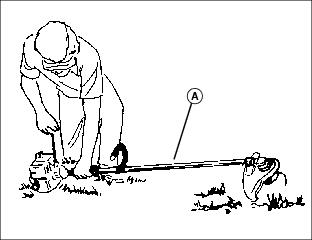
1. Lay the string trimmer (A) on a flat, bare surface.

3. Move switch (B) to the run position.
4. Push primer bulb (C) eight to ten times.
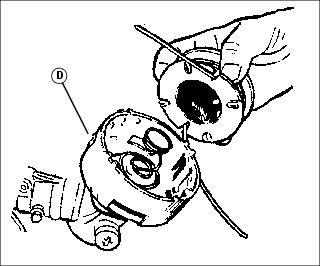
5. Move choke lever (D) to choke position (E).
6. Squeeze trigger (F) to full throttle position and hold it or depress the part throttle lock (G) and release trigger.
NOTE: Trigger safety interlock (H) must be depressed before squeezing trigger.
7. Pull starter rope until engine tries to run. (No more than six pulls.)
8. Move choke lever to half choke position (I).
9. Pull starter until engine runs.
10. Run engine 30 to 45 seconds at full throttle on half choke position to warm up. Move choke lever to run position (J).
Warm/Restarting
1. Hold throttle trigger in open position.
2. Place choke lever in its run position, if not already there.
NOTE: If engine fails to start, push primer until fuel appears in clear plastic return line.
Stopping the Engine
2. Move switch to the stop position.
String Trimming Technique
· Always hold the string trimmer firmly with both hands.
· Always wear heavy long pants, shoes, gloves, hearing protection, goggles or full face protection when operating this equipment.
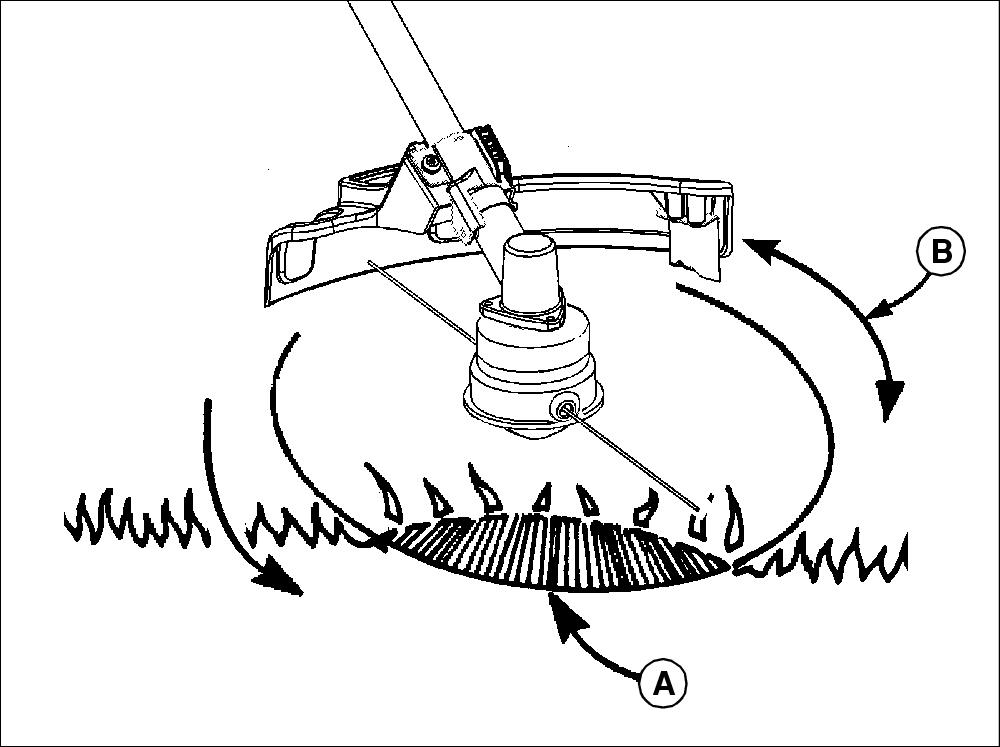
· Keep the trimmer tilted toward the area being cut. Cut in the best cutting area (A). Do not cut in dangerous cutting area (B).
· Always operate trimmer at full throttle. Prolonged part throttle cutting will result in oil dripping from muffler.
· Cut tall grass from top down. This will prevent grass from wrapping around the drive shaft housing and stringhead that may cause overheating.
· If grass becomes wrapped around the stringhead, stop the engine, disconnect the spark plug wire, and remove the grass.
· When cutting with string, cut from left to right so that grass clippings will be thrown away from you.
· Use the tip of string to do the cutting. Do not force stringhead into uncut grass.
· Avoid stone walls, curbs, wood, wire and picket fences to prevent string wear and breakage.
· Tree bark, wood moldings, siding and fence posts can easily be damaged by the string.
· Walk around trees and shrubs.
· Keep the string advanced to the correct cutting length.
Extending the String
NOTE: This trimmer is equipped with a cut-off blade on the grass deflector. For best cutting, advance the string until it is trimmed to length by the cut-off blade.
The string wears shorter as trimming is performed. Engine speed (RPM) increases as string shortens [76 mm (3 in.) string length or less]. Allowing the engine to run at high RPM for a prolonged period of time will shorten engine life. Extend the string whenever engine begins to run faster than normal. This will maintain best performance and keep string long enough to advance properly.
Extending String - Engine Running
NOTE: String advances approximately 19 mm (3/4 in.) per tap.
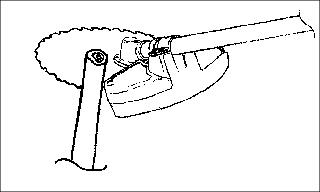
· With engine running at full throttle, lightly tap (do not pound) rotary head on bare ground or a hard surface.
Extending String - Engine Stopped
NOTE: If string is worn too short, it may not advance by tapping. Extend the string manually.
1. Stop the engine and wait for all moving parts to stop.
2. Turn the unit over to face the rotary head.
3. Pull outward on one of the cutting strings while pushing in on the spool retainer.
4. When the string stops, release the spool retainer. Continue pulling the string.
5. Repeat procedure until the desired amount of string is extended.
Replacing String
NOTE: Use only 2.0 mm (0.08 in.) diameter mono filament string.
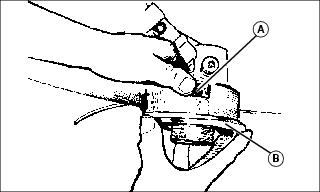
2. Push in one of the locking tabs (A), releasing it from its notch. Pull on the stringhead cap (B). Release the other locking tab, lift off the stringhead cap and remove spool.
3. Clean all dirt, dust and grass out of stringhead, spool and stringhead cap.
4. Cut a length of cutting string approximately 9 m (30 ft).
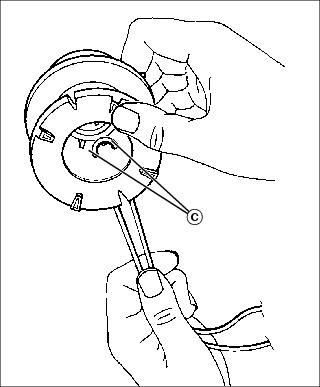
5. Loop string through anchor holes (C) in spool making sure that both strings are even in length.
NOTE: Do not wind string on spool. Always rotate spool.
6. Hold spool and feed string on neatly while rotating spool. When finished, snap the string ends into slots on the edge of the spool.
7. Insert strings in their respective string savers (D). Place spool back on stringhead. Pull on the ends of both strings simultaneously to release them from the slots.
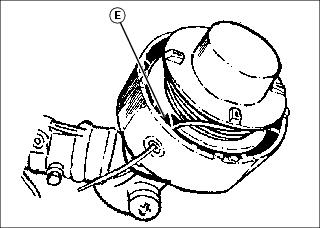
8. Check that strings are not trapped under the spool (E).
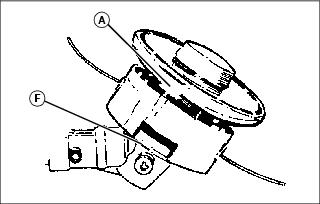
9. Install stringhead cap by aligning locking tabs (A) with their notches (F) and pushing cap down until both locking tabs are securely locked.
10. Check that stringhead is assembled correctly before operating unit. Advance string manually, making sure strings are not trapped.
Brush Cutting Technique
· Inspect blade for sharpness and damage. Replace any blade that is no longer sharp or is damaged.
· Check that the blade is securely fastened before each use.
· Always hold the brushcutter firmly with both hands.
· Always wear heavy long pants, shoes, gloves, hearing protection, goggles or full face protection when operating this equipment.
· Maintain your grip and balance on both feet. Position yourself so that you will not be drawn off balance by the kickback reaction of the cutting blade.
· After engine stops, keep rotating blade in heavy grass or brush until it stops rotating.
· Inspect and clear the area of any hidden objects such as fencing, wire, wood, metal, etc.
· Never use blade near sidewalks, fencing, posts, buildings or other immovable objects.

· Scythe (A) only with a quad blade installed on the trimmer.
· Never use blade after hitting a hard object without inspecting it for damage. Do not use if any teeth are bent or if any cracks are detected.