
Service Mower
Rotating the Mower Deck for Service
Rotating Mower Deck for Service
1. Park machine safely. (See Parking Safely in the Safety section.)
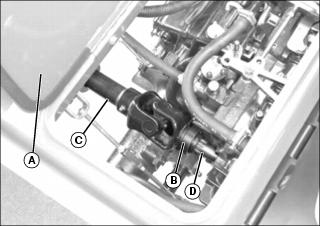
2. Unlock and open service hatch (A) on machine.
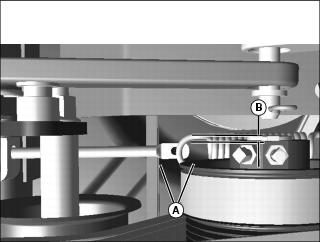
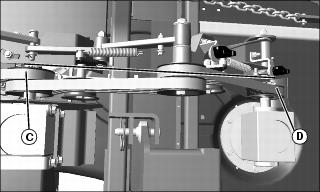
3. Pull forward on the coupler ring (B) located on the mower deck PTO drive shaft (C). Pull the drive shaft off of machine PTO output shaft (D).
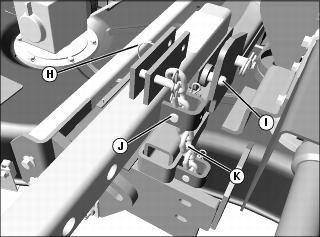
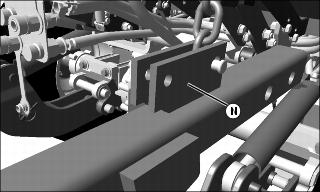
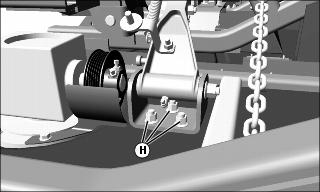
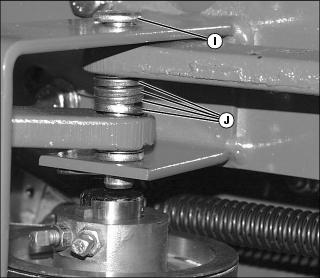
4. Pull out turn and release the retaining ring (H) to release the hanger pin (I) so the pin rides on the deck bracket.
5. Remove quick pull pin from drilled pin (J) and remove float chain (K).
NOTE: A second person may be needed to help lift wing while latching wing chain.
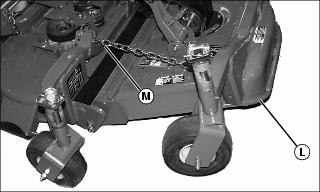
6. Lift wing deck (L) and latch chain (M).
7. Start machine and raise mower deck to top of travel. Stop engine. Mower deck should rotate.
8. Lift up on the front of deck until hanger pin snaps into hole of deck bracket.
9. Lock service chain to latch brackets (N) on left and right side mower deck lift arms.
Rotating Mower Deck for Operation
1. Start machine and raise mower deck to top of travel and stop engine.
2. Remove service chain latches.
3. While one person lifts up on front of deck a second person pulls mower deck service lock pin out of deck bracket.
4. Allow deck to rotate forward carefully.
5. Latch service latch in retracted position.
6. Install pin and service chain.
7. Lower mower deck to ground.
8. Lift up on deck wings and release chains.
Removing and Installing Belt Shields
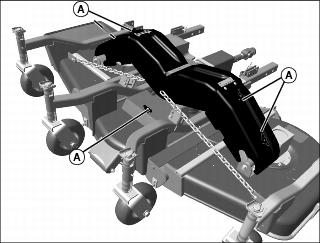
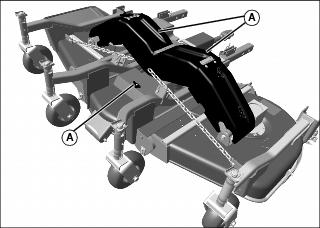
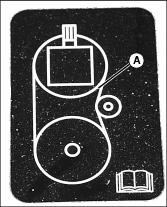
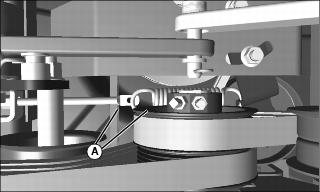
1. Remove knobs securing belt shields (A) to mower deck.
2. Lift belt shields up off of the attaching bolts.
3. Installation is the reverse of removal.
Cleaning Grass and Debris From Mower Deck
IMPORTANT: Avoid damage! Clean under deck shields and in the engine compartment before each use to help prevent heavy grass and thatch build-up on the machine. |
1. Remove belt shields (A) from mower deck and clean any grass or debris from around belts and sheaves.
Adjusting Mower Deck Drive Belt Tension
1. Park machine safely. (See Parking Safely in the Safety section.)
2. Remove the mower deck belt shield.
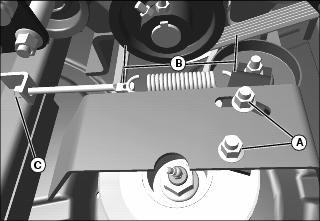
Picture Note: Some parts removed for photo clarity.
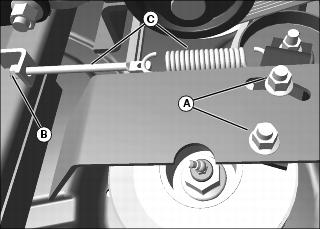
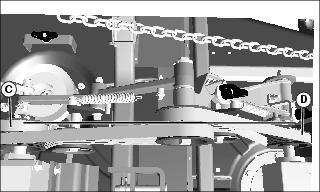
4. Measure length of belt tension spring (B) from hook to hook. Overall length should be 120mm (4.75 in.).
5. Adjust nut (C) until length of belt tension spring is correct.
Removing and Installing Mower Deck Drive Belts
Removing Gearbox Belt
1. Park machine safely. (See Parking Safely in the Safety section.)
2. Remove the mower deck belt shield.
Picture Note: Parts removed for clarity.
4. Remove nut (B), and tension spring and rod (C) from mower deck.
IMPORTANT: Avoid damage! Do not clean belts using parts cleaning solvent or belt dressing. They soften belts and shorten belt life. |
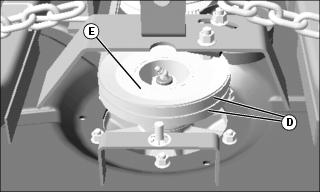
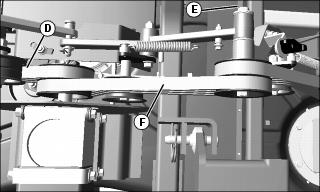
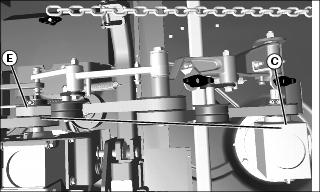
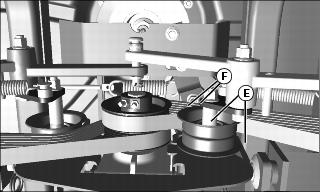
5. Remove drive belts (D) from drive sheave (E).
Removing Vertical Drive Belt
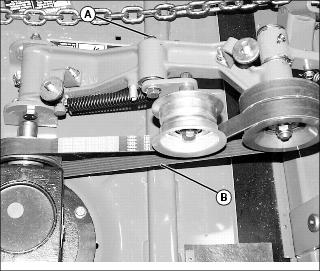
a. Loosen nut (A), using a 15mm wrench, on idler pivot and rotate idler and remove belt (B) by hand.
a. Partially remove left belt (B) by loosening nut from previous steps.
b. Loosen nut (C), using a 15mm wrench, from left center idler pivot to rotate idler and remove belt (D) by hand.
a. Partially remove left center belt (D) by loosening nut from previous steps.
b. Loosen nut (E), using a 15mm wrench, from right center idler pivot to rotate idler and remove belt (F) by hand.
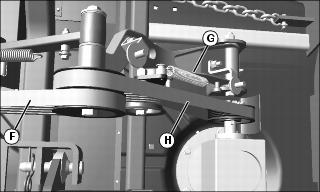
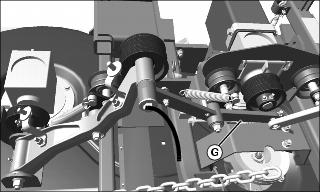
a. Partially remove right center belt (F) by loosening nut from previous steps.
b. Loosen nut (G), using a 15mm wrench, from right idler pivot to rotate idler and remove belt (H) by hand.
Installing Belt
1. Belt installation in opposite order of removal.
NOTE: Belt routing diagram is affixed to mower deck belt shield and to the deck.
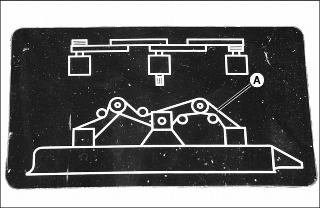
2. Route drive belt (A) around mower deck sheaves as shown. (Shown from rear of deck.)
Aligning Vertical Belt Drive
Picture Note: Some parts removed for photo clarity.
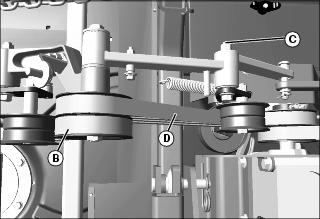
1. Loosen jam nuts and set screws (A) to adjust center pulley on gear box 4mm (5/32 in.) (B) from end. Tighten hardware.
2. Use a straight edge on front of center pulley (C) to locate pulley (D) on right side gearbox. If pulley is located off shaft go to step 1 and adjust 4mm (5/32 in.) dimension.
3. Use straight edge on right side gearbox back to center pulley to verify right side pulley and gearbox location. Rotate gearbox to get alignment. Work between step 2 and 3 to get alignment within 2mm (5/64 in.).
4. Use straight edge on rear of center pulley (C) to locate pulley (E) of left side gearbox. If pulley interferes with gearbox go back to step 1 and adjust 4mm (5/32 in.) dimension accordingly.
5. Use straight edge on left side gearbox back to center pulley to verify left side pulley and gearbox location. Rotate gearbox to get alignment. Work between steps 4 and 5 to get alignment within 2mm (5/64 in.).
6. Assemble jam nut to set screws (A) (if not already done).
7. Apply thread lock to set screws of each of the gearbox pulleys and tighten between 6 and 10 •m (53 and 88
8. Use straight edge between front of center pulley (C) to right side pulley (D).
9. Remove belts (E) and center pivot pin and spacers (F).
10. Rotate right arm assembly down (G) to deck and locate front of transfer pulley to straight edge.
11. Adjust three mounting bolts by loosening the three nuts (H) near outer gearbox to locate pulley.
12. Rotate arm up and install center pin.
13. Repeat steps 10 through 12 and on other side, except with straight edge on the back of center pulley.
14. Remove center pin (I) and install spacers (J) between brackets and drive arms to limit movement of arm to less than 2mm (5/64 in.).
Checking Gearbox Oil Level
1. Before checking the gearbox oil level:
• Park machine on a level surface.
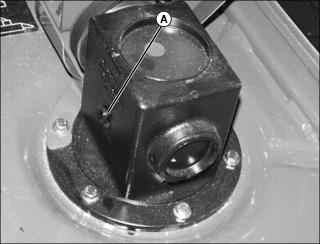
2. Remove check plug (A). Oil should be at the bottom of the check plug hole.
Changing Center Gearbox Oil
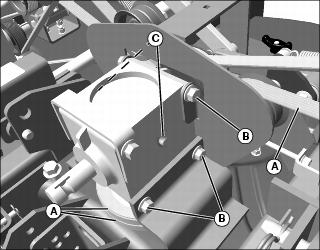
Picture Note: PTO driveshaft cover removed for clarity.
2. Remove belts (A) from center gearbox sheaves.
3. Remove bolts (B) from both sides of the gearbox.
4. Remove both check plugs (C).
6. Lift and turn the gearbox to drain oil.
7. Install gearbox on mower deck.
IMPORTANT: Avoid damage! Verify belt alignment before tightening hardware to avoid damaging the belt. |
8. Install belts on gearbox sheaves.
9. Add oil to the bottom of check plug holes.
Changing Wing Gearbox Oil
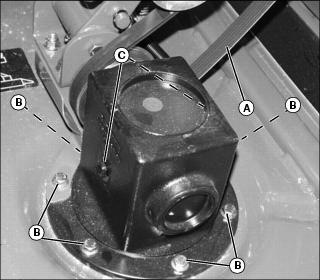
1. Remove belt (A) from wing gearboxes.
2. Remove mower blade, washer and cup.
4. Remove both check plugs (C).
6. Lift and turn gearbox along with the spindle to drain the oil.
7. Install the gearbox on the mower.
8. Add oil to the bottom of check plug holes.
IMPORTANT: Avoid damage! Verify belt alignment before tightening hardware to avoid damaging the belt. |
Removing and Installing Blades
1. Park machine safely. (See Parking Safely in the Safety section.)
2. Rotate mower deck for service.
NOTE: Only replace blades. Never straighten or weld them.
3. Insert a wooden block between end of blade and edge of deck to prevent blade from turning while removing blade hardware.
4. Remove bolt and washer (A), by turning the bolt counterclockwise until removed. Remove blade (B) from spindle. Repeat for all blades requiring service.
5. Inspect the blades for damage. Replace all damaged blades.
7. Clean blades, spindles, and hardware.
9. Install blade onto mower deck spindle with wings of blade facing up.
10. Install blade bolt and washer with the cupped-side of washer against the blade. Tighten blade bolt to 122 N•m (90 lb-ft). Repeat for other blades.
11. Lower mower decks completely.
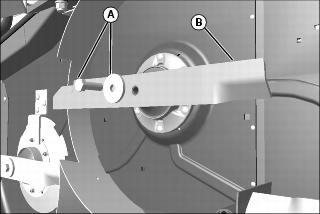
Sharpening Blades
• Sharpen blades with grinder, hand file, or electric blade sharpener.
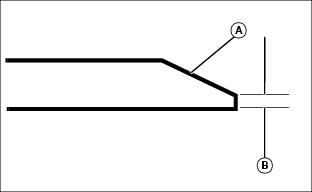
• Keep original bevel (A) when grinding.
• Blade should have 0.40 mm (1/64 in.) cutting edge (B) or less.
• Balance blades before installing.
Balancing Blades
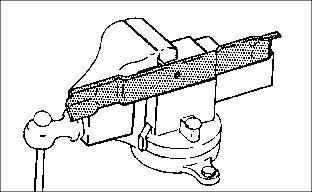
2. Put blade on nail in a vise. Turn blade to horizontal position.
3. Check balance. If blade is not balanced, heavy end of blade will drop.