
Service Miscellaneous
Filling Fuel Tank
Add John Deere stabilizer to fuel before using it in your machine to prevent engine damage due to stale fuel. Follow directions on stabilizer container.
For diesel fuel
Use diesel fuel Grade No. 1-D for cold air temperatures or Grade No. 2-D fuel for warm air temperatures. Diesel fuel must be cetane Number 40. A cetane number of 50 or more is preferred, especially for air temperatures below -20 degrees C (-4 degrees F) or elevations above 1500 m (5000 ft).
Number 2 diesel fuel is recommended. Using other fuel will result in increased fuel consumption and decreased engine performance.
For gasoline
In gasoline engines, use regular grade 87 octane unleaded fuel.
1. Stop engine. Let it cool several minutes before you add fuel.
2. Remove grass clippings and other trash from tank area.
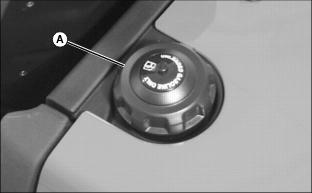
4. Fill tank with fresh, stabilized fuel only to bottom of filler neck.
Tightening Wheel Hardware
NOTE: Tighten bolts after first 50 hours of operation and every 100 hours thereafter.
1. Tighten all wheel bolts alternately to 81-95 N·m (60-70 lb-ft).
Adjusting Park Brake
A properly adjusted park brake should have no play in the pedal when the brake is in the unlocked position. The pedal should return and contact the rear of the opening in the operator foot platform.
As the brake pads wear, the brake pedal will have to be depressed further to fully engage the brakes. If the brake pedal travel is too far for operator comfort, the brake adjusting rod can be adjusted.
1. Park the machine safely. (See Parking Safely in the SAFETY section.)
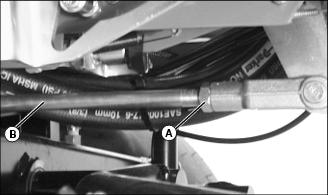
2. Loosen jam nut (A) on the brake adjusting rod (B).
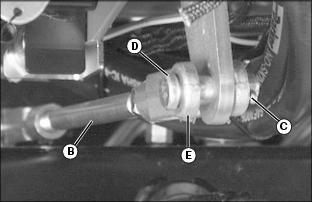
3. Remove cotter key (C) and drilled head pin (D) from park brake linkage.
NOTE: Be careful not to turn out the yoke too far on either end of the threaded adjustment rod. The maximum length of thread to be exposed at each end of the rod should be 25mm (1 in.).
4. Hold brake adjusting rod (B). Turn front yoke (E) counterclockwise until the park brake pedal needs to be depressed slightly to install drilled pin back into front yoke.
5. Install drilled head pin (D) and cotter key (C).
7. If further adjustment is required, refer to the Technical Manual or see a John Deere distributor.
Cleaning and Repairing Plastic Surfaces
Your John Deere dealer has the professional materials needed to properly remove surface scratches from any plastic surfaces, do not attempt to paint over marks or scratches in plastic parts.
1. Rinse hood and entire machine with clean water to remove dirt and dust that may scratch the surface.
2. Wash surface with clean water and a mild liquid automotive washing soap.
3. Dry thoroughly to avoid water spots.
4. Wax the surface with a liquid automotive wax. Use products that specifically say "contains no abrasives."
5. Buff applied wax by hand using a clean, soft cloth.
Cleaning and Repairing Metal Surfaces
Cleaning:
Follow automotive practices to care for your vehicle painted metal surfaces. Use a high-quality automotive wax regularly to maintain the factory look of your vehicle's painted surfaces.
Repairing Minor Scratches (surface scratch):
1. Clean area to be repaired thoroughly.
2. Use automotive polishing compound to remove surface scratches.
3. Apply wax to entire surface.
Repairing Deep Scratches (bare metal or primer showing):
1. Clean area to be repaired with rubbing alcohol or mineral spirits.
2. Use paint stick with factory-matched colors available from your John Deere dealer to fill scratches. Follow directions included on paint stick for use and for drying.
3. Smooth out surface using an automotive polishing compound. Do not use power buffer.