
Operating
Daily Operating Checklist
o Remove grass and debris from engine compartment and muffler area, before and after operating machine.
o Check area below machine for leaks.
o Check all necessary guards and shields are in place.
o Check mower deck level, cutting height and blades.
o Check mower and drive belts.
o Check steering controls and park brake linkage for damage.
Avoid Damage to Plastic and Painted Surfaces
· Do not wipe plastic parts unless rinsed first.
· Insect repellent spray may damage plastic and painted surfaces. Do not spray insect repellent near machine.
· Be careful not to spill fuel on machine. Fuel may damage surface. Wipe up spilled fuel immediately.
Recommended Accessories
· Front weights are available for use on the Commercial Walk Behind Mower in hilly conditions. Use of weights will improve stability on slopes.
See your John Deere Dealer for more information.
Operator Station Controls
Engine Controls
Mower Deck Height Controls
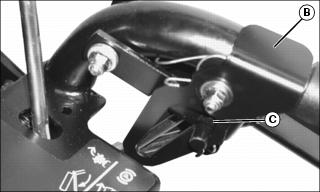
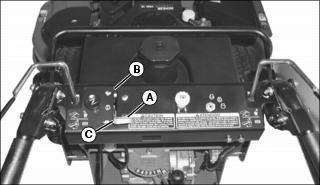
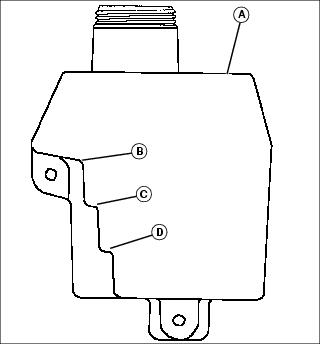
Picture Note: Left side shown.
B - Height Adjustment Locking Pin
C - Cutting Height Adjustment Label
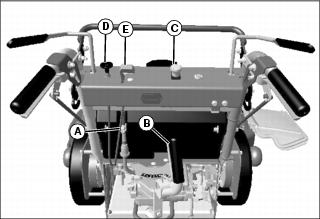
Adjusting Mower Deck Cutting Height
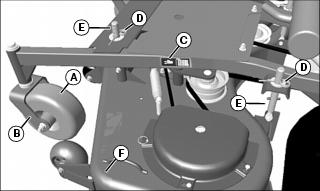
The mower deck height adjustment consists of seven different cutting heights. The seven cutting heights range from 38-114mm (1-1/2 - 4-1/2 in.) when front caster wheel (A) is located in lower mounting hole in the yoke (B), as shown.
The cutting height label (C) indicates the proper hole placement.
To change mower deck cutting height:
NOTE: To maintain a level mower deck, both sides, front, and rear of the deck must be adjusted equally.
1. Park machine safely. (See Parking Safely in the SAFETY section.)
2. Pull out height adjustment locking pins (D) from both suspension pins (E).
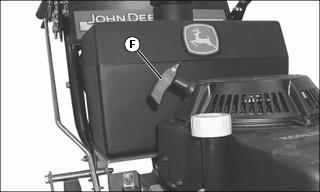
3. Lift or lower mower deck using handle (F) to the desired mower deck height as shown on the decal. A handle is located on each side of the mower deck.
4. Replace locking pins into appropriate holes in deck suspension pins.
5. Repeat procedure for other side of deck.
To Change Caster Wheel Height:

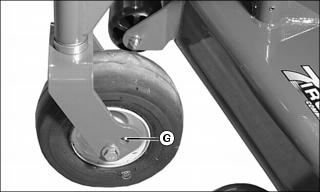
To obtain a cutting height adjustment of less than 38mm (1-1/2 in.), it is necessary to put the caster wheel in the higher hole position (G). Moving the caster wheel to the higher hole position will lower the front of the deck by 13 mm (1/2 in.) and allow a cutting height adjustment range of 25.4 to 114 mm (1 to 4.5 in.).
To obtain a 6.5mm (1/4 in.) cutting height adjustment, 6.5mm (1/4 in.) thick washers were provided with the machine. The washers must be added to all four deck suspension pins to insure proper level on the mower deck.
Adjusting Mower Deck Cutting Height

The mower deck height adjustment consists of seven different cutting heights. The seven cutting heights range from 38-114mm (1-1/2 - 4-1/2 in.) when front caster wheel (A) is located in lower mounting hole in the yoke (B), as shown.
The cutting height label (C) indicates the proper hole placement.
To change mower deck cutting height:
NOTE: To maintain a level mower deck, both sides, front, and rear of the deck must be adjusted equally.
1. Park machine safely. (See Parking Safely in the SAFETY section.)
2. Pull out height adjustment locking pins (D) from both suspension pins (E).
3. Lift or lower mower deck using handle (F) to the desired mower deck height as shown on the decal. A handle is located on each side of the mower deck.
4. Replace locking pins into appropriate holes in deck suspension pins.
5. Repeat procedure for other side of deck.
To Change Caster Wheel Height:
To obtain a cutting height adjustment of less than 38mm (1-1/2 in.), it is necessary to put the caster wheel in the higher hole position (G). Moving the caster wheel to the higher hole position will lower the front of the deck by 13mm (1/2 in.) and allow a cutting height adjustment range of 25.4 to 101.6mm ((1to 4 in.).
To obtain a 6.5mm (1/4 in.) cutting height adjustment, 6.5mm (1/4 in.) thick washers were provided with the machine. The washers must be added to all four deck suspension pins to insure proper level on the mower deck.
Testing Safety Systems

The safety systems installed on your machine should be checked before each machine use. Be sure you have read the machine operator manual and are completely familiar with the operation of the machine before performing these safety system checks.
Use the following checkout procedures to check for normal operation of machine.
If there is a malfunction during one of these procedures, do not operate machine. See your authorized dealer for service.
Perform these tests in a clear open area. Keep bystanders away.
Testing PTO Switch
2. Release operator presence levers.
3. Pull PTO switch knob up to engage PTO.
Testing Neutral Switch (Start)
2. Push PTO switch knob down to disengage.
3. Set speed selector in any gear except Neutral "N".
4. Pull starter handle to try and start engine.
Testing Neutral Switch (Run)
3. Push PTO switch knob down to disengage.
4. Release operator presence levers.
5. Set speed selector in any gear except Neutral "N".
Testing Operator Presence Switches
2. Push throttle to the 1/2 position.
3. Engage an operator presence lever.
4. Pull PTO switch knob up to engage PTO.
5. Release operator presence lever.
Testing Park Brake
1. Inflate tires to correct pressures.
2. Stop machine on a 17° slope (30% grade). Stop engine and lock park brake by engaging thumb locks.
Using Operator Presence Levers
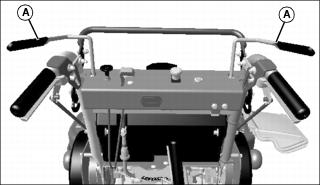
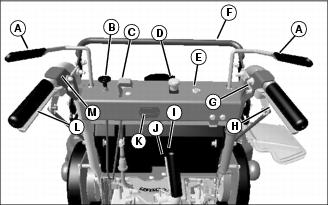
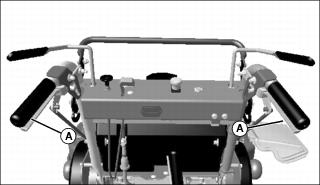
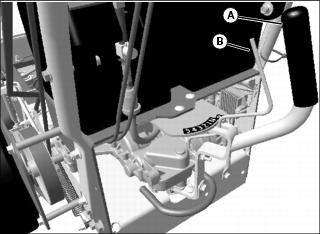
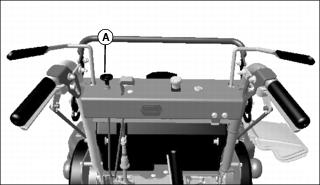
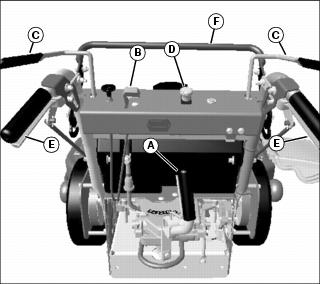
The operator presence system is designed to protect the operator. The operator presence levers (A) can be operated by either the left or right hand.
To operate the PTO, the operator presence lever must be held down against the handlebars by the operator.
If the operator releases the operator presence lever while mowing, the engine will automatically stop.
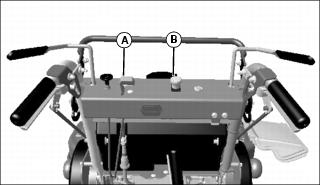
Using Hand Brake Levers
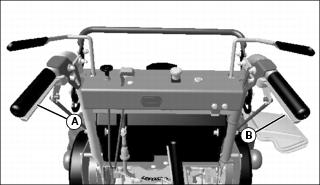
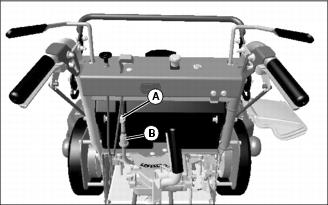
The hand brake levers (A and B) are used to steer the unit. When a hand brake lever is engaged or partially engaged, the drive wheel is disconnected from the transmission and the steering brake is applied. The left and right hand sides work independently from each other.
Left brake lever (A) controls left drive wheel. Pull and hold lever against handle to turn left.
Right brake lever (B) controls right wheel. Pull and hold lever against handle to turn right.
Emergency Stopping:
· Pull up brake levers to stop forward movement.
· Lock brake levers by pushing brake lever locks down.
· Move speed selector lever to the neutral position.
· Release operator presence lever.
· Turn ignition key to the off position.
Using Brake Lever Locks
The brake lever locks are designed to operate as a parking brake. When the brake levers are locked in the engaged position: the drive wheels are disconnected from the transmission and the left and right steering brakes are engaged. The left and right hand sides work independently from each other.
1. Pull up brake levers (A) to stop forward movement.
2. Push lever locks (B) down with thumbs.
3. Release brake levers while holding lever locks with thumbs. Brake will remain in detent position (C).
To release brake lever locks; pull up on brake levers and locks will automatically release.
Locking Park Brake
The park brake is set when the brake lever locks are engaged.
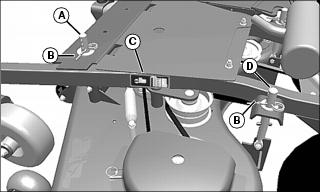
Using Speed Selector Lever
Speed selector lever (A) controls the units forward speed and reverse motion.
Forward:
· There are five forward speeds available: "1" is the slowest speed and "5" is the fastest speed.
· Forward speed range is approximately: 3.2-11.9 km/h (2.0-7.4 mph).
· The transmission shift lever "N" neutral position is adjustable. If necessary, adjust neutral "N" position.
Reverse:
· Stop forward movement before you shift into reverse.
· Pull reverse lock (B) towards speed selector lever (A). Move speed selector lever into reverse "R" position.
· Reverse speed is approximately: 5.1 km/h (3.2 mph).
· If reverse lock (B) will not deflect enough to allow shift lever (A) to move into reverse "R" position, adjust the reverse lock.
The transmission controls the mowers forward and reverse motion throughout all the gears. If you suspect any slippage in the drivetrain, check the tension on the drive belts.
Using Choke
Pull knob (A) up to close choke when starting a cold engine.
Push knob down to open choke once engine is running.
Using Throttle Lever
· Push throttle lever (A) forward to the fast position (B) when mowing.
· Move throttle lever to the fast position (B) when starting and warming the engine.
· Pull throttle lever backward to the slow position (C) to idle engine. Do not run engine at slow idle any longer than necessary.
Using PTO
NOTE: Prior to engaging the PTO, an operator presence lever must be engaged.
Engage PTO:
1. Move throttle lever (A) to the 3/4 to full open position.
2. Pull PTO switch knob (B) up to engage.
3. Move throttle lever forward to full open position for mowing.
Disengage PTO:
1. Push PTO switch knob (B) down.
Using Fuel Shut-Off Valve

Picture Note: Valve shown in open/on position.
Move the fuel shut-off valve (A) to the on position for normal operation. Move the valve to the off position when the machine is not in use, and during transport.
Starting Engine
1. Open fuel shut-off valve (A).
2. Move speed selector lever (B) to neutral position.
3. Check PTO switch knob (C). It must be down (OFF) for machine to start.
· If engine is cold, pull choke knob (D) up.
· If engine is at operating temperature, choke should be in down (off) position. If necessary, pull choke knob up part way to start.
5. Push throttle lever (E) forward to the full open position.
6. Turn key on (first position).
7. Pull starter handle (F) slowly until slack is removed, then pull hard to cycle engine. Repeat as necessary until engine starts, then let starter handle return slowly. Do not allow handle to snap back to starter.
8. Push choke knob to off position when engine starts, and move throttle lever to desired engine speed.
Stopping the Engine
IMPORTANT: Avoid damage! Do not stop engine when mower is on a slope of more than 10°. Oil may run through valve train into carburetor and muffler. |
2. Move speed selector lever to the neutral position.
3. Slowly move throttle lever back to the 3/4 position.
4. Turn key switch to stop position.
5. Move fuel shut-off valve to closed/off position.
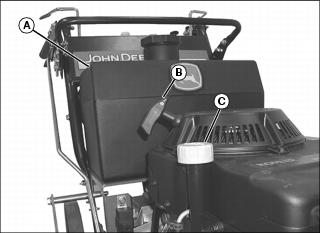
Using Fuel Gauge
The fuel tank (A) has a built in fuel gauge.
2. Look inside fuel tank. Fuel tank has molded-in steps showing the approximate amount of fuel left in the tank.
Operating Mower
1. Engage both brake lever locks.
2. Adjust mower deck to desired cutting height.
4. Engage operator presence control levers (C).
5. Set speed selector lever (A) to desired setting.
6. Move throttle lever (B) to the 3/4-full position.
NOTE: In cold weather or with a new machine, it may be necessary to engage choke at the same time as PTO knob (B) to prevent engine from stalling.
7. Pull PTO knob (D) up to engage mower deck.
8. Move throttle lever to the fast position.
9. Release both brake lever locks and slowly release brake levers (E) to engage wheel drive belts.
10. To turn mower, pull up on the right brake lever to turn to the right, or the left brake lever to turn to the left. Lifting slightly will partially disengage the wheel drive belt on that side, allowing for a long sweeping turn. As the lever is lifted more, the brake will begin to engage, allowing for a more drastic turn.
11. To stop mower, pull up on both brake levers at the same time. Engage the brake lever locks and disengage the PTO.
12. To operate reverse assist:
· Place speed selector lever in reverse.
· Grasp reverse assist tube (F) and pull back firmly until machine starts to move.
· Release assist tube to disengage operation.
Transporting Machine on a Trailer
Use a heavy-duty trailer to transport your machine. Trailer must have signs and lights required by law.
1. Drive machine onto a trailer.
3. Place transmission in NEUTRAL.
6. Turn fuel shutoff valve to off position.
7. Fasten machine to trailer with heavy-duty straps, chains or cables. Both front and rear straps must be directed down and outward from machine.
Mowing Tips
· Mow grass with throttle lever in the full fast position.
· Keep mower deck and discharge chute clean.
· Properly level mower deck for a smooth cut.
· Use a travel speed that fits the conditions:
· Mow tall or wet grass twice. Cut grass at half desired height - then cut at desired height.
· Travel slow when mowing tall, thick or wet grass.
· Avoid damaging grass by slipping or skidding machine drive wheels. Practice smooth control lever movements.
· When performing sharp turns, do not allow inside machine drive wheel to stop and twist on grass.