
Service Miscellaneous
Using Proper Fuel
Use regular grade unleaded fuel with an octane rating of 87 octane or higher. Fuel blends containing up to 10% ethanol or up to 15% MTBE reformulated fuel are acceptable. Do not use fuel or additives containing methanol as engine damage can occur.
Always use fresh, clean fuel that is purchased in a quantity that can be used within approximately 30 days, or add fuel stabilizer.
Fuel is blended to give best seasonal performance. To avoid engine performance problems such as hard starting or vapor lock, use in-season fuel. Use fuel during warm weather that was purchased during that season, and use fuel during cold weather that was purchased during that season.
Fuel can become stale in machines with engines that are used seasonally or infrequently during a season. Stale fuel can produce varnish and plug carburetor components which can affect engine performance.
Keep fuel storage container tightly covered and in a cool area out of direct sunlight. Fuel can break down and degrade if not sealed properly or exposed to sun and heat.
Condensation may collect in the fuel tank because of a variety of operating or environmental conditions and, over time, may affect your machine's operation. Fill fuel tank at the end of daily use and store fuel in plastic containers to reduce condensation.
For best year-round performance and fuel-handling, add stabilizer to fuel immediately after fuel purchase. Such practice helps prevent engine performance problems and allows fuel storage in the machine all year without draining.
Filling Fuel Tank
Fill fuel tank at the end of each day's operation to prevent condensation and freezing during cold weather.
1. Park machine safely. (See Parking Safely in the SAFETY section.)
3. Remove any trash from area around fuel tank cap.
4. Remove fuel tank cap slowly to allow any pressure built up in tank to escape.
5. Fill fuel tank only to bottom of filler neck.
Checking Tire Pressure
NOTE: Refer to the SPECIFICATIONS section for tire pressures.
2. Check tire pressure with an accurate gauge.
3. Add or remove air, if necessary.
Tightening Drive Wheel Hardware
1. Tighten rear wheel nuts to 100 N·m (75 lb-ft.)
2. Tighten wheel nuts in numbered sequence shown. Tighten alternately until recommended torque value is reached.
Servicing Caster Pivot Bearings
1. Park machine safely. (See Parking Safely in the SAFETY section.)
2. Raise and securely support the front of the mower deck.
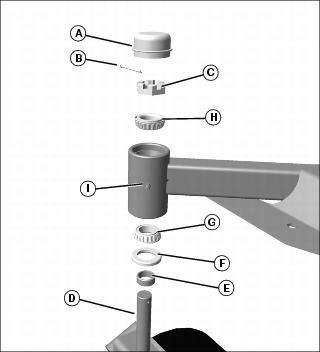
3. Remove cap (A), cotter pin (B), castle nut (C), caster yoke and wheel assembly (D) and caster bushing (E).
NOTE: It is not necessary to remove the bearing races unless the bearings need to be replaced.
4. Remove seal (F) and lower bearing (G).
6. Clean and inspect bearings (G) and (H); pack with clean grease. Replace bearings if needed.
NOTE: Install seal with lip to the outside.
7. Install lower bearing (G) and a new seal (F).
NOTE: Do not overtighten castle nut (C). Tighten castle nut only enough to install the cotter pin (B). The caster wheel yoke assembly must be free to rotate.
9. Install caster bushing (E) on yoke shaft, and install caster yoke and wheel assembly (D), castle nut (C), cotter pin (B) and cap (A).
10. Apply grease to lubrication fitting (I).
Cleaning Plastic Surfaces
1. Wash surface with clean water and a mild liquid automotive washing soap.
2. Dry thoroughly to avoid water spots.
Cleaning and Repairing Metal Surfaces
Cleaning:
Follow automotive practices to care for your vehicle painted metal surfaces. Use a high-quality automotive wax regularly to maintain the factory look of your vehicle's painted surfaces.
Repairing Minor Scratches (surface scratch):
1. Clean area to be repaired thoroughly.
2. Use automotive polishing compound to remove surface scratches.
3. Apply wax to entire surface.
Repairing Deep Scratches (bare metal or primer showing):
1. Clean area to be repaired with rubbing alcohol or mineral spirits.
2. Use paint stick with factory-matched colors available from your authorized dealer to fill scratches. Follow directions included on paint stick for use and for drying.
3. Smooth out surface using an automotive polishing compound. Do not use power buffer.