
Service Engine
Engine Warranty Maintenance Statement
Maintenance, repair, or replacement of the emission control devices and systems on this engine, which are being done at the customers expense, may be performed by any non-road engine repair establishment or individual. Warranty repairs must be performed by an authorized John Deere dealer.
Adjusting Carburetor
NOTE: Carburetor is calibrated by the engine manufacturer and is not adjustable.
If engine is operated at altitudes above 1829 m (6,000 ft), some carburetors may require a special high altitude main jet. See your authorized dealer.
If engine is hard to start or runs rough, check the TROUBLESHOOTING section of this manual.
Possible engine surging will occur at high throttle with transmission in "N" neutral and mower engagement lever disengaged. This is a normal condition due to the emission control system.
After performing the checks in the troubleshooting section and your engine is still not performing correctly, contact your authorized dealer.
Avoid Fumes

Engine Oil
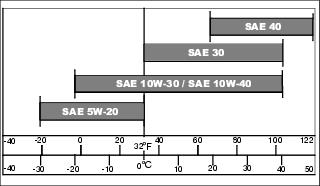
Use oil viscosity based on the expected air temperature range during the period between oil changes.
The following oils are preferred:
The following oils are also recommended, based on their specified temperature range:
Other oils may be used if above John Deere oils are not available, provided they meet one of the following specifications:
· API Service Classification SF, SG, SH or SJ
Checking Engine Oil Level
NOTE: Check oil twice a day if you run engine over 4 hours in a day.
1. Park machine safely. (See Parking Safely in the SAFETY section.)
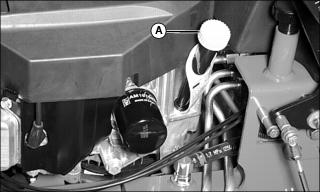
2. Remove dipstick (A). Wipe clean.
3. Install dipstick in tube, but do not tighten, let dipstick threads rest on top of the tube.
4. Remove dipstick. Check oil level on dipstick; oil should be between ADD and FULL marks.
Changing Engine Oil and Filter
IMPORTANT: Avoid damage! Change the oil more often if the vehicle is used in extreme conditions: |
1. Start engine and run until it reaches normal operating temperature.
2. Park machine safely. (See Parking Safely in the SAFETY section.)
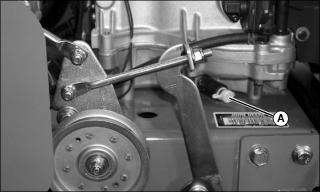
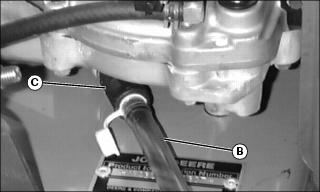
b. Attach hose (B) to drain valve.
d. Push drain valve (C) in, turn to the left and pull drain valve out to open valve.
e. Drain oil into oil drain pan.
f. Close drain valve by pushing in and turning valve to the right.
g. Remove hose (B) and install drain cap (A).
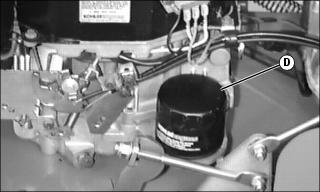
a. Place container under engine.
b. Turn filter counterclockwise to remove. Make sure that rubber seal is removed with filter, then discard old filter.
c. Put film of clean engine oil on seal of new filter.
d. Install new filter by turning clockwise until seal contacts mounting surface, then turn filter by hand an additional 3/4 turn.
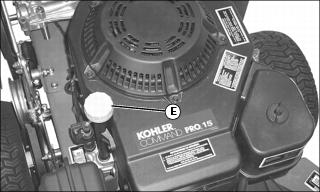
6. Add oil slowly into dipstick filler tube. Capacity is 1.5 L (1.6 qt) without filter change, 1.9 L (2.0 qt) if filter has been changed.
7. Start engine to fill filter with oil and check for oil leaks. Then stop engine.
8. Check oil level, add if necessary, and check for oil leaks. Correct any oil leaks before operating.
Checking and Cleaning Air Filter Elements
NOTE: It may be necessary to check the air filter more frequently if operating machine in dusty conditions.
1. Park machine safely. (See Parking Safely in the SAFETY section.)
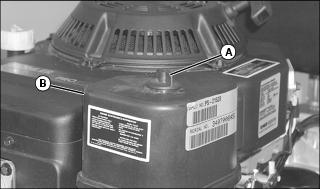
2. Loosen plastic retainer (A) and lift off air filter cover (B).
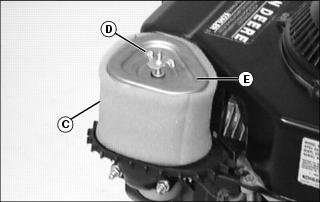
3. Inspect foam precleaner (C) without removing. If foam precleaner is dirty, carefully remove from filter, leaving paper filter in the air cleaner housing.
· Wash foam precleaner in a solution of warm water and liquid detergent. Squeeze out excess water in a dry cloth until precleaner is completely dry. (Do not wring.)
· Saturate precleaner in clean engine oil and squeeze out excess.
4. Inspect and replace paper filter element only if damaged or very dirty.
5. Remove wing nut (D) to remove paper element assembly (E).
6. Install new paper element and secure with wing nut, then install foam element over paper element.
7. Install air filter cover and secure with retainer.
Checking Spark Plugs
1. Park machine safely. (See Parking Safely in the SAFETY section.)
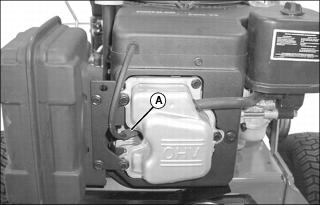
2. Disconnect spark plug wires (A).
3. Clean the area around each spark plug.
4. Remove and inspect spark plugs:
· Clean plugs and check for damage, replace if necessary.
· If plugs are in good condition, check gap.
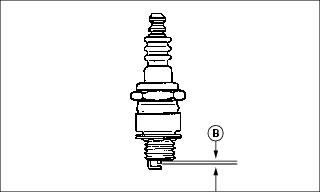
5. Adjust spark plug gap (B) to 1.02 mm (0.040 in.).
6. Install spark plugs and tighten to 27 N·m (180 lb-in.).
Replacing Fuel Filter
IMPORTANT: Avoid damage! When installing a new fuel filter, the filter arrow must be pointed in the direction of the fuel flow. |
1. Park machine safely. (See Parking Safely in the SAFETY section.)
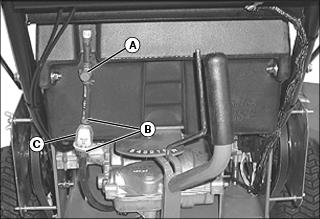
3. Turn fuel shut-off valve (A) to the off position.
4. Slide hose clamps (B) away from fuel filter (C).
5. Place a drain pan under hoses to catch any fuel that may be left in the hoses.
6. Disconnect hoses from filter.
7. Install new filter with embossed arrow pointing in direction of fuel flow.