
Service Hydraulics
Hydraulic Oil
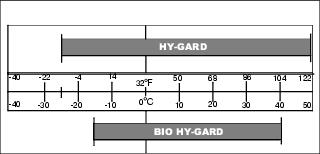
Use oil viscosity based on the expected air temperature range during the period between oil changes.
The following John Deere transmission and hydraulic oil is preferred:
Checking Hydraulic Oil Level
IMPORTANT: Avoid damage! Hot hydraulic oil will expand and show incorrect oil level. Check oil level: |
NOTE: Do not overfill oil reservoir tank. Oil will expand during operation and could overflow.
1. Raise attachment to service position. (See Using the Lift Cylinder Safety Support in the Safety section.)
2. Park machine safely. (See Parking Safely in the Safety section.)
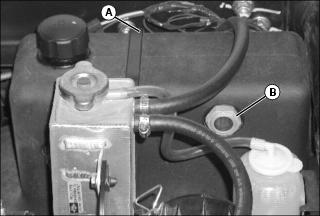
3. Locate auxiliary oil reservoir (A) on left side of machine.
4. Visually check level of oil in sight glass (B).
Changing the Hydraulic Oil and Filter (If equipped with Auxiliary Hydraulics Kit)
NOTE: This service procedure only applies to vehicles equipped with the auxiliary hydraulic kit.
1. Raise attachment to service position. (See Using the Lift Cylinder Safety Support in the Safety section.)
2. Park vehicle safely. (See Parking Safely in the Safety section.)
3. Allow the engine and the oil reservoir to cool.
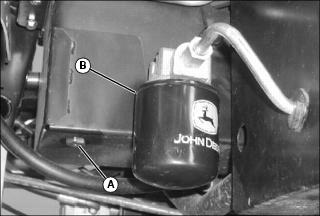
4. Locate drain plug (A) under the oil reservoir on the left side of the vehicle.
5. Place container under the oil drain location.
6. Remove drain plug and allow oil to drain.
7. Remove hydraulic oil filter (B) located on left side of vehicle when hydraulic kit is installed.
8. Turn filter counterclockwise to remove. Use a drain pan to catch dripping oil.
9. Apply a film of clean oil on gasket of new filter.
10. Turn filter clockwise until gasket makes contact with the mounting surface. Tighten 1/2 to 3/4 turn after gasket contact.
11. Install drain plug. Do not overtighten.
12. Clean hydraulic oil reservoir strainer:
NOTE: Routinely clean strainer when changing the hydraulic oil and filter. Strainer should be serviced when the hydraulic oil tank is empty.

a. Loosen adjustable hose clamp (C).
b. Remove rubber hose (D) from strainer (E).
c. Remove strainer from the hydraulic oil tank.
d. Clean strainer with solvent or mineral spirits and allow to dry.
e. Install strainer into the hydraulic oil tank.
f. Install rubber hose onto strainer.
g. Tighten adjustable hose clamp.
13. Thoroughly clean area around cap.
14. Remove dipstick cap from the oil reservoir tank.
15. Fill oil reservoir with approximately 11.3 L (3.0 gal) of oil.
17. Cycle the hydraulic PTO lever for approximately three seconds. Check for leaks.
19. Check oil level. Adjust oil level as necessary.
20. Lower attachment or cargo box.
Cleaning Oil Cooler
 c CAUTION: Avoid injury! Compressed air can cause debris to fly a long distance.
• Clear work area of bystanders. • Wear eye protection when using compressed air for cleaning purposes. |
IMPORTANT: Avoid damage! Cooling fins must be clean to prevent engine from overheating and to allow adequate air intake. |
NOTE: This service procedure should be performed on vehicles equipped with auxiliary hydraulic kit.
1. Raise attachment to service position. (See Using the Lift Cylinder Safety Support in the Safety section.)
2. Park vehicle safely. (See Parking Safely in the Safety section.)
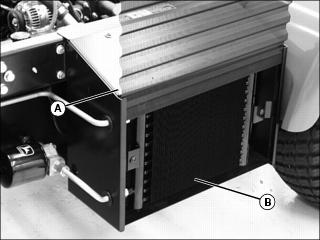
3. Lift air intake screen (A) from position in front of the engine radiator.
4. Remove dirt and debris from the oil cooling coils (B) using compressed air or water. Check coils for damage.