
Service Engine
Engine Warranty Maintenance Statement
Maintenance, repair, or replacement of the emission control devices and systems on this engine, which are being done at the customer’s expense, may be performed by any non-road engine repair establishment or individual. Warranty repairs must be performed by an authorized John Deere dealer.
Avoid Fumes
Engine Oil
Use oil viscosity based on the expected air temperature range during the period between oil changes.
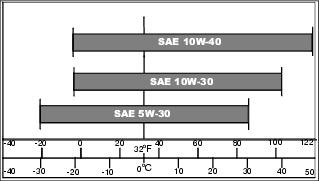
The following John Deere oils are preferred:
Other oils may be used if above John Deere oils are not available, provided they meet the following specification:
• API Service Classification SG or higher
Using Proper Fuel
Use regular grade unleaded fuel with an octane rating of 87 octane or higher. Fuel blends containing up to 10% ethanol or up to 15% MTBE reformulated fuel are acceptable. Do not use fuel or additives containing methanol as engine damage can occur.
Always use fresh, clean fuel that is purchased in a quantity that can be used within approximately 30 days, or add fuel stabilizer.
Fuel is blended to give best seasonal performance. To avoid engine performance problems such as hard starting or vapor lock, use in-season fuel. Use fuel during warm weather that was purchased during that season, and use fuel during cold weather that was purchased during that season.
Fuel can become stale in machines with engines that are used seasonally or infrequently during a season. Stale fuel can produce varnish and plug carburetor components which can affect engine performance.
Keep fuel storage container tightly covered and in a cool area out of direct sunlight. Fuel can break down and degrade if not sealed properly or exposed to sun and heat.
Condensation may collect in the fuel tank because of a variety of operating or environmental conditions and, over time, may affect your machine’s operation. Fill fuel tank at the end of daily use and store fuel in plastic containers to reduce condensation.
For best year-round performance and fuel-handling, add stabilizer to fuel immediately after fuel purchase. Such practice helps prevent engine performance problems and allows fuel storage in the machine all year without draining.
Filling Fuel Tank
Fill fuel tank at the end of each day’s operation to prevent condensation and freezing during cold weather.
1. Park machine safely. (See Parking Safely in the SAFETY section.)
3. Remove any trash from area around fuel tank cap.
4. Remove fuel tank cap slowly to allow any pressure built up in tank to escape.
5. Fill fuel tank only to bottom of filler neck.
Adjusting Throttle Lever Location

1. Remove two hex head bolts (A).
2. Remove handlebar cover (B).
4. Move throttle lever plate (D) to where the throttle lever location is most comfortable for the operator.
6. Install handlebar cover with two bolts and tighten.
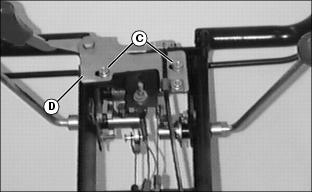
Adjusting Throttle Lever Tension

1. Remove two hex head bolts (A).
2. Remove handlebar cover (B).

3. Using two wrenches, tighten or loosen the lock nut (C) on the throttle pivot bolt (D). At the proper tension, the throttle lever is easy to move, yet maintains the desired throttle setting during operation.
4. Install handlebar cover with two bolts and tighten.
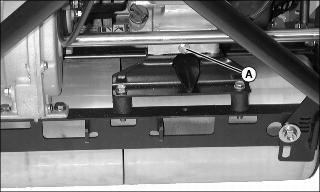
Cleaning Air Cleaner
1. Remove wing nut (A) to remove air cleaner cover (B).
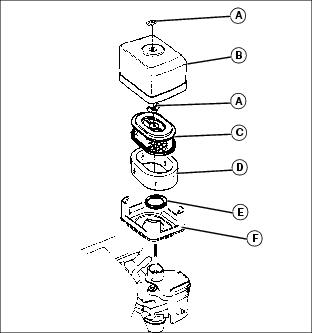
2. Remove second wing nut (A) to remove air cleaner element (C) and precleaner (D).
3. Check housing, precleaner, element and rubber gasket (E) for damage. Housing must seat well and permit only filtered air to reach carburetor. Replace if necessary.
4. Be sure nothing is obstructing the air passage.
5. Precleaner (D) - Clean every 25 hours of operation:
• Wash in detergent and water, rinse in clean water.
• Air cleaner element (C) - Clean or replace every 100 hours of operation:
• If element is extremely dirty or damaged, install new element.
• Assemble air cleaner assembly and install two wing nuts. Ensure base (F) is properly installed prior to assembly.
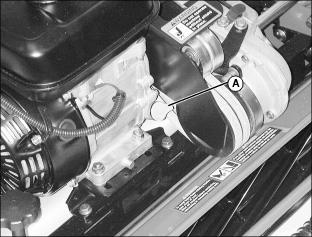
Cleaning Fuel Sediment Bowl
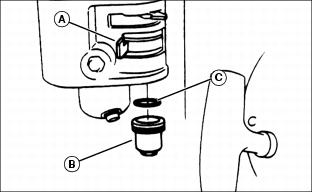
1. Turn fuel shut-off valve (A) to the off position.
2. Unscrew and remove sediment bowl (B) and O-ring (C).
3. Clean thoroughly with John Deere degreasing solvent or equivalent.
Checking Engine Oil Level
NOTE: Check oil twice a day if you run engine over 4 hours in a day.
Make sure engine is cold when checking engine oil level.
1. Be sure engine is in a level position, if necessary, put a block under front roller to level engine.
NOTE: Do not screw dipstick into engine to check oil level.
2. Remove dipstick (A), wipe clean, and insert into filler port.
3. If no oil or only a slight amount is seen, add to full level (B). Do not overflow.
4. Wipe any spilled oil off mower.
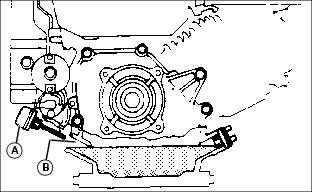
Changing Engine Oil
NOTE: Change engine oil after first 20 hours of operation, then every 50 hours. Check and fill plugs are located in front and rear of machine.
1. Run engine a few minutes to warm oil.
2. Be sure engine is in a level position, if necessary, put a block under front roller to level engine.
4. Remove drain plug (A) and drain oil into container.
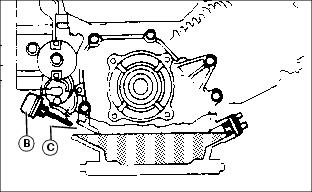
6. Remove dipstick (B), wipe clean.
7. Add to full level (C). Do not overflow.
8. Wipe any spilled oil off mower.
Cleaning Spark Plug And Adjusting Electrode Gap

1. Disconnect plug wire (A) and remove plug.
2. Thoroughly clean plug using high flash-point solvent and wire brush.
3. Inspect plug for cracked porcelain, pitted or damaged electrodes, or other damage.
NOTE: In Canada, replace plug with a resistor plug.
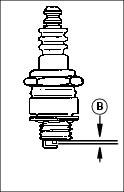
5. Check plug gap (B) with a round wire-type feeler gauge.
• Gap must be 0.7–0.8mm (0.028–0.031 in.).
• Change gap by moving only the outer electrode toward center electrode.
6. Install and tighten plug to 25 N•m (18 lb-ft).
Adjusting Carburetor
NOTE: The carburetor is calibrated by the engine manufacturer and should not require any adjustments.
If engine is operated at altitudes above 1829 m (6,000 ft.), some carburetors may require a special high altitude main jet. See your John Deere dealer.
If engine is hard to start or runs rough, check the TROUBLESHOOTING section of this manual.
After performing the checks in the troubleshooting section and your engine is still not performing correctly, contact your John Deere dealer.