
Service Steering & Brakes
Removing and Installing Caster Wheels
Removing
1. Park machine safely. (See Parking Safely in the SAFETY section.)
2. Lift front of machine with a safe lifting device.
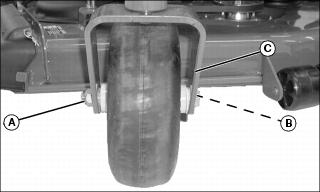
3. Remove hex nut (A) and wheel bolt (B).
4. Remove wheel from assembly yoke (C).
Installing
2. Install wheel bolt (B) and hex nut (A).
3. Tighten nut and torque to 31.15 Nm (23 Ft. lbs)
Checking and Aligning Motion Control Levers
Check Alignment
1. Park machine safely. (See Parking Safely in the SAFETY section.)
2. Move both motion control levers forward.
3. Check levers for equal alignment. If position of control levers are unequal, an adjustment is necessary.
Alignment Procedure

2. Slide both left and right motion control levers forward or rearward to desired position on control arm until levers are aligned.
NOTE: The control lever height can also be adjusted using this procedure. There are two height settings on the control arms.
Checking and Adjusting Motion Control Levers Gap
Checking Alignment
1. Park machine safely. (See Parking Safely in the SAFETY section.)

2. Move motion control levers (A) inward to neutral position.
3. If the ends of the levers strike against each other while in the neutral position an adjustment is needed.
Adjustment Procedure

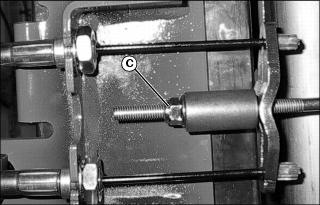
2. Tighten left and right adjustment bolts (C) slightly to increase gap between handles. The recommended gap between handles is 6-19 mm (1/4-3/4 in.)
3. Tighten jam nuts to hold adjustment bolts in place.
Adjusting Park Brake
Park Brake Adjustment
Perform adjustment if neutral interlock system adequately restrains controls in neutral, but brake won’t hold on slope.
1. Park machine safely. (See Parking Safely in the SAFETY section.)
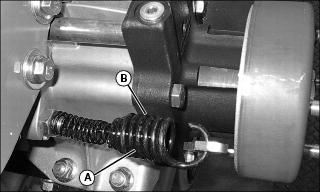
3. Remove rear wheels in order to access the brake cable extension spring (A)
4. Measure the gap between the third and fourth coil of the extension spring (B).
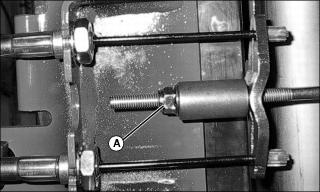
5. Tighten or loosen the equalizer adjustment nut (C) so the gap between the coils measures between 0.35mm (.014in) and 0.5mm (.020in).
Neutral Interlock Adjustment
Perform adjustment only if neutral interlock system does not adequately lock control sticks in neutral, or if brake/steering system has been disassembled.
1. Park machine safely. (See Parking Safely in the SAFETY section.)
2. Disengage park brake pedal.
3. Back off brake equalizer nut (D) 15 turns.
5. Move control levers to the ‘out’ position.

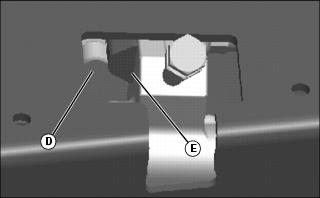
Picture Note: Control lever removed for clarity.
7. Adjust (shorten) turnbuckle (C) until cam (D) is fully engaged under control pivot wedge (E).
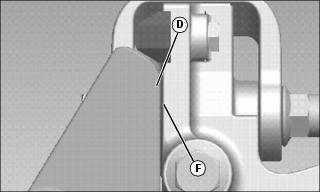
• When adjusted properly, cam (D) and control surface (F) will be parallel.
8. Verify that the control handle will freely move in and out of the slot in the frame before tightening jam nuts.
9. Adjust the equalizer nut. (See Park Brake Adjustment)
10. Move control levers to the ‘out’ position.
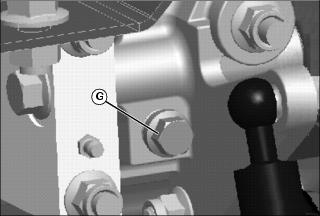
11. Adjust control set screw (G) until you notice the control lever begin to move forward in the control slot.
12. Move control lever in and out to verify that it is not binding with the frame slot. Engage and release park brake.
13. If brake pedal binds or does not fully release, back off the set screw 1 flat (DO NOT MANUALLY PULL PEDAL BACK). Recheck pedal for binding. If pedal still binds, back off the right hand set screw by 1 flat. Repeat as necessary.