
Operating
Daily Operating Checklist
o Check for loose or broken tines.
o Check for loose or missing hardware.
o Check for bent or damaged aerating links.
o Check tine holders and ram for damage.
Operating Tips
IMPORTANT: Avoid damage! Always raise aerator first and then disengage PTO. Do not reduce PTO rpm when aerator is temporarily raised out of the ground. |
Around Greens and Teeboxes:
• Survey the green before aerating.
• Operate with PTO speed at 540 RPM. Do not operate at speed below or above this speed.
• Plan your direction to minimize turning and maneuvering around hazards at the end of a pass.
• Make the initial pass across the center of the green and work your way to the outside.
• Keep PTO engaged and operating at 540 RPM when turning tractor around to make another pass. Raise aerator only high enough to lift turf guards off the ground. Do not raise aerator to full 3 point hitch lift height.
• Maintain consistent spacing while aerating a green by selecting a marking reference before starting.
On Fairways:
• Mark and/or flag all sprinkler heads and other items that could be damaged or cause damage to the aerator.
• Start on the outside perimeter of the fairway and work your way to the inside.
• Check for sand traps, water or other hazards before starting.
• Plan your direction to minimize turning and maneuvering around hazards at the end of a pass.
• Avoid sharp turns while aerating.
• Keep PTO engaged and operating at 540 RPM when turning tractor around to make another pass. Raise aerator only high enough to lift turf guards off the ground. Do not raise aerator to full 3 point hitch lift height.
Training:
• Practice before operating the aerator for the first time is critical to quality performance. Read the operator manual to learn operating procedures.
• Practice in an open field to become familiar with operating techniques necessary to maintain correct speed for proper hole spacing and hole quality.
General Operating Practice:
• Do not make sharp turns. Lift aerator out of ground to turn at the end of fairway.
• Wait to aerate if the soil is too hard and compacted. Aerate after rain or watering to achieve best results.
• Always carry extra tines and tools to replace a tine if it breaks while you are aerating.
Aeration Hole Quality
• Coring Depth: Poor quality can result if the depth is set too deep. Decrease the tine depth by 6 mm (1/4 in.) to 12.7 mm (1/2 in.) and check for improved hole quality.
• Tine Type: Closed tubular tines will provide better quality holes than open-side tines. Use open-side tines in applications to overcome plugging in high sand-content soils or wet conditions.
• Attachment Angle: Support legs provide the correct attaching angle at hook up for most conditions. Adjusting the angle too much or too little will be detrimentally affect hole quality. Adjusting angle too much can result in damage to the powershaft and/or gearbox.
• Turf Guard: The turf guard needs to be firmly on the surface during operation or lifting may occur. This lifting is especially prevalent in turf with poor root conditions. Excessive turf guard pressure can cause marking in soft turf.
• Damaged Aerating Linkage: If the hole quality is bad in one aeration linkage path only, then that associated linkage may have a damaged or missing part. First, inspect the linkage for any missing or loose hardware. Sometimes damaged linkage will make unusual noise. Check for bent tines. Straighten or replace tines if needed. Replace linkage if needed.
• Hole Spacing: Hole spacings greater than 76.2 mm (3 in.) can reduce the hole quality in some turf conditions.
• Hard Soil: The aerator will raise up off the turf in hard soils conditions and the hole quality may be less than desirable.
• Do not adjust hole depth deeper than what tines can penetrate, as damage can be incurred to all moving parts as well as Aercore frame.
Pre-Operating Adjustments
• Level the aerator side to side.
• Adjust the aerator attachment angle side to side if necessary.
• Set the rockshaft adjustable depth stop to the 3/4 position to prevent aerator from raising fully.
• Adjust the speed of drop/lock valve so aerator lowers fairly quick without striking the ground abruptly.
• Raise aerator slightly off the ground. Raise engine speed so that PTO speed is set to 540 RPM, and engage PTO. Check all moving parts for rubbing or interference. Disengage PTO, and turn off machine. Make any necessary adjustments.
Checking Machine Ground Speed
NOTE: Machine ground speed directly affects forward hole spacing, quantity of holes, and rate of coverage. Operating within 2 - 4.8 km/h (1.2 - 3 mph) is recommended for most soil conditions.
1. Select a location to test ground speed.
2. Measure a test area 30.5 m (100 ft) in length.
3. Operate machine at required engine speed for PTO to operate at 540 RPM. Select a low speed and drive machine 30.5 m (100 ft). Record the time required to travel the distance.
4. Make three passes, recording the time for each pass. The average time should be 30 - 40 seconds for most conditions. Average times for operating at the low and high end of the recommended speed range are as follows:
• at 2 km/h (1.2 mph), average time traveling the test distance should be 57 seconds.
• at 4.8 km/h (3 mph), average time traveling the test distance should be 23 seconds.
5. Adjust speed accordingly to achieve the best results.
Adjusting Attachment Angle
NOTE: The aerator support legs provide the correct attaching angle for most soil conditions.
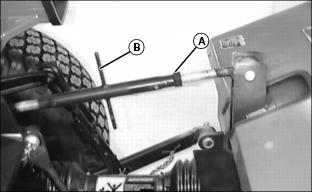
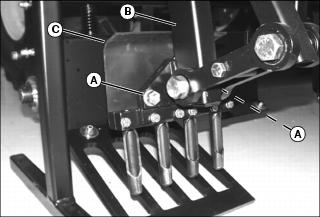
1. Loosen locking nut (A) and turn center link (B) to increase or decrease aerator angle.
2. Tighten locking nut to lock center link in position.
Adjusting Tine Depth
NOTE: Before determining tine depth adjustment is needed, make sure adjustment roller and turf guards were contacting the ground during operation of the aerator. If aerator is not lowered completely, tine depth will be less than expected.
Tine depth can be adjusted to a maximum 10 cm (4 in.). Depth adjustment must be the same on both sides of aerator. Damage may result if depth adjustment is set deeper than what tines can penetrate the ground.
1. Raise aerator so roller is off the ground before attempting to adjust depth.
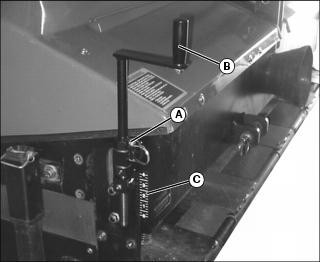
2. Remove spring locking pin (A) securing the depth control position at both sides of aerator.
3. Turn adjusting handle (B) to adjust up or down to desired depth. Use depth indicator label (C) to determine tine depth. The adjustment must be equal on both sides.
4. Install spring locking pin (A) to secure depth control arms in position at both sides of aerator.
Hole Coverage and Spacing
NOTE: Refer to the table in the Specifications section, Operating Speed and Hole Productivity Chart, for specific aeration hole output for certain speeds.
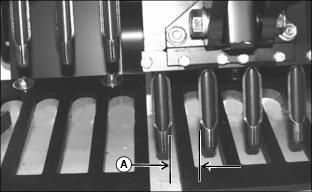
Adjusting Holes-Per-Square-Foot
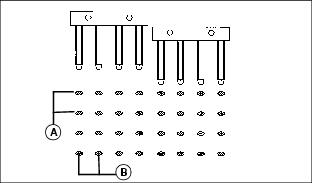
Increasing the ground speed will reduce the number of holes per square foot, but will increase forward hole spacing (A) and increase the square feet aerated per hour.
Changing the tine holder from 4x holders to 3x holders will increase the tine hole spacing (B) and decrease the number of holes per square foot.
Operating the Aerator
IMPORTANT: Avoid damage! Always raise aerator first and then disengage PTO. Do not reduce PTO rpm when aerator is temporarily raised out of the ground. |
1. Complete the pre-operating adjustments for the aerator and remove the support legs if installed.
3. Raise aerator so turf guards are slightly off the ground.
4. Set machine range shift lever to low gear.
5. Set machine at required engine speed for PTO to operate at 540 RPM.
7. Obtain proper ground speed.
NOTE: Operate with PTO speed at 540 RPM. Do not operate at speed below or above this speed.
9. Engage cruise control or optional speed control kit, if equipped, to maintain consistent ground speed.
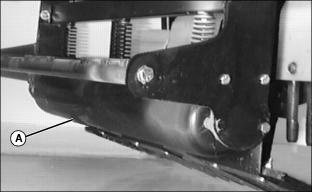
10. Lower aerator so adjustment roller (A) contacts the ground by moving 3-Point raise/lower lever completely forward.
11. Maintain engine speed for PTO to operate at 540 RPM.
12. To raise the aerator at the end of a pass:
a. If turning around to make another pass, raise aerator just high enough for turfguards to clear the ground, do not disengage PTO and maintain PTO speed of 540 RPM.
b. If not turning around to make another pass, raise aerator and then immediately disengage PTO.
Selecting the Correct Tine Holder
NOTE: Different tine holders will require different turf guards to be installed. See your John Deere dealer.
Tine holders are available in three sizes to accommodate different hole spacing requirements. Hole spacing (A) is the distance between each tine. See your John Deere dealer for tine holder kits.
Removing and Installing Tine Holders
NOTE: Different turf guards are required when installing different size tine holders. See your John Deere dealer.
1. Park machine safely. (See Parking Safely in the SAFETY section.)
2. Install support legs to aerator. Lower aerator until support legs are resting on the ground.
3. Remove flanged lock nuts (A) securing tine holder to connecting rod (B). Remove the tine holder.
NOTE: Core deflectors are not required for mini-tines and solid tines.
4. Remove core deflector (C) and install it onto selected tine holder if necessary. Tighten hardware completely.
5. Install correct tines to selected tine holder.
6. Attach tine holder to flanged mounting surface on connecting rod using the flanged lock nuts. Tighten the nuts to 156 N•m (115 lb-ft).
Removing and Installing Tines
NOTE: Different diameter tines may require different tine holders and turf guards. If different tine holder is not required, it can remain installed on machine when changing the tines.
New tines will not consistently pull cores. Operate aerator in a practice area to break-in new tines.
1. Park machine safely. (See Parking Safely in the SAFETY section.)
2. Install support legs to aerator. Lower aerator until support legs are resting on the ground.
NOTE: Do not remove bolts to remove tines. Loosen only as much as needed to remove tines.
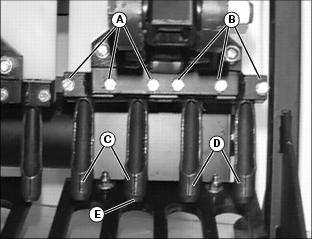
3. Loosen bolts (A) or (B) on tine holder just enough to remove the tines. Tines (C) or (D) can be removed two at a time by loosing only the bolts on that side of the tine holder.
NOTE: A short board may be used to hold all the tines in place while tightening.
4. Install tine into tine holder with beveled end (E) of tine pointing down. Install open-sided tines with open side facing rearward as shown.
5. Push tines completely inside tine holder. Tighten bolts alternately to 35 N•m (26 lb-ft).
Removing and Installing Turf Guards
IMPORTANT: Avoid damage! Twisted or bent turf guards can damage the tines. Replace turf guards at the first sign of any damage. |
1. Park machine safely. (See Parking Safely in the SAFETY section.)
2. Install support legs to aerator. Lower aerator until support legs are resting on the ground.
3. Remove and retain nut, bolt and washer (A) from each turf guard bracket on machine.
NOTE: Illustrated views are from back of aerator.
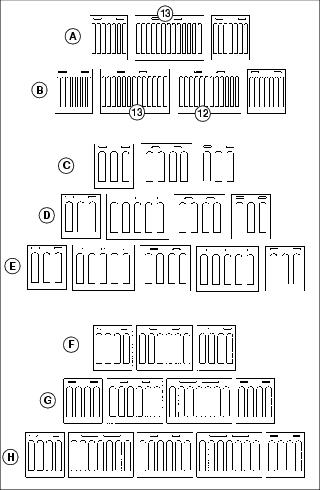
A - Aercore 1000 with Mini-Tine holders
B - Aercore 1500 with Mini-Tine Holders
C - Aercore 1000 with 3x Tine holders
D - Aercore 1500 with 3x Tine holders
E - Aercore 2000 with 3x Tine holders
F - Aercore 1000 with 4x Tine holders
G - Aercore 1500 with 4x Tine holders
H - Aercore 2000 with 4x Tine holders
4. Determine appropriate illustration for your model aerator.
NOTE: There should be approximately 40 mm (1-1/2 in.) spacing between turf guards.
Install nuts and washers on top side of turf guards.
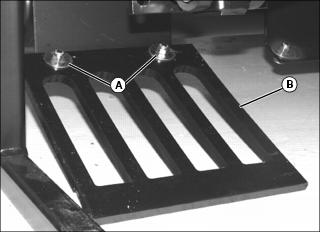
5. Attach turf guards (B) to turf guard brackets using nuts, bolts and washers (A) removed earlier. Make sure guards are installed in correct order with grooved side of each guard facing down. Do not tighten hardware completely.

6. Turn each belt pulley (C) manually to lower it’s tine set as close as possible to turf guard for proper alignment.
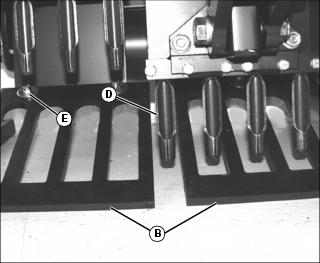
7. Adjust each turf guard (B) so tines (D) are centered in tine openings and in spaces between tine guards (as shown). Tighten turf guard attaching hardware (E) completely after proper alignment.
Removing and Installing Core Deflectors
NOTE: Core deflectors are not required with mini-tines and solid tines. Deflectors may be removed or installed with tine holders on or off the aerator.
1. Park machine safely. (See Parking Safely in the SAFETY section.)
2. Install support legs to aerator. Lower aerator until support legs are resting on the ground.
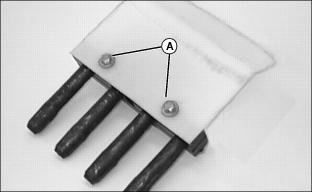
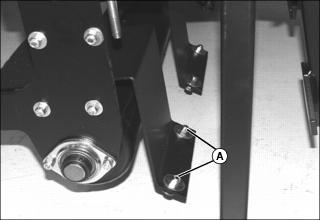
3. Remove and retain hardware (A) from backside of core deflector.
4. Install new core deflector so curved portion points rearward when installed on aerator.
5. Secure each deflector with two flat washers, lock washers and bolts. Tighten hardware until lock washers are compressed. Do not over-tighten.
Transporting Aerator
IMPORTANT: Avoid damage! Remove support legs from aerator before transporting. Legs can become caught in moving parts and be torn from machine by elevated ground structure and debris. |
1. Raise aerator slightly so tines are above the ground.
2. Disengage the PTO. Wait several seconds for PTO to stop rotating.
3. Raise aerator completely for transport.
4. Close the speed of drop/lock valve completely.
5. Transport aerator at a safe speed.
Transporting Aerator on Trailer
NOTE: Trailer capacity must exceed combined machine weight and attachment weight. (See Specifications section in operator’s manual.)
Be sure the trailer has all necessary lights and signs required by law.
1. Park trailer on a level surface.
2. Raise aerator completely before driving machine and aerator onto trailer.
3. Drive machine and aerator onto heavy-duty trailer. Position machine on trailer so hood or engine cover will not raise in wind while being transported.
5. Turn off machine and remove key.
IMPORTANT: Avoid damage! Be certain to always remove both support legs before removing aerator and machine from trailer. |
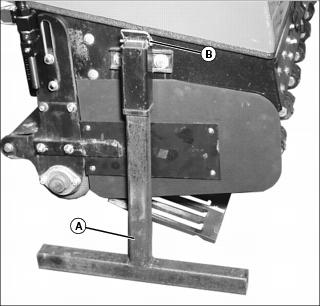
6. Install support leg (A) on both sides of aerator and secure with spring locking pin (B).
NOTE: Machine does not have to be running in order to lower aerator.
7. Open the speed of drop/lock valve slightly. Lower aerator slowly until support legs are resting on trailer.
8. Fasten tractor to trailer. See your machine operator’s manual for procedure.
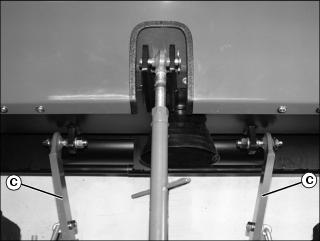
9. Fasten aerator by attaching heavy-duty straps, chains, or cables at both sides of the tractor lift arms at points (C) to trailer. Straps must be directed down and outward from aerator.


