
Service Mower
Adjusting Deck Belt Tension
1. Park machine safely. (See Parking Safely in the SAFETY section.)
2. Remove mower center belt cover.
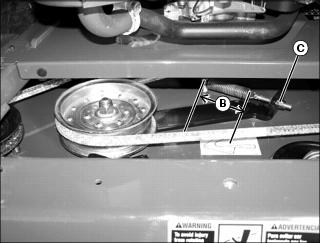
3. Measure the length of the idler arm tension spring between the inside edges of both end hooks. Length should be:

Picture Note: 36 inch deck shown.
Picture Note: 48 inch deck shown.
• WH48A and WH52A: 11.7 cm 1/8 in.) (B)
4. Loosen the jam nut (C) and adjust the threaded rod until the proper spring length is obtained.
6. Replace mower center belt cover.
Replacing Mower Deck Drive Belt
36 Inch Deck
1. Park machine safely. (See Parking Safely in the SAFETY section.)
2. Remove mower center belt cover.

3. Loosen nyloc hex nut (A) on top of idler pulley (B) until belt will fit between pulley and belt guide. The hex nut does not need to be completely removed.
4. Loosen the jam nut (C) and loosen the threaded rod until all spring (D) tension is removed from the belt (E).
5. Remove mower deck drive belt and discard.

6. Install new mower deck drive belt. See figure above for belt routing.
7. Tighten nyloc hex nut on top of pulley.
8. Tighten the adjustment nut on the threaded rod until the proper spring length is obtained (see Adjusting Deck Belt Tension above). Tighten the jam nut.
9. Replace mower center belt cover.
48 and 52 Inch Decks
1. Park machine safely. (See Parking Safely in the SAFETY section.)

2. Remove knob (A) and center belt cover (B).
3. Remove two knobs (C) and both left and right deck spindle covers (D).

4. Loosen nyloc hex nut (E) on top of idler pulley (F) until belt will fit between pulley and belt guide. The hex nut does not need to be completely removed.
5. Loosen the jam nut (G) and loosen the threaded rod until all spring (H) tension is removed from the belt (I).
6. Remove mower deck drive belt and discard.

7. Install new mower deck drive belt. See figure above and label (J) for belt routing.
8. Tighten nyloc hex nut on top of pulley.
9. Tighten the adjustment nut on the threaded rod until the proper spring length is obtained (see Adjusting Deck Belt Tension above). Tighten the jam nut.
10. Install left and right deck spindle covers and center belt cover with knobs.
Adjusting Mower Deck Rake
1. Stop machine on a smooth, level surface.
2. Park machine safely. (See Parking Safely in the SAFETY section.)
NOTE: The rear-to-front deck rake is pre-set at the factory to 4.8 mm (3/16 in.). Adjustment is only required if parts are damaged or replaced.

3. Remove hair pins from rear HOC rods (A) and allow rear of deck to rest on anti-scalp wheels.
4. Loosen the jam nut (B) on the trunnion (C).
5. Remove hex flange nut (D), bolt (E), and spacer (F) retaining HOC rod to deck (G).
6. Rotate trunnion in or out to achieve desired height.
7. Install HOC rod on deck. Ensure that spacer (F) is positioned between deck and trunnion.
8. Tighten trunnion jam nut (B).
10. Measure blade height from front to back and side to side. Ensure that deck is level from side to side and that rear-to-front rake is 4.8 mm (3/16 in.).
Replacing Mower Spindle Bearings
1. Park machine safely. (See Parking Safely in the SAFETY section.)
NOTE: The mower blade can remain attached to the spindle shaft for this procedure but may be removed if preferred.

2. Support blade/spindle shaft assembly (A) and remove nut (B), washer (C), spacer (D) and pulley (E).
3. Remove blade/spindle shaft assembly (A) from spindle housing (F).
4. Remove lower bearing (G) and spacer (H) from spindle housing (F). Discard bearing.
5. Remove and discard upper bearing (I).
7. Install a new lower bearing (G) and spacer (H) on spindle shaft.
8. Install the spindle shaft/blade assembly (A), lower bearing (G) and spacer (H) into the spindle housing (F).
9. Install the upper bearing (I).
10. Install pulley (E), spacer (D) and washer (C).
11. Install and tighten nut (B). Tighten to 115 N•m (85 lb-ft).
12. If removed, install mower blade, blade spacers and blade bolt. See Servicing Mower Blades in this section.
Servicing Mower Blades
Checking for Bent Mower Blades
1. Stop machine on a smooth, level surface.
2. Park machine safely. (See Parking Safely in the SAFETY section.)

3. Measure the distance (A) from blade tip to level surface with a ruler or a leveling gauge available at your John Deere dealer.
4. Rotate blade 180? and measure distance between other blade tip and flat ground surface.
5. Install new blade if the difference between the two measurements is more than 3 mm (1/8 in.).
Removing Mower Blades
1. Insert wood block between blade and mower to prevent blade from turning when removing bolt.

2. Remove the bolt (A), blade (B) and spacers (C) from the spindle shaft. Repeat for all blades.
• Mower blades should be sharp and free of any damage. Replace or sharpen mower blades as required.
Installing Mower Blades
1. Install the spacers (C), blade (B) and bolt (A) on the spindle shaft. Repeat for all blades.
2. Secure blades with a wooden block to prevent blade rotation.
3. Tighten blade bolts to a torque of 163 N•m (120 lb-ft).
4. Remove supports and lower mower.
Sharpening Blades

1. Sharpen blade with grinder, hand file or electric blade sharpener.
• Keep original bevel (A) when grinding.
• Blade should have 0.40 mm (1/64 in.) cutting edge (B) or less.
2. Balance blade before installing.
Balancing Blades

2. Put blade on a nail in a vice or in a vertical wall stud. Turn blade to horizontal position. If blade is not balanced, heavy end of blade will drop.
3. Grind bevel of heavy end. Do not change blade bevel.
Sharpening Blades
• Sharpen blades with grinder, hand file, or electric blade sharpener.

• Keep original bevel (A) when grinding.
• Blade should have 0.40 mm (1/64 in.) cutting edge (B) or less.
• Balance blades before installing.
Balancing Blades
2. Put blade on nail in a vise. Turn blade to horizontal position.
3. Check balance. If blade is not balanced, heavy end of blade will drop.
4. Grind bevel of heavy end. Do not change blade bevel.
Checking for Bent Mower Blades
1. Park machine safely. (See Parking Safely in the SAFETY section.)
2. Raise mower deck to highest position to access blades.

Picture Note: Mower deck with side discharge used for illustration
3. Measure distance (A) between blade tip and flat ground surface.
4. Rotate blade 180? and measure distance between other blade tip and flat ground surface.
5. Install new blade if the difference between the two measurements is more than 3 mm (1/8 in.).
Replacing Mower Deck Idler Pulley
1. Park machine safely. (See Parking Safely in the SAFETY section.)
2. Remove mower center belt cover.
NOTE: It is not necessary to remove spring pressure to remove the idler pulley.


Picture Note: 48 and 52 Inch Decks
3. Remove nyloc hex nut (A) on top of idler pulley (B).
NOTE: If necessary use a pry bar or screwdriver to hold the round head square neck hex bolt in the square hole in the idler arm.
5. Install new idler pulley on top of existing spacer and tighten nyloc hex nut.
6. Check belt tension spring length (see Adjusting Belt Deck Tension in this section).


