
Removing and Storing
Removing
NOTE: Refer to illustration in the Installing Section, earlier in this manual.
1. Park machine safely. See “Parking Safely” in the Safety section.
2. Remove large hairpin cotter from hitch pin.
3. Hold sweeper tow tubes to remove pressure from hitch pin, then remove hitch pin from hitch clevis and rear hitch plate or drawbar on machine.
4. Pull or push sweeper backward to disengage hitch clevis from machine hitch, install hitch pin in hitch clevis for storage and secure with large hairpin cotter.
Storing
The sweeper can be tipped upright and stored against a wall using a minimum of space:
1. Remove any loose material from hamper and brush housing / drive assembly. The sweeper should be clean and dry before configuring for storage.
2. Remove small hairpin cotters and clevis pins securing hamper assembly to brush housing and remove hamper assembly.
3. Unlock spreader bars and collapse hamper.
4. Remove large hairpin cotter and hitch pin from hitch clevis, if stored there.
5. Move lift handle to the index hole farthest forward (toward the tow tubes).
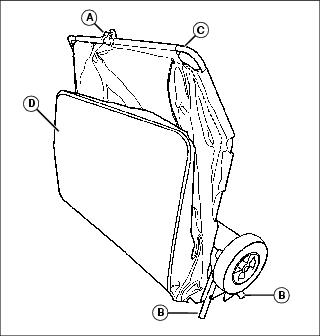
6. Roll sweeper to desired storage area, lift hitch clevis (A) to pivot sweeper to vertical position and resting on the tubes (B) at rear of sweeper (bottom of sweeper should face wall).
7. Lift the collapsed hamper assembly by the rear tubes, positioning the middle of the upper rear tube (C) at the center hamper cut-out over the opening in the hitch clevis (the inside of the hamper faces the lift handle and tow tubes, and the bottom (D) of the hamper facing outward). Lower the hamper to rest in the hitch clevis.


