
Service Miscellaneous
Tightening Wheel Hardware
Front Wheel Bolts
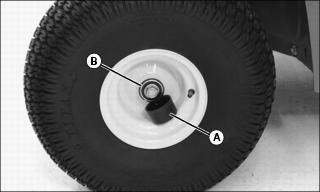
Tighten flange front cap screws (B) to 88 Nm (65 lb-ft).
Rear wheel Nuts
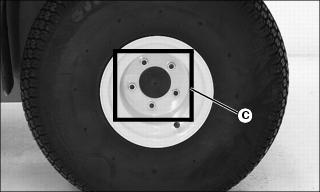
Tighten rear drive wheel nuts (C) alternately to 88 Nm (65 lb-ft).
Grease

Use the following grease based on the air temperature range. Operating outside of the recommended grease air temperature range may cause premature failures.
Only use a quality grease in this application. DO NOT mix any other greases in this application. DO NOT use any BIO-GREASE in this application.
The following John Deere grease is PREFERRED:
NON-CLAY HIGH-TEMPERATURE EP GREASE-JDM J13E4, NLGI Grade 2.
Other greases may be used if above preferred John Deere grease is not available, provided they meet the following specification:
John Deere Standard JDM J13E4, NLGI Grade 2.
Lubricating Front King Pins
1. Park the vehicle safely. (See Parking Safely in the SAFETY section.)
2. Turn the key switch to the OFF "0" position.
3. Press the directional control switch into the neutral (N) position.
5. Raise front of utility vehicle with a safe lifting device.
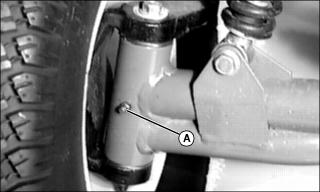
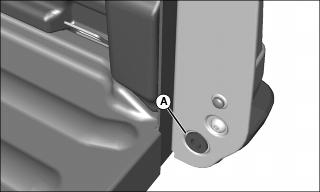
6. Lubricate one grease fitting (A) on each king pin axle arm with the preferred grease or an equivalent.
Removing and Installing Hood
Removing Hood
1. Park the vehicle safely. (See Parking Safely in the SAFETY section.)
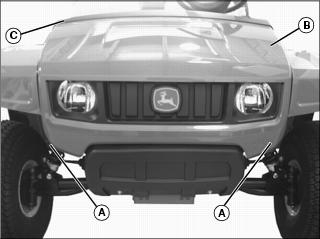
2. Stand in front of vehicle and grasp hood near arrow marks (A). Pull out firmly.
IMPORTANT: Avoid damage! When removing hood (B), set hood in an upright position and not on top side of hood. |
3. Pull forward on hood (B) and remove hood from under dash panel (C).
Installing Hood
1. Install hood (B) under dash panel (C).
2. Pivot hood downward, pushing near arrows (A) to secure rubber retainers on hood tabs onto molded retainers on front fenders.
Replacing Cargo Box Tailgate Bushings
1. Remove the cargo box tailgate (See Removing the Tailgate in OPERATING).
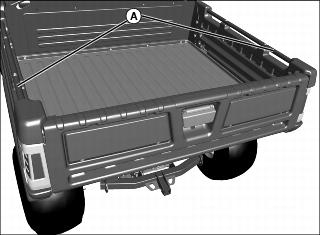
2. Remove snapfit bushing (A) from both sides of cargo box.
3. Replace bushings and reinstall the tailgate.
Cleaning and Repairing Cargo Box
Repairing Accessory Tubes
Use 3M Scotchbrite pad to polish and smooth nicks, scrapes or scratches in the vinyl surface of the tubes (A).
Cargo Box Floor
A rejuvinating product is available for cargo boxes with the optional spray-in liner. See your John Deere dealer.
Cleaning Plastic Hood and Body Panel Surfaces
1. Rinse with clean water to remove dirt and dust.
2. Dry thoroughly to avoid water spots.
3. Spray PLEDGE onto hood and surfaces and leave on for 30 to 60 seconds.
4. Wipe off with cheesecloth to bring out lustre.
Cleaning and Repairing Metal Surfaces
Cleaning:
Follow automotive practices to care for your vehicle painted metal surfaces. Use a high-quality automotive wax regularly to maintain the factory look of your vehicle's painted surfaces.
Repairing Minor Scratches (surface scratch):
1. Clean area to be repaired thoroughly.
2. Use automotive polishing compound to remove surface scratches.
3. Apply wax to entire surface.
Repairing Deep Scratches (bare metal or primer showing):
1. Clean area to be repaired with rubbing alcohol or mineral spirits.
2. Use paint stick with factory-matched colors available from your authorized dealer to fill scratches. Follow directions included on paint stick for use and for drying.
3. Smooth out surface using an automotive polishing compound. Do not use power buffer.