
Service Miscellaneous
Using Proper Fuel (Diesel)
Use the proper diesel fuel to help prevent decreased engine performance and increased exhaust emissions. Failure to follow the fuel requirements listed below can void your engine warranty.
onsult your local fuel distributor for properties of the diesel fuel in your area.
In general, diesel fuels are blended to satisfy the low temperature requirements of the geographical area in which they are marketed.
Diesel fuels specified to EN 590 or ASTM D975 are recommended.
In all cases, the fuel shall meet the following properties:
IMPORTANT: Avoid damage! Improper fuel additive usage may cause damage on fuel injection equipment of diesel engines. |
If a fuel of low or unknown lubricity is used, addition of John Deere PREMIUM DIESEL FUEL CONDITIONER at the specified concentration is recommended.
• Diesel fuel quality and fuel sulfur content must comply with all existing emissions regulations for the area in which the engine operates.
• Use only ultra low sulfur diesel (ULSD) fuel with a maximum of 0.0015% (15mg/kg) sulfur content.
IMPORTANT: Avoid damage! Do not mix diesel engine oil or any other type of lubricating oil with diesel fuel. |
Using Bio-Diesel Fuel
Bio-diesel fuels may be used only if the bio-diesel fuel properties meet the latest edition of ASTM D6751, EN14214, or equivalent specification.
The current maximum allowable bio-diesel concentration is a 5% blend (also known as B5) in petroleum diesel fuel.
To learn of any changes to the recommendations for bio-diesel usage with your diesel engine, ask your John Deere dealer or reference the Services and Support link on the John Deere Commercial and Consumer Equipment website.
Handling and Storing Diesel Fuel
Do not smoke while you fill the fuel tank or service the fuel system. |
• Fill the fuel tank at the end of each day’s operation to prevent water condensation and freezing during cold weather.
• When fuel is stored for an extended period or if there is a slow turnover of fuel, add a fuel conditioner to stabilize the fuel and to prevent water condensation. Contact your fuel supplier for recommendations.
Filling Fuel Tank
Fill fuel tank at the end of each day’s operation to prevent condensation and freezing during cold weather.
1. Park machine safely. (See Parking Safely in the SAFETY section.)
3. Remove any trash from area around fuel tank cap.
4. Remove fuel tank cap slowly to allow any pressure built up in tank to escape.
5. Fill fuel tank only to bottom of filler neck. Do not overfill.
• Gas models: Turn cap until clicks.
hecking Wheel Bolt Tightness
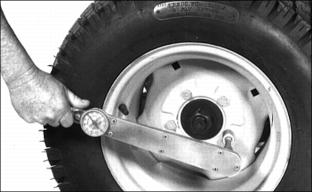
heck wheel bolts often during the first 100 hours of operation. Tighten every other bolt in sequence until all bolts are at 88 N•m (65 lb-ft).
leaning Plastic Surfaces
1. Rinse hood and entire machine with clean water to remove dirt and dust that may scratch the surface.
2. Wash surface with clean water and a mild liquid automotive washing soap.
3. Dry thoroughly to avoid water spots.
4. Wax the surface with a liquid automotive wax. Use products that specifically say “contains no abrasives.”
5. Buff applied wax by hand using a clean, soft cloth.
leaning and Repairing Metal Surfaces
leaning:
Follow automotive practices to care for your vehicle painted metal surfaces. Use a high-quality automotive wax regularly to maintain the factory look of your vehicle’s painted surfaces.
Repairing Minor Scratches (surface scratch):
1. Clean area to be repaired thoroughly.
2. Use automotive polishing compound to remove surface scratches.
3. Apply wax to entire surface.
Repairing Deep Scratches (bare metal or primer showing):
1. Clean area to be repaired with rubbing alcohol or mineral spirits.
2. Use paint stick with factory-matched colors available from your authorized dealer to fill scratches. Follow directions included on paint stick for use and for drying.
3. Smooth out surface using an automotive polishing compound. Do not use power buffer.
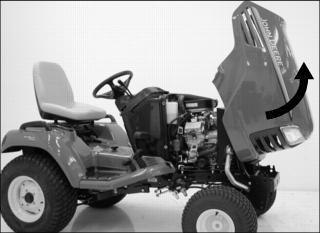
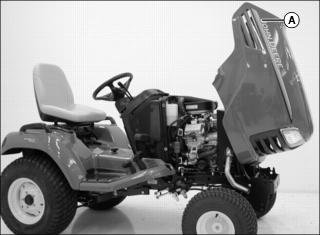
Raising and Lowering Hood
Raising
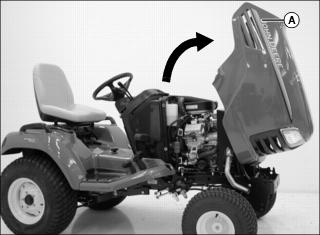
1. Lift rear of hood (A) and tilt to fully upright position.
Lowering
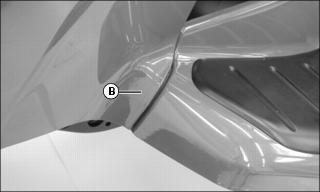
2. Check to be sure hood tabs (B) catch in frame on both sides of machine.
Removing and Installing Hood
Removing
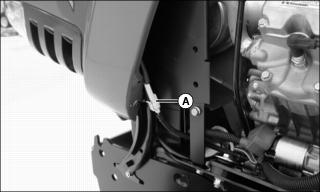
2. Disconnect headlight harness (A) on left side of machine.
3. Pull hood forward and roll hood up and out of rail.
Installing
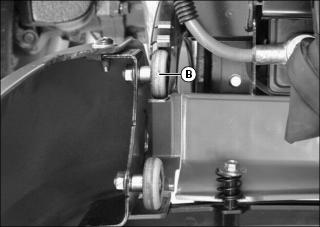
2. Install first set of rollers (B) on hood into rail.
3. Connect headlight harness on left side of machine.
4. Tilt rear of hood toward steering wheel and lift hood up and drop second set of rollers into rail.
5. Allow hood to roll downward on rail.
Removing and Installing Side Panels
Removing
1. Park machine safely. (See Parking Safely in the SAFETY Section.)
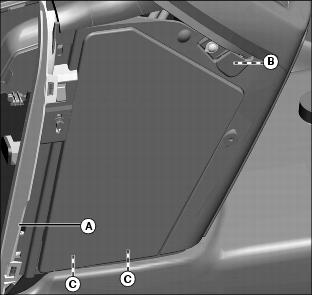
3. Turn 1/4 turn fastener (A), and pull top of side panels out of rubber grommet (B).
4. Lift side panels off of two grooves (C) on machine frame.
Installing
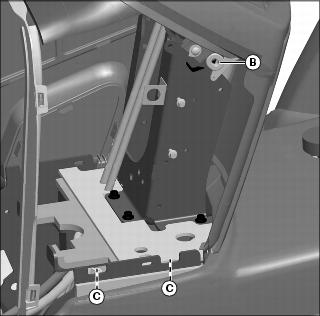
1. Install tabs on bottom of side panel into grooves (C) on machine frame. Install top of side panel tab into rubber grommet (B).
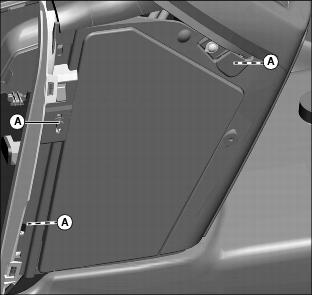
2. Secure side panel with 1/4 turn fastener (A).
Removing and Installing Wheel Assembly (Models with Wheel Bolt)
Removing
1. Park machine safely. (See Parking Safely in the Safety section.)
IMPORTANT: Avoid damage! Place jack stands under frame, not under transmission or engine, when raising or supporting machine. |
2. Raise machine with a safe lifting device and lower machine onto jack stands or other stable supports. Block wheels remaining on the ground to prevent machine movement.
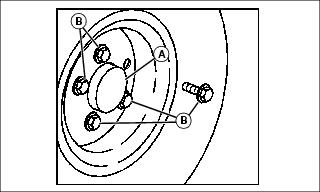
Picture Note: Wheel may or may not have a cap (A) to remove when removing the wheel.
3. Remove the wheel bolts (B).
5. Take wheel assembly to an authorized service dealer for repairs.
Installing
1. Apply multipurpose grease to spindle shaft before installing wheel assembly.
2. Install wheel assembly with valve stem to the outside.
3. Tighten wheel bolts evenly in alternating sequence until snug.