
Operating
Tow Vehicle Requirements
NOTE: See SPECIFICATIONS in this manual for your trailer model information.
Your tow vehicle must have the following:
Towing hitch that matches towing vehicle capacity.
Towing hitch with a capacity that meets or exceeds trailer Gross Vehicle Weight Rating (GVWR).
Hitch ball with a capacity that meets or exceeds GVWR and matches trailer coupler size.
Mounted electric brake controller.
Properly wired 7-pin connector.
Side view mirrors and heavy duty flashers that meet individual state regulations and requirements.
Pre-Operating Checklist
1. Check to be sure you have met all Tow Vehicle Requirements listed in OPERATING in this manual.
2. Check tow vehicle oil fill, coolant fill, lights, and tire pressure and condition.
3. Follow Coupling Trailer to Tow Vehicle instructions in OPERATING in this manual to couple trailer to tow vehicle.
4. Check all clearance, tail, and brake lights.
5. Check trailer tire condition, tread, and inflation pressures.
6. Check to be sure ramps, if installed, are locked into place in pockets.
7. Perform low speed brake check (slow speed application of trailer brakes with controller override switch).
8. If any brake issues are detected adjust brakes or determine problem and repair as needed.
9. Perform walk around inspection for any damage to trailer.
10. Check trailer hydraulic oil level and battery charge. Perform a brief raise and lower cycle for hydraulic lift control check.
11. Before loading trailer, confirm that trailer tows and trails well.
Checking Trailer Lights
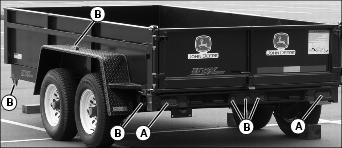
Connect the trailer harness to the tow vehicle's electrical system and check operation of trailer lights on both sides and rear of trailer.
Coupling Trailer to Tow Vehicle
Install Coupler on Ball Hitch
 c CAUTION: Avoid injury! Uncoupling may result in loss of control of trailer while traveling. Trailer must be securely coupled to the hitch.
|
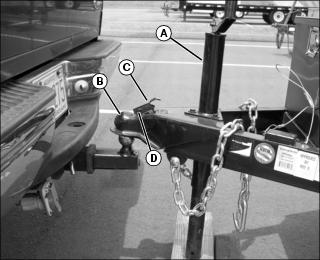
1. Use trailer jack (A) to raise trailer tongue high enough to allow ball hitch on tow vehicle under trailer coupler (B).
2. Pull coupler locking mechanism (C) upward to open position.
|
c CAUTION: Avoid injury! Check to be sure area is clear of any bystanders before backing tow vehicle.
|
3. Slowly back tow vehicle to align ball hitch centered beneath coupler as shown.
4. Follow tow vehicle operator's manual instructions to park tow vehicle safely.
5. Use jack to lower trailer tongue until coupler fully engages ball hitch.
6. Push coupler locking mechanism (C) down to closed position to lock coupler onto ball hitch.
7. Insert a pin or lock through hole (D) in coupler locking mechanism.
9. Remove blocks from trailer tires.
Install Safety Chains and Breakaway Cable

1. Cross the safety chains (E) beneath the trailer tongue and loop the chains around tow vehicle frame or holes in vehicle's hitch system.
2. Leave enough slack in chains to permit tight tow vehicle turns, but keep chains short enough to hold trailer tongue above the road if trailer uncouples.
3. Secure switch breakaway cable (F) on tow vehicle frame or hitch system so cable will stay attached to tow vehicle and separate from switch (G) if trailer uncouples.
4. Check to be sure breakaway cable pin is fully installed in switch (G).
Connect Harness and Check Light Operation
1. Route trailer harness (H) through cutout in hydraulic pump box to connect to tow vehicle.
2. Follow instructions in your tow vehicle operator's manual to connect 7-pin connector on harness to vehicle's electrical system.
Check Light Operation
1. Check all lights for proper operation:
a. Marker lights - Turn on tow vehicle headlights.
b. Brake lights - Step on tow vehicle brake pedal.
c. Turn signal lights - Operate tow vehicle turn signal controls.
Check Brake Operation
1. Follow tow vehicle operator's manual instructions to check operation of tow vehicle brakes and trailer braking system.
2. Test drive tow vehicle and trailer to confirm vehicle and trailer braking systems operate correctly.
Loading Trailer
IMPORTANT: Avoid damage! Do not overload trailer. The trailer is capable of holding more than its rated load capacity when high density materials are loaded. |
The following charts are general guidelines for load heights based on approximate weights shown for the listed materials.
5x8 Trailer Capacity
* High Density Material - Will overload trailer before bed is full.
6x12 Trailer Capacity
* High Density Material - Will overload trailer before bed is full.
Using Tie-Down Rings
1. Arrange load so that the weight is centered over the main trailer bed area.
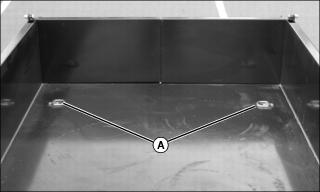
Picture Note: Two tie-down rings shown. Use all four tie-down rings when possible.
2. Secure loads to the tie-down rings (A) in a safe and secure manner.
Using Hydraulic Lift Control
|
c CAUTION: Avoid injury! Fully raised trailer bed may contact overhead wires or obstructions.
Check to be sure area above trailer is clear before raising trailer bed. |
1. Position tow vehicle and trailer on a firm, level surface.
2. Follow tow vehicle operator's manual instructions to park tow vehicle safely.
|
c CAUTION: Avoid injury! Falling material or debris can crush.
Keep bystanders, especially children, away from back end when raising trailer bed. |
3. Check to be sure dump area behind trailer is clear.
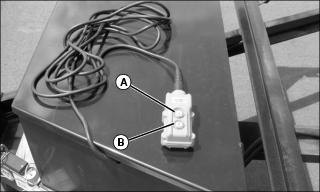
4. Push UP button (A) on control to slowly raise the trailer bed.
|
c CAUTION: Avoid injury! Trailer bed is heavy and can crush.
Keep bystanders, especially children, away when lowering trailer bed. |
5. Push DOWN button (B) on control to fully lower trailer bed after unloading.
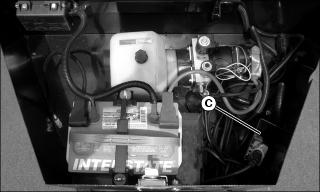
6. Store lift control in pocket (C) in hydraulic pump box when not in use.
Using Safety Prop
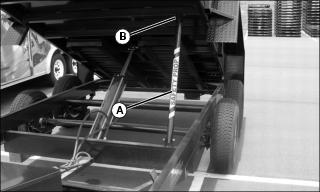
1. To keep the empty trailer bed in raised position, raise the bed high enough to insert the end of the safety prop (A) into the holder (B).
|
c CAUTION: Avoid injury! Trailer bed is heavy and can crush.
Do not leave bed in raised position without safety prop in place. |
2. Lower the trailer bed to rest the bed weight on the safety prop.
3. To release the safety prop, raise the trailer bed slightly and remove the end of the prop from the holder.
Operating Combination Gate
1. Follow tow vehicle operator's manual instructions to park tow vehicle safely.
Using as a Dump Gate
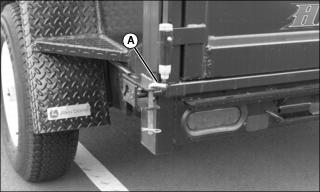
1. Remove pin (A) on each lower corner of gate.
2. Slowly raise trailer bed allowing loaded material to slide out under gate. With some loads it may be necessary to move the trailer forward as the material is discharged to allow full unloading of the bed.
3. Once unloaded, lower trailer bed and secure the gate with pins (A).
Using as a Spreader Gate
NOTE: Spread function should only be used on flowable materials like sand or gravel.
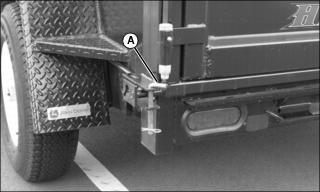
1. Remove pin (A) on each lower corner of gate.
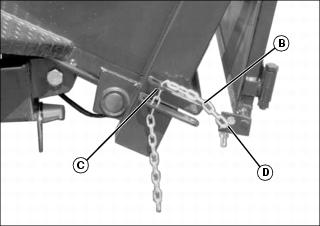
2. Install chains (B) on each side of the trailer between chain anchor points on the bed (C) and on the gate (D).
Two chains should be used and evenly adjusted to avoid damage to gate.
Adjust the free length of both chains as required to control the discharge flow of material.
3. Raise the trailer bed to maintain material flow while unloading. Avoid raising bed too fast to cause material to build up on tailgate.
4. Maintain smooth rate of travel while spreading. Avoid uneven surfaces while spreading material.
5. Once unloaded, lower trailer bed, remove chains, and secure the gate with pins (A).
Using as a Swing Open Gate (Model 6x12)
NOTE: When swing gates are opened, stay clear of any loaded material that may fall from the trailer bed.
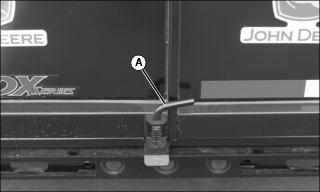
1. Raise the center gate locking pin (A) and open both gates from the center.
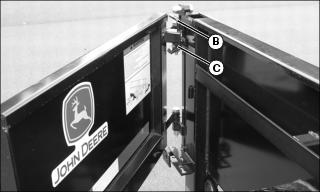
2. Swing right and left gate sections to the side until the spring loaded latch pin (B) on each section engages in the lock plate (C).
3. Slowly raise trailer bed to unload material. Check to be sure that material begins sliding out as the bed is raised.
|
c CAUTION: Avoid injury! Fingers and hands can be pinched or crushed. Be aware of potential pinch points and keep hands away.
|
4. Once unloaded, lower trailer bed, pull each gate section latch pin (B) and close both gates, interlocking them in the center.
5. Check to be sure that the center gate locking pin (A) is fully engaged.
Operating One Piece Gate
1. Follow tow vehicle operator's manual instructions to park tow vehicle safely.
Using as a Dump Gate
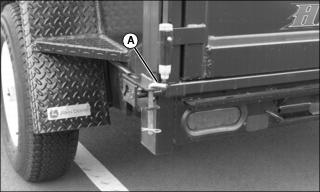
1. Remove pin (A) on each lower corner of gate.
2. Slowly raise trailer bed allowing loaded material to slide out under gate. With some loads it may be necessary to move the trailer forward as the material is discharged to allow full unloading of the bed.
3. Once unloaded, fully lower trailer bed and secure the gate with pins (A).
Using as a Spreader Gate
NOTE: Spread function should only be used on flowable materials like sand or gravel.
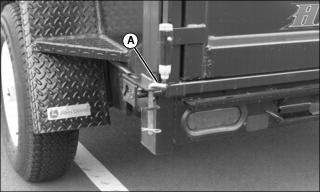
1. Remove pin (A) on each lower corner of gate.
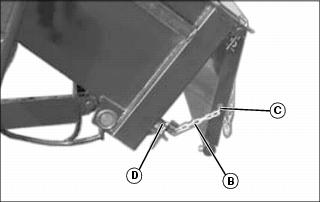
2. Install chains (B) in both gate chain slots (C). Install the free end of the chains in the lower gate latch brackets (D) with pins (A).
Two chains should be used and evenly adjusted to avoid damage to gate.
Adjust the free length of both chains as required to control the discharge flow of material.
3. Raise the trailer bed to maintain material flow while unloading. Avoid raising bed too fast to cause material to build up on tailgate.
4. Maintain smooth rate of travel while spreading. Avoid uneven surfaces while spreading material.
5. Once unloaded, lower trailer bed, remove chains, and secure the gate with pins (A).
Using as a Drop Gate
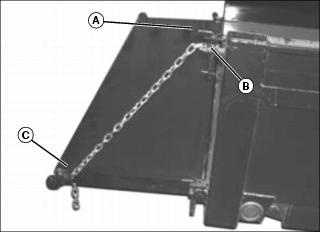
1. Remove pin (A) on each upper corner of gate and lower the gate.
2. Install chains in upper latch pin brackets (B) and secure with pins (A).
3. Raise gate to desired height and secure with free end of chain (C).
Using Ramps (Model 6x12 with Combination Gate Only)
1. Follow tow vehicle operator's manual instructions to park tow vehicle safely.
NOTE: When swing gates are opened, stay clear of any loaded material that may fall from the trailer bed.
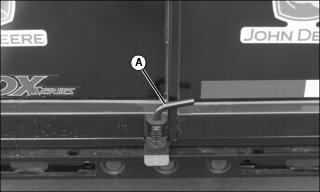
2. Raise the center gate locking pin (A) and open both gates from the center.
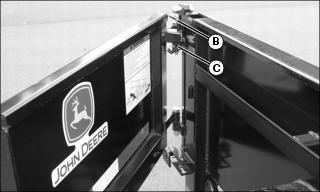
3. Swing right and left gate sections to the side until the spring loaded latch pin (B) on each section engages in the lock plate (C).
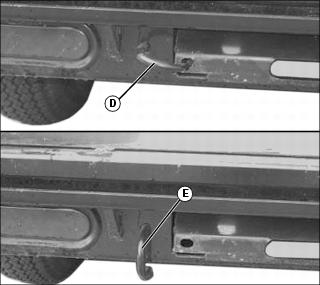
4. Grasp each ramp lock handle (D), pull handle out, rotate to vertical position (E), and release.
5. Slide each ramp from its pocket.
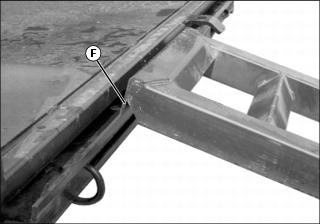
6. Position each ramp lip (F) on raised edge on back end of trailer.
7. Load the trailer and secure the load as required.
8. Slide ramps back into pockets and secure with lock handles.
9. Pull each gate section latch pin (B) and close both gates, interlocking them in the center.
10. Check to be sure that the center gate locking pin (A) is fully engaged.
Uncoupling Trailer From Tow Vehicle
1. Follow the tow vehicle operator's manual instructions to park the tow vehicle safely.
2. Block the trailer tires to prevent trailer from rolling.
3. Disconnect trailer harness and store in hydraulic pump box.
4. Disconnect breakaway cable and replace pull pin in switch box.
5. Disconnect safety chains from tow vehicle.
6. Remove pin or lock from hole in trailer locking mechanism and move locking mechanism to open position.
7. Position block beneath trailer jack if ground is not solid enough to support trailer tongue load.
8. Extend trailer jack enough to raise trailer coupler off ball hitch and drive tow vehicle away from trailer.