
Service Miscellaneous
Using Proper Fuel (Diesel)
Use the proper diesel fuel to help prevent decreased engine performance and increased exhaust emissions. Failure to follow the fuel requirements listed below can void your engine warranty.
Consult your local fuel distributor for properties of the diesel fuel in your area.
In general, diesel fuels are blended to satisfy the low temperature requirements of the geographical area in which they are marketed.
Diesel fuels specified to EN 590 or ASTM D975 are recommended.
In all cases, the fuel shall meet the following properties:
IMPORTANT: Avoid damage! Improper fuel additive usage may cause damage on fuel injection equipment of diesel engines. |
If a fuel of low or unknown lubricity is used, addition of John Deere PREMIUM DIESEL FUEL CONDITIONER at the specified concentration is recommended.
• Diesel fuel quality and fuel sulfur content must comply with all existing emissions regulations for the area in which the engine operates.
• Use only ultra low sulfur diesel (ULSD) fuel with a maximum of 0.0015% (15mg/kg) sulfur content.
IMPORTANT: Avoid damage! Do not mix diesel engine oil or any other type of lubricating oil with diesel fuel. |
Using Bio-Diesel Fuel
Bio-diesel fuels may be used only if the bio-diesel fuel properties meet the latest edition of ASTM D6751, ASTM D7467, EN14214, or equivalent specification.
The current maximum allowable bio-diesel concentration is a 5% blend (also known as B5) in petroleum diesel fuel.
Concentrations up to B20 may be used if machine is modified with genuine John Deere B20 kit. Use of B6-B20 fuel will require maintenance interval changes from some components, and special procedures for fuel handling and machine storage.
To learn of any changes to the recommendations for bio-diesel usage with your diesel engine, ask your John Deere dealer or reference the Services and Support link on the John Deere Commercial and Consumer Equipment website.
Handling and Storing Diesel Fuel
Do not smoke while you fill the fuel tank or service the fuel system. |
• Fill the fuel tank at the end of each day’s operation to prevent water condensation and freezing during cold weather.
• When fuel is stored for an extended period or if there is a slow turnover of fuel, add a fuel conditioner to stabilize the fuel and to prevent water condensation. Contact your fuel supplier for recommendations.
Filling Fuel Tank
Fill fuel tank at the end of each day’s operation to prevent condensation and freezing during cold weather.
1. Park machine safely. (See Parking Safely in the SAFETY section.)
3. Remove any trash from area around fuel tank cap.
4. Remove fuel tank cap slowly to allow any pressure built up in tank to escape.
5. Fill fuel tank only to bottom of filler neck. Do not overfill.
• Gas models: Turn cap until clicks.
Removing and Installing Drive Wheels
Removing:
IMPORTANT: Avoid damage! Lift machine at specified points on frame. Using rear bumper as a lift point can damage the frame. |
1. Park machine safely. (See Parking Safely in the SAFETY section.)
3. Slightly loosen four wheel nuts.
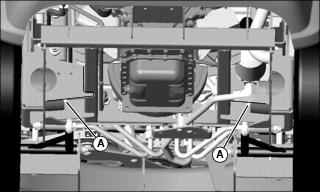
4. Lift rear end of machine with a safe lifting device centered under tire support frame (A) on the side the tire is being removed.
5. Place machine on jack stands.
Installing:
Tightening Drive Wheel Hardware
1. Tighten rear wheel nuts to 115 N•m (85 lb-ft)

2. Tighten wheel nuts in numbered sequence shown. Tighten alternately until recommended torque value is reached.
Removing and Installing Front Caster Wheels
Removing
1. Park machine safely. (Refer to Parking Safely in the Safety section.)
2. Lift front of machine with a safe lifting device.
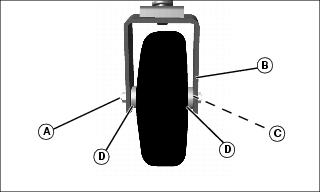
3. Remove hex nut (A) and wheel bolt (C).
4. Remove wheel and cups from assembly yoke (B).
Installing
1. Install replacement wheel with cups (D).
2. Install wheel bolt (C) and hex nut (A).
Checking Tire Pressure
NOTE: Refer to the SPECIFICATIONS section for tire pressures.
2. Check tire pressure with an accurate lower pressure gauge.
3. Add or remove air, if necessary.
Tightening ROPS Hardware
1. Park machine safely. (See Parking Safely in the SAFETY section.
2. Raise ROPS to upright position and insert lock pins.
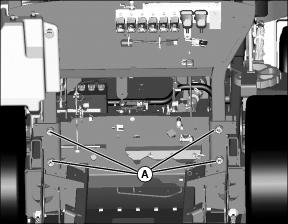
Picture Note: Parts have been removed for photo clarity.
3. Tighten the ROPS attaching bolts (A) to 90 Nm (66 lb-ft).
Cleaning Plastic Surfaces
1. Wash surface with clean water and a mild liquid automotive washing soap.
2. Dry thoroughly to avoid water spots.
Cleaning and Repairing Metal Surfaces
Cleaning:
Follow automotive practices to care for your vehicle painted metal surfaces. Use a high-quality automotive wax regularly to maintain the factory look of your vehicle’s painted surfaces.
Repairing Minor Scratches (surface scratch):
1. Clean area to be repaired thoroughly.
2. Use automotive polishing compound to remove surface scratches.
3. Apply wax to entire surface.
Repairing Deep Scratches (bare metal or primer showing):
1. Clean area to be repaired with rubbing alcohol or mineral spirits.
2. Use paint stick with factory-matched colors available from your authorized dealer to fill scratches. Follow directions included on paint stick for use and for drying.
3. Smooth out surface using an automotive polishing compound. Do not use power buffer.