Straight Belt Conveyor Maintenance and Adjustment — As Required
Belt Maintenance
- Check conveyor belt daily for proper tension and tracking.
-
NOTE: Belt side wear is normal if tracking is correct.
Belt will operate satisfactorily with up to 25.4 mm (1 in.) wore from sides.
Inspect belt lacing for wear of belt grip area and loosening hardware - Tighten loose nuts and peen end of lacing screw into nut slot as required.
Belt Adjustment
-
Tension
Belt tension should be just tight enough to prevent slippage—no tighter. If the “flats” on the conveyor drive belt are visible through the belt, tension is high enough.
-
Tracking
Empty spreader to check tracking by doing the following:
-
Make sure that machine engine is shut off. Set spinner speed to 0 rpm by placing solution pump switch in off position.
-
 CAUTION: Do not work near rotating spinners. Severe injury can
result from contact with moving parts.
CAUTION: Do not work near rotating spinners. Severe injury can
result from contact with moving parts.Make sure that the conveyor is shut off. Measure vertical distance from bottom of sill to conveyor in front of second stake from front. Measurement should be 7.62 cm (3 in.) on both sides of conveyor. Use front adjusting bolts to tension both sides of conveyor as necessary.
-
Verify that snubber pulley is secure and square. Measure from bearing block to rear of sill on both sides. Move bearing blocks in slotted holes as necessary to make measurements equal.
-
Run machine engine, place controller in manual mode (see Verify Feedgate Opening in Pre-Starting Checks section of this manual) and run conveyor at slow speed. Gradually increase speed (40—50 rpm) until unit tracking is visual. If problems occur, refer to next page.
-
CAUTION: Use great care to avoid entanglement with any moving
parts.

N97101-UN-28FEB12
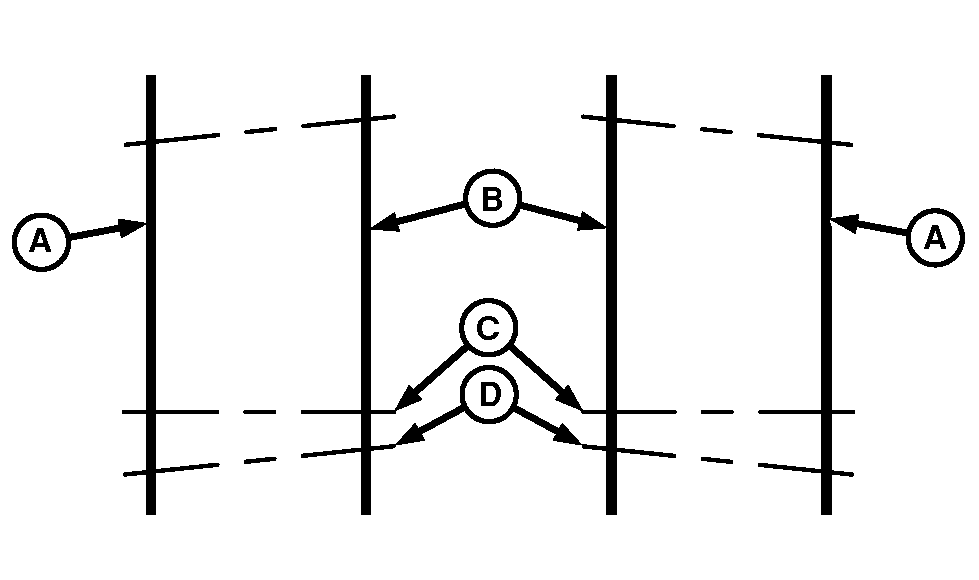
Problem 1
A - Idler Pulley, Belt Contact Side
B - Belt Contact Point
C - Snubber
D - Drive Pulley
A properly adjusted belt will either remain in a steady position centered on the pulley or more often will “wander” back and forth 6.35 mm (1/4 in.) to 127 mm (1/2 in.) across the pulley, but remain generally centered. The conveyor belt sides should not curl or scuff.Tracking problems and solutions
Improper tracking is usually due to three basic causes. These problems and their respective solutions follow:
-
Problem 1:
Belt tracks to one side, contacts side of conveyor. Contact is more severe at the front and may not quite touch at the rear.
-
Solution 1:
Tighten idler bearing at side in contact with belt. Make this adjustment one turn at a time. Operate conveyor 10—15 minutes at high speed to allow belt to react to the adjustment. Repeat if necessary.
N97102-UN-28FEB12
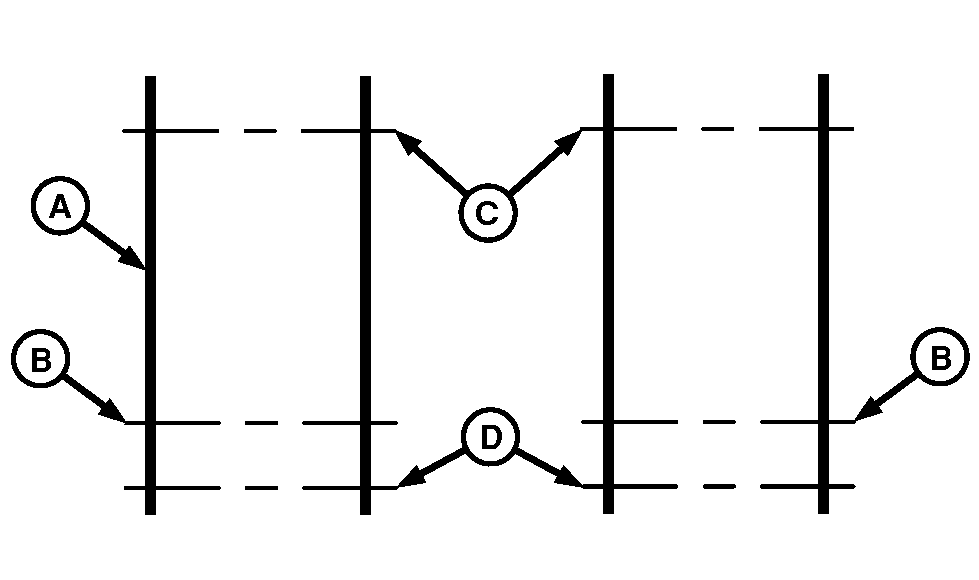
Problem 2
A - Belt Contact, Front
B - Belt Contact, Rear
C - Drive Pulley, Adjustment Side
D - Snubber
-
Problem 2:
Belt contacts one side at front and contacts other side at rear.
-
Solution 2:
If adjusting as in Problem 1 does not remedy the situation, adjustment of the drive pulley is necessary. Mark the position of the adjustment screw (right-hand side) on the side of the unit. Determine which illustration shows the problem to determine which direction the drive shaft should be moved. Loosen the adjustment screw to move the shaft forward; tighten the screw to move the shaft rearward.
NOTE: The illustration is exaggerated. Only move the adjustment screw 6.35 mm (1/4 in.) turn at a time after loosening the bolts holding the bearing. Usually 0.4 mm (1/64 in.) to 0.8 mm (1/32 in.) is all that is necessary. Retighten bearing. Operate conveyor for 10—15 minutes at a high speed to allow belt to react to adjustment. The problem should change to problem 1. Adjust as in problem 1 to track belt properly.
N97103-UN-28FEB12
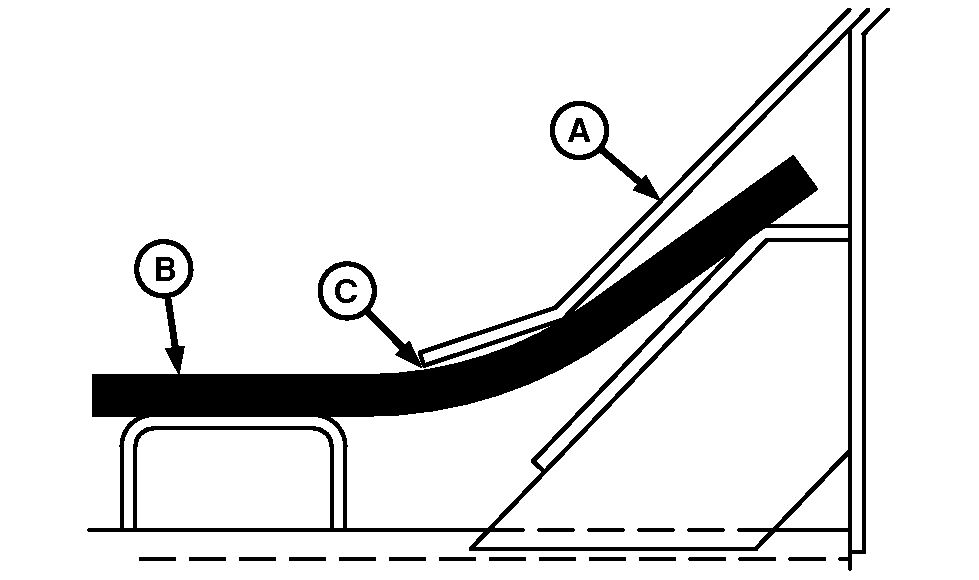
Problem 3
A - Belt Contact Point
B - Snubber, Low Side
C - Idler Pulley
D - Driver Pulley
-
Problem 3:
Belt contacts side as in problem 1, but contacts more heavily at a point approximately 0.91 m (3 ft.) from rear.
-
Solution 3:
Realign snubber pulley. Note the point or side of contact from the illustration. This side of the snubber is too low.
NOTE: This pulley moves up and down ONLY.
-
Loosen belt and raise or lower as necessary.
-
Loosen the two bolts holding the snubber bearing on the side to be adjusted after marking the old position.
-
Move approximately 1.6 mm (1/16 in.) at a time and retighten.
-
Retighten belt the exact number of turns previously loosened.
-
Operate conveyor 10—15 minutes to allow belt to react to adjustment.
-
Refer to problem 1 and readjust. If readjustment does not compensate, repeat.
If, after adjustment, the belt does not track properly, check the following.
-
Check for twisted spreader body. Shims must be placed between spreader cross-tubes and the mounting surface to eliminate any twist in the body structure.
-
Check for crowned Idler Pulley by placing a straight edge on the pulley. If properly crowned, the straight edge will contact the center pulley leaving 1.6 mm (1/16 in.) gap between the straight edge and both pulley ends. Replace pulley if crown is not present.
-
Check for lacing “squareness” by removing the belt. This should be done as a last resort. If the lacing is not square to the belt ends, contact your dealer for service.
-
Sight down the body under the belt shields. The only point which should come close to or slightly contact the belt, is the lowest point on the shield. If the belt contacts the shield firmly at any other point, tracking will be impossible and you should see your dealer immediately. Only your dealer can correct the situation.
Belt Shield
-
N97104-UN-28FEB12Belt Shield
A - Belt Shield
B - Belt
C - Proper Adjustment of Shield, Zero Gap
The belt shields along each side of the belt inside the unit should be just contacting the belt when the belt is properly adjusted and the unit is empty. - If a shield has clearance along its length, it can be moved down until it just contacts the belt by loosening the fastener bolts, allowing the shield to slide downward and tightening bolts.
- If the shield is tending to cut into the belt along its full length, loosening the bolts and raising the shield until it just contacts the belt will correct the problem.
- If the shield cuts the belt at one or more points or if it gaps at one or more points, it should be replaced.
Belt Removal and Replacement
NOTE: Two people are required for belt removal and replacement procedure.
-
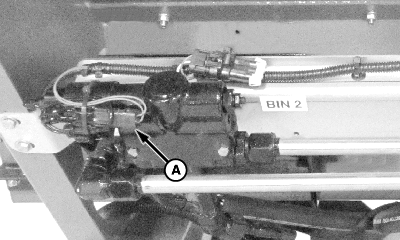
N101125-UN-14NOV12A - Connector
Disconnect connector (A) from spinner PWM valve to prevent spinners from running during procedure. -
N101378-UN-19DEC12A - Belt Shields
Remove belt shields (A), clean and repaint. -
Set conveyor speed to manual operation and select a slow speed so tracking is visual. (See Initial Setup in Operate System section of this manual.)
-
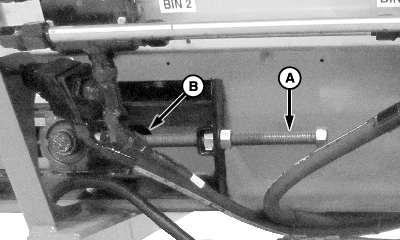
N101311-UN-18DEC12A - Idler Adjustment Bolt
B - Extreme Rear Position
Move front idler adjustment bolts (A) to extreme rear position (B). -
Shut down spreader.
-
Remove splice pin to separate belt splice.
-
Insert pin into one side of belt splice.
-
Attach winch to belt splice and remove belt.
NOTE: If splice pin cannot be removed, cut belt and remove by hand.
-
Using any suitable tool, remove any caked material from the drive pulley, snubber pulley, idler pulley and from inside frame channels. Clean and paint as required.
-
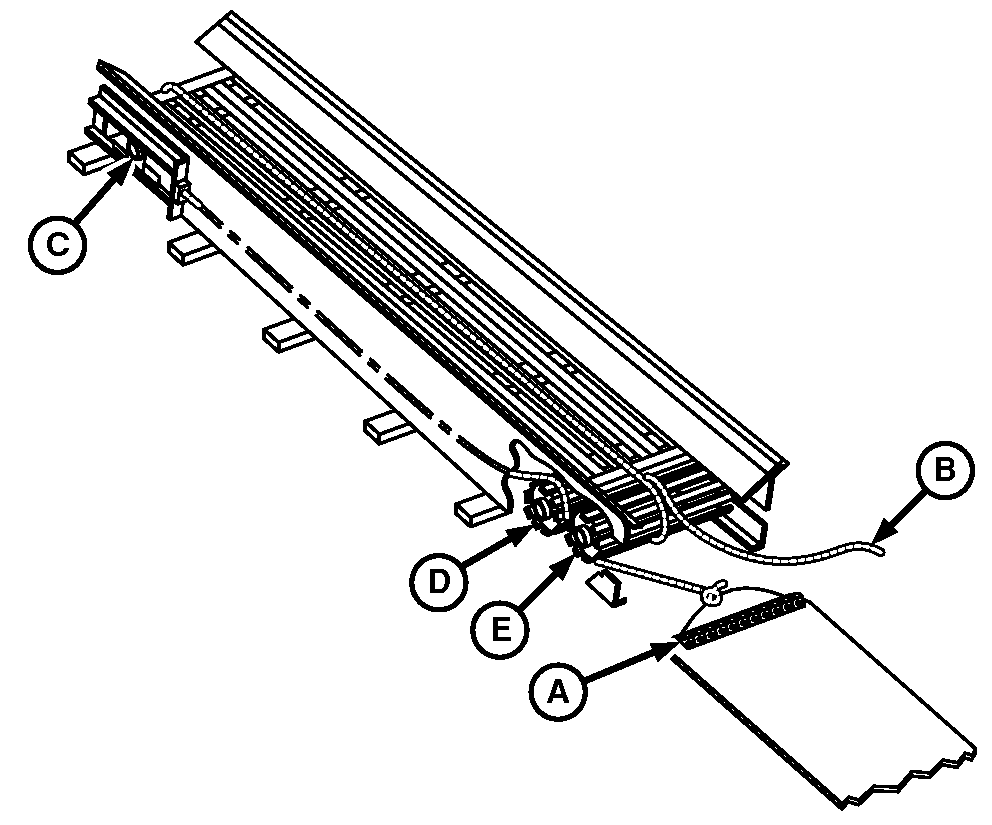
N97830-UN-10APR12A - Wire
B - Rope, 762—914.4 cm (25—30 ft.)
C - Idler Pulley
D - Snubber Pulley
E - Drive Pulley
Thread OLD splice pin through one end of new belt. Connect wire (A) to pin about 0.64 cm (1/4 in.) in from each side of the belt, forming a loop. -
CAUTION: Be sure that power is shut off before performing threading
operation.
Thread the rope (B) along the top of the belt channel, around the front idler pulley (C), over the snubber pulley (D) and under the drive pulley (E).
-
Tie end of rope under drive pulley to wire loop. Wrap other end once around drive pulley and out the rear.
-
CAUTION: Use extreme care to avoid entanglement! Someone must
stay at controls to stop conveyor instantly if required.
Use extreme care to avoid entanglement! Stay well back from drive pulley.
Start conveyor drive so drive pulley turns slowly. Pull on rope while another person feeds belt into unit from rear. Pull new belt under drive pulley, over snubber pulley, along frame channels, around front idler pulley and back to drive pulley.
-
N97832-UN-10APR12A - Lumber, 5.08 cm x 10.16 cm x 91.44 cm (2 in. x 4 in. x 36 in.)
Shut off all power and insert lumber under belt to support its weight.NOTE: Use three pieces of lumber to support belt weight.
-
Insert a plastic tube in each splice and across the full width of the belt and pull the two ends together at the center of the rear face of the drive pulley.
-
Insert the splice pin.
-
Snug belt up by tightening idler pulley until the edge of belt is approximately 5.08 cm (2 in.) above lower edge of sill lower flange on each side.
-
Adjust as needed for proper tracking. (See Belt Adjustment in this section.)
-
N101125-UN-14NOV12A - Connector
Connect connector (A) at spinner PWM valve.
|
CS12167,00004AE-19-20140327 |