Charge or Replace the Battery
 CAUTION:
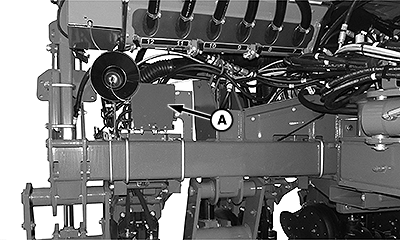
A91166-UN-22JUN16
SAR Battery Location
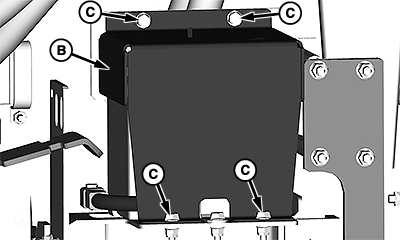
A91167-UN-22JUN16
A - SAR Battery Position
B - Battery Cover
C - Cap Screws
Avoid injury from electric shock or acidic burns. Use caution when servicing batteries.- Explosive mixtures of hydrogen gas are present within battery cells. Do not service or charge batteries in an area where open flames, sparks, or any other source of combustion is present.
- Avoid a short circuit or spark that results in an explosion. Use caution when using tools, wires, or metal objects near batteries. To prevent shorting out of batteries, wrap tools with vinyl tape.
- Remove all jewelry (watches, rings, bracelets) before servicing the electrical system or batteries.
- Always wear approved eye protection while servicing the vehicle. Wear a full face shield, rubber gloves, and rubber apron when servicing the batteries.
- Replace worn, damaged, or broken parts immediately.
- Wear rubber gloves before touching battery terminals, connectors, or wires that are not insulated.
- Avoid a short circuit or sparks that result in an explosion. Connect the battery wires properly.
- Battery electrolyte is poisonous and causes severe burns. Avoid contact with skin, eyes, or clothing.
ANTIDOTES for Electrolyte:
- EXTERNAL: Flush with water for at least 20 minutes. Call a physician immediately.
- INTERNAL: Drink large quantities of milk or water. Follow with a Magnesium Hydroxide Mixture "Milk of Magnesia"or vegetable oil. Call a physician immediately.
- EYES: Flush with water for at least 20 minutes and get prompt medical attention.
A visual inspection of the battery is intended to find and correct potential problems before more serious safety and operational concerns occur. A battery is a perishable item that requires periodic maintenance. Life of a battery is extended with a reasonable amount of care.
-
NOTE: For easiest access to work on the SAR battery, fold the planter into transport position.
Locate the SAR battery position (A). Battery position varies depending on the planter.
-
Remove cap screws (C) and the battery cover (B).
-
Avoid system malfunctions. Any damage to the battery case or terminals are possible signs that the terminal connections are loose. A visual inspection of the batteries must be performed before a charger is placed on the battery.
Visually inspect the battery for the following:
- Discolored or melted terminal boots.
- Burn spots.
- Dirt or corrosion on or around the battery terminals.
- Damage to the battery case or terminals.
- Leakage of electrolyte.
- Broken or frayed cables.
-
A91166-UN-22JUN16SAR Battery Location
A91167-UN-22JUN16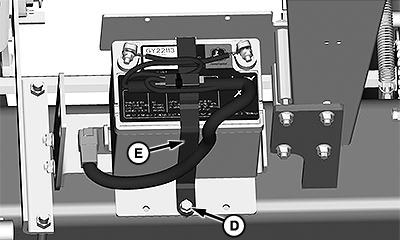
A91168-UN-22JUN16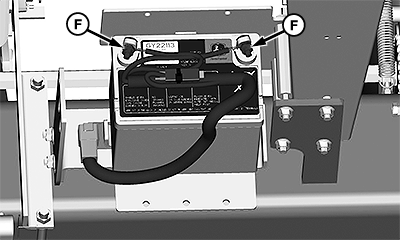
A91169-UN-22JUN16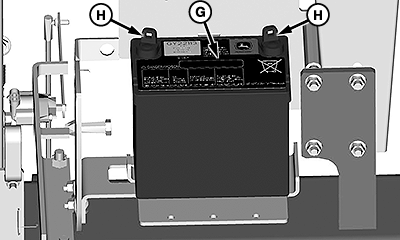
A91170-UN-22JUN16A - SAR Battery Position
B - Battery Cover
C - Cap Screws
D - Cap Screw
E - Retention Strap
F - Cables
G - Battery
H - Terminals
If the battery (G) requires cleaning, do the following:-
Locate the SAR battery position (A). Battery position varies depending on the planter.
-
Remove cap screws (C) and the battery cover (B).
-
Remove the cap screw (D) and retention strap (E) from the battery.
-
Remove the battery cables (F).
-
Clean the battery terminals (H), battery cables, and battery compartment with a solution of one-part baking soda to five parts water. If more cleaning is required on the battery connections, use a wire brush.
-
Rinse all parts with clean water and allow to dry.
-
Paint rust or corrosion affected areas with acid resistant paint.
-
-
To determine if the battery needs charging, check the voltage level on the battery terminals (H) with a multimeter.
- If battery voltage is 11—12 V, no extra charge is needed.
- If battery voltage is 0—10 V, charge the battery.
-
If the battery (G) requires charging, do the following:
-
Remove the battery cables (F).
-
Charge the battery.
-
Install the cables and cover.
-
-
If the battery requires replacement, do the following:
-
Remove cap screws (C) and the battery cover (B).
-
Remove the cap screw (D) and retention strap (E) from the battery.
-
Remove the battery cables (F).
-
Remove the battery (G) from the battery tray.
-
Replace with the proper battery.
-
Install the cables, strap, hardware, and cover in reverse order of removal.
-
|
WP29706,0000A2A-19-20160628 |