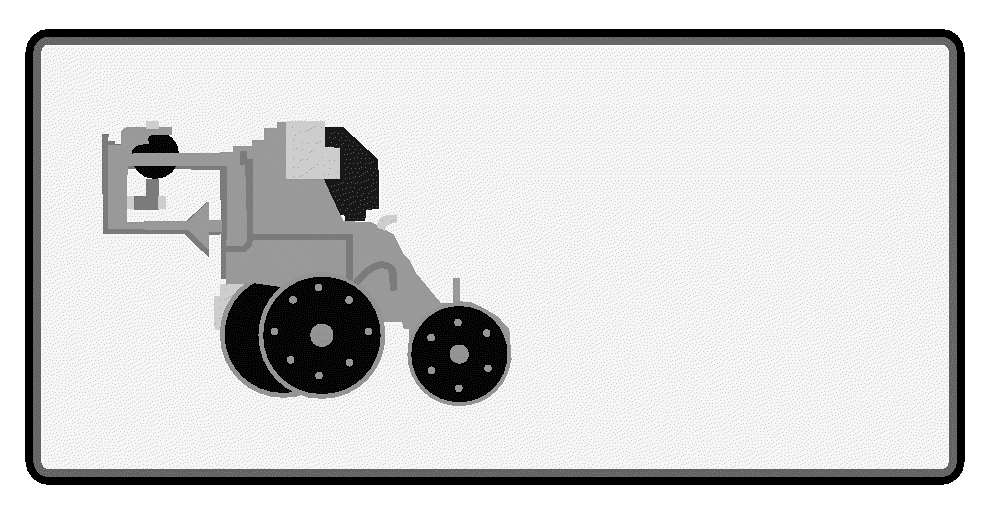
Individual Row Hydraulic Downforce (IRHD) Operation
A79863-UN-29JAN14
Planter Button
A88826-UN-15DEC15
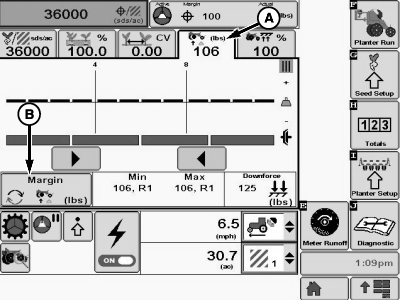
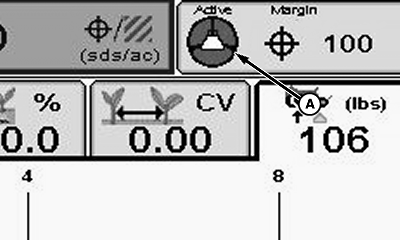
Margin Information Shown
A88999-UN-15DEC15
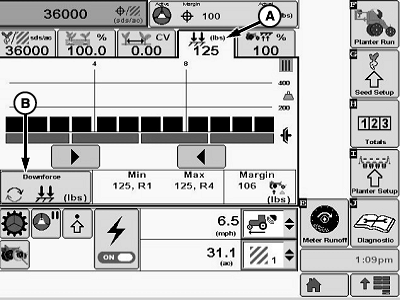
Downforce Information Shown
A - Downforce Tab
B - Margin / Downforce Toggle Button
IMPORTANT: To keep hydraulic pump pressure high enough to support IRHD operation, always place the frame control SCV in continuous detent.
Select the Menu >> Planter button.
When the downforce tab (A) is selected, the downforce at a glance screen is displayed. When the toggle button (B) is selected to show the margin, the chart displays the downforce margin by row and the tab (A) displays the average margin for the whole planter. When the toggle button (B) is selected to show the downforce, the chart displays the applied downforce by row and the average applied downforce on tab (A).
The gauge wheel downforce sensor measures the amount of load that the gauge wheels are carrying as the row units move through the field. The load on the gauge wheels changes frequently when the planter is in motion and is displayed as the margin on the display.
The Downforce margin is the amount of extra downforce applied to the row units, over and above what is required for the opener disks to penetrate the soil and achieve the full planting depth. The extra downforce comes from the weight of the row unit and meter, the weight of seed in the seed hoppers, the pneumatic downforce system, or the external downforce springs.
IMPORTANT: Always perform an in-field check BEFORE adjusting the target downforce margin. Once the depth and the seed furrow have been verified, the target margin is adjustable to achieve the correct depth.
A target downforce margin must be entered based on the operator's judgment of the planting conditions. Refer to Alarms and Limits Setup page in the SeedStar 3 Setup section. Set the downforce margin high enough to create a defined seed furrow but not so high that the side wall of the furrow is compacted.
The high and low margin alarm set points are defined on the Alarms and Limits Setup Page. The margin alarm activates if the average downforce margin goes above or below the target margin by the amount entered on the Alarms and Limits Setup Page.
The center line of the Downforce Margin chart is the target margin. The Downforce at a Glance bars above the center line indicates the downforce margin above the target set point. The bars below the center line indicate the downforce margin below the target set point. A row that displays the low margin for an extended period, indicates that the system is maxed out and unable to apply additional downforce to that row. Another indication for displaying the low margin for an extended period is the frame does not have sufficient weight to keep the row in the ground. Check the applied downforce by selecting the toggle button (B).
IMPORTANT: To ensure the downforce sensor accuracy, zero the sensors annually or whenever the sensors do not read 0 lbs. when the planter is raised.
A89059-UN-16DEC15
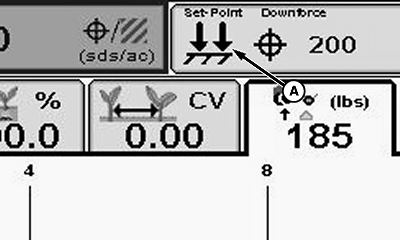
A - Set-Point Downforce Icon
The Set-Point Downforce mode allows the operator to adjust the force in the hydraulic actuator manually through the display in the cab. The data from the pressure sensors on the hydraulic actuators is sent to the Planter Master Controller (PMC) and then displayed as the downforce on the monitor.IMPORTANT: When using the Set-Point mode, the same downforce is applied to all the row units and will not adjust independently.
Icon (A) indicates the Set-Point downforce mode. The operator selects a desired downforce target that produces the most optimal seed furrow. When the soil conditions change the operator must increase or decrease the downforce to maintain the target margin, depth control, and avoid compacting the furrow.
The data from the gauge wheel sensors is sent to the PMC and then displayed as the downforce margin on the monitor.
IMPORTANT: Always perform an in-field check BEFORE adjusting the target downforce margin. Once the depth and seed furrow have been verified, the target margin is adjustable to achieve the correct depth.
A89060-UN-16DEC15
A - Active Downforce Icon
The Active Downforce system automatically adjusts the force in the hydraulic actuators based on the soil condition information gathered from the gauge wheel sensors. The data from the gauge wheel sensors is sent to the PMC and then displayed as the downforce margin on the monitor.Icon (A) indicates the active downforce mode. The operator selects a desired target margin (the amount of extra downforce applied to the row unit, over and above what is required for the opener disks to penetrate the soil and achieve the full planting depth). The Active Downforce automatically monitors and adjusts the pressure in the hydraulic actuators to ensure that the actual margin is equal to the target margin on each row independently. When the soil conditions change, the active downforce system automatically adjusts the downforce to achieve the target margin.
IMPORTANT: Always perform an in-field check BEFORE adjusting the target downforce margin. Once the depth and seed furrow has been verified, the target margin is adjustable to achieve the correct depth.
A73458-UN-03NOV11
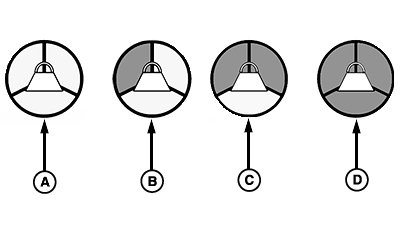
A - No Activity
B - Sensor Diagnostic Check OK
C - Wheel Motion Sensor Active
D - Planter Lowered (System Active)
Three requirements must be met for the Active Downforce system to function properly.- The sensor diagnostic check is OK.
- The wheel motion sensor is active and the planter must be moving at a least 1.6 km/h (1 mph).
- The planter must be lowered in the planting position.
Initially, the Active Downforce icon is empty. As the three requirements are met, the corresponding segments of the icon turn from blank to gray. After all the requirements are met, the entire icon will turn green, indicating that the IRHD system is enabled, and active.
Individual Row Hydraulic Downforce—Active Mode
A89056-UN-16DEC15
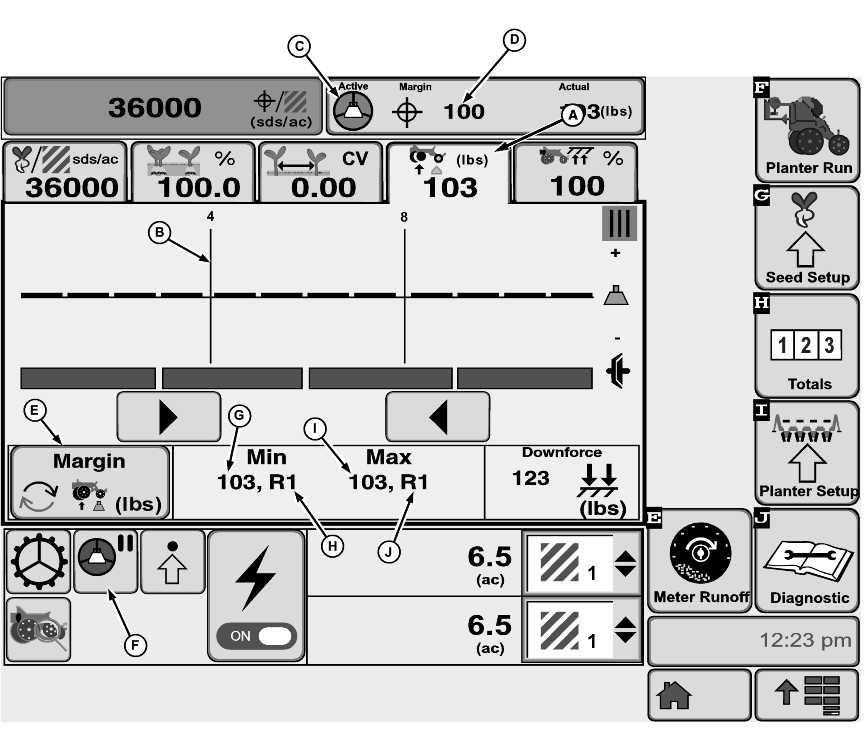
A - Downforce Tab and Icon
B - Downforce Margin Graph
C - Active Downforce Icon
D - Target Downforce Margin
E - Margin / Downforce Toggle Button
F - Active IRDF Pause Button
G - Low Margin Value
H - Low Margin Row
I - High Margin Value
J - High Margin Row
(A) Downforce tab and icon.
(B) Downforce margin bar graph.
(C) Select the downforce icon to open the target margin input screen.
(D) Target downforce margin.
(E) Margin / downforce toggle button
(F) Pause button allows the operator to disable the individual row hydraulic downforce system temporarily for a pre-determined amount of time. Time duration is set in the Alarms and Limits Settings page.
(G) Low margin value displays the lowest downforce margin value available with the gauge wheel sensors.
(H) Low margin row displays the row unit associated with the lowest downforce margin.
(I) High margin value displays the highest downforce margin value available with the gauge wheel sensors.
(J) High Margin row displays the row unit associated with the highest downforce margin.

A88818-UN-15DEC15
A - Actual Margin
B - Target Margin Input Box
C - Increase and Decrease Buttons
D - Enter Button
(A) Actual margin displays the average margin of all the gauge wheel downforce sensor data.Setting Target Margin
- Activate the margin target button to expand the target margin input area.
- Set the target margin by using the target margin input box (B) or the increase and decrease buttons (C).
- When complete, select the enter button (D).
In the active mode, the system automatically makes individual row hydraulic downforce adjustments to compensate for the variations in the soil to maintain the target margin.
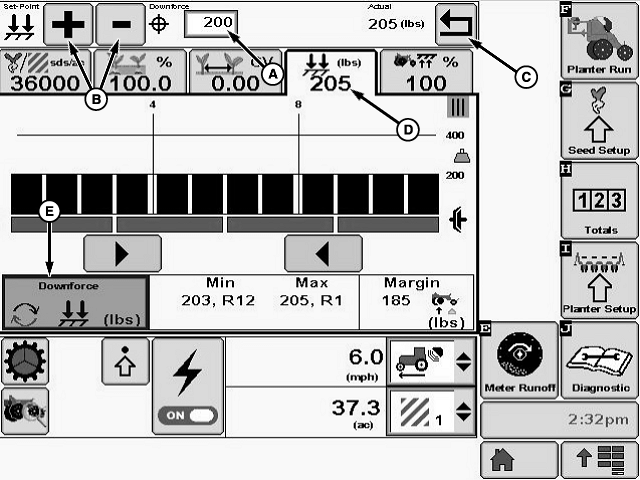
Individual Row Hydraulic Downforce—Set-Point Mode
A89058-UN-16DEC15
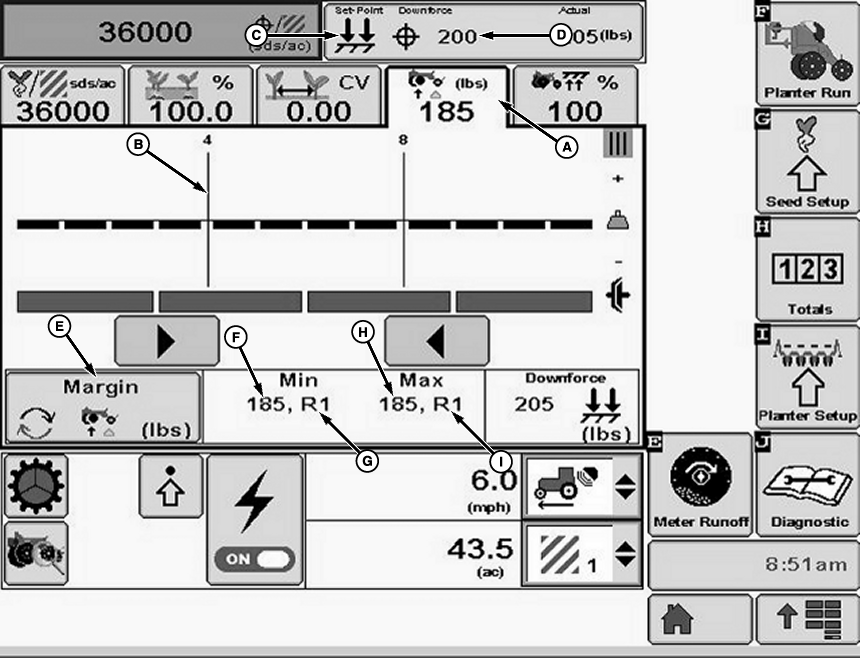
A - Set-Point Downforce Tab and Icon
B - Downforce Margin Graph
C - Set-Point Downforce Icon
D - Target Downforce Margin
E - Margin / Downforce Toggle Button
F - Low Margin Value
G - Low Margin Row
H - High Margin Value
I - High Margin Row
(A) Set-Point downforce tab and icon.
(B) Downforce margin bar graph.
(C) Select the downforce icon to open the target downforce screen.
(D) Target downforce.
(E) Margin / downforce toggle button
(F) Low margin value displays the lowest downforce margin value available with the gauge wheel sensors.
(G) Low margin row displays the row unit associated with the lowest downforce margin.
(H) High margin value displays the highest downforce margin value available with the gauge wheel sensors.
(I) High Margin row displays the row unit associated with the highest downforce margin.
A89057-UN-16DEC15
A - Target Downforce Input Box
B - Increase and Decrease Buttons
C - Enter Button
D - Actual Downforce
E - Margin / Downforce Toggle Button
Setting Target Downforce- Activate the downforce target button to expand the target downforce input area.
- Set the target row unit downforce by using the target downforce input box (A) or the increase and decrease buttons (B).
-
When complete, select the enter button (C).
The actual downforce (D) displays the average downforce pressure of all the gauge wheel downforce sensor data.
- Select the toggle button (E) to view the applied downforce or Margin chart.
|
WP29706,0000B1B-19-20161219 |