Vacuum Meter Inspection and ServiceAnnually inspect seed meter for wear and chemical/seed treatment build-up. |
720012FFOMSE,F3 -19-18MAY93-1/6 |
|
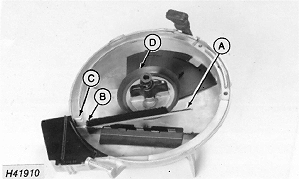
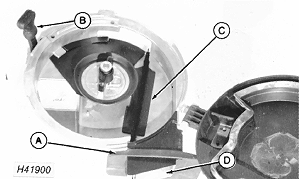
1. Check brush (A) for gaps. If gaps are big enough to allow seed to pass through, replace brush. NOTE: When replacing brush: Insert narrow end (B) into slot first. Snap brush into slot until it contacts side of meter housing (C). 2. Replace hub seal (D) if cracked or weathered. 3. Check seed disks for wear in the following areas. Replace as needed. |
|
720012FFOMSE,F3 -19-18MAY93-2/6 |
|
|
|
|
|
|
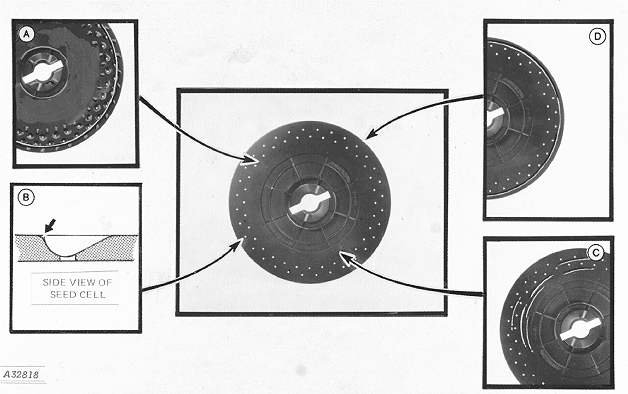
A small amount of wear around the perimeter of the disk (A) is acceptable. If wear occurs, check to see if seed can leak through the gap between the disk and housing. Seed leakage may be eliminated by adjusting meter hub. See ADJUSTING METER HUB in Preparing The Vacuum Meter Unit section. Inspect the individual seed cells. The abrasion of the seed may cause wear of the sharp corners (B), which increases cell size. (This could result in over-population when planting small seed or under-population when planting large seed). Replace the seed disk if the size of cell is significantly increased and field checks determine a reduction in accuracy. |
Small grooves or scratches are acceptable on the vacuum side of seed disk (C). Wear around the perimeter of the disk (D), is acceptable up to an approximate depth of 1.0 mm (3/64 in.). NOTE: Before replacing seed disks, perform a field check to determine if the disk is metering seeds accurately. (See Checking Seed Population section.) It is not necessary to replace the seed disk if its metering performance is satisfactory. |
720012FFOMSE,F3 -19-18MAY93-3/6 |
|
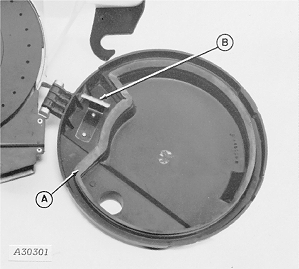
4. Replace vacuum seals (A) if seed disks are replaced or when large cracks/wear areas are visible. NOTE: If vacuum seals are replaced, spray Slip Plate on used seed disks. (See Lubrication section.) New seed disks are factory lubricated. 5. Replace seed disk wiper (B) if edge of wiper is grooved or excessively worn.
|
|
720012FFOMSE,F3 -19-18MAY93-4/6 |
|
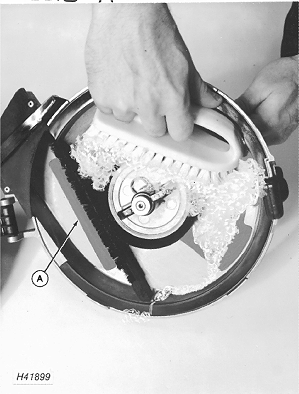
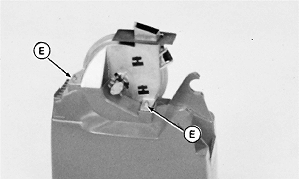
6. Annual cleaning of vacuum meter and seed disks is recommended. Use mild detergent and a soft brush. IMPORTANT: Use precautions as recommended by chemical manufacturers when handling parts coated with seed treatments. Use proper skin, eye and respiratory protection. NOTE: Thoroughly clean the seed disk cell area and remove any excessive treatment buildup behind the plastic (A) in the vacuum meter housing.
|
|
720012FFOMSE,F3 -19-18MAY93-5/6 |
|
7. Replace the vacuum meter dust cover (A) if it does not fit properly, or is cracked or weathered. 8. Inspect the rubber handle (B) and replace if cracked or broken. 9. Inspect plastic insert (C) and chute cover (D) and replace if worn. 10. Inspect flex-drive assembly to make sure drive coupler pivots freely. Disassemble, clean and lubricate with molybdenum disulfide grease if flex drive does not pivot freely. 11. Assemble vacuum meter assembly onto hopper and attach meter with nuts (E).
|
|
720012FFOMSE,F3 -19-18MAY93-6/6 |