Verify Metering-Stationary MethodIMPORTANT: Ground speed sensor and tank meters must be calibrated prior to doing field check. Refer to AIR CART SET-UP MODE-CALIBRATE TIRE SENSOR in Operating Machine-Monitor Setup section and AIR CART SET-UP MODE-CALIBRATE METERS in Operating Machine-Monitor Operation section. 1. Determine target application rate for the product in use. 2. Check that existing meter segments can deliver product at desired rate. 3. Make sure there is sufficient product in tank to collect a measurable sample. Product should cover all meter inlets and not be heaped to one side. Half-width disconnect handles must be fully down for accurate rate verification. 4. Meter cartridge assembly must be full of product at the start of the procedure. IMPORTANT: With variable rate option, for the correct transmission setting and rate desired, seeding must take place for a short distance BEFORE THE CHECK in order to let the variable rate define a transmission setting. 5. Set transmissions to the recommended transmission setting given at the end of each tank calibration. |
AG,OUO6023,1156 -19-21JUL00-1/8 |
|
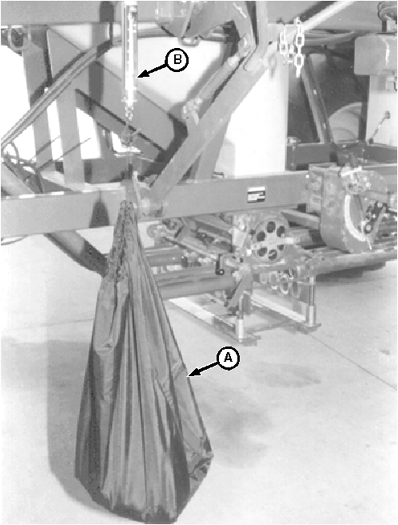
6. Hang empty bag (A) from scale (B) and reset scale to "0" (zero) by turning knob on top of scale. Setting scale to "0" (zero) will ensure that measured weight is of collected sample only, and does not include the weight of the bag.
|
|
AG,OUO6023,1156 -19-21JUL00-2/8 |
|
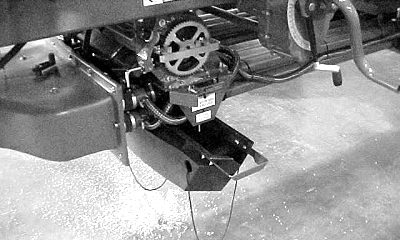
7. Make sure independent meter clutch (A) is electrically or mechanically engaged during rate verification. Clutch is engaged when solenoid lever is up and out of outer member slot.
|
|

AG,OUO6023,1156 -19-21JUL00-3/8 |
|
8. Install catch pan. Remove cover plate from bottom of manifold. Slide collection pan, squared end first, in from left hand side of manifold using the provided rails. Move slide to bottom shoot position (Stationary Double-Shoot only). NOTE: Before returning to normal operation, ensure slide on stationary double-shoot manifold is in proper position. |
|
AG,OUO6023,1156 -19-21JUL00-4/8 |
|
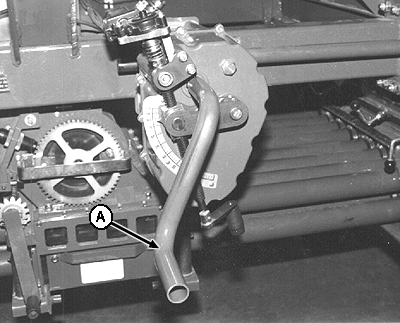
IMPORTANT: Turning crank handle clockwise will result in an inaccurate rate verification. IMPORTANT: For Stationary Double-Shoot Manifold, turning crank handle with slide in top-shoot position will result in an inaccurate rate check and can result in difficult operation or damage of the slide assembly. NOTE: On two-tank carts, crank handle is factory installed on front transmission. On carts with optional middle tank, crank handle is installed on middle-tank transmission. Leave crank handle in factory installed position to avoid contacting frame or other components during rate verification. 9. Noting starting point, turn crank handle (A) counterclockwise, counting each full 360° revolution. All transmissions and driveshafts turn when crank handle is turned. NOTE: Check product level occasionally; do not overfill pan. Depending on product displacement, 100 full crank turns will normally produce a good measurable sample. For low displacement products, or when yellow meter segments are used, more crank turns may be needed to obtain a measurable amount of product. 10. Remove collection pan and empty contents into collection bag. |
|
AG,OUO6023,1156 -19-21JUL00-5/8 |
|
11. Hang filled collection bag (A) from scale (B) and weigh sample. 12. Use the following formulas and examples to calculate application rate. IMPORTANT: Rate calculation is correct only if the proper sprockets are used for row spacing and rear tire. Refer to charts below. NOTE: For 38 cm (15- in.) and 76 cm (30 in.) rows, use 19 cm (7.5 in.) row spacing in calculation. NOTE: Select K-Factor based on tire size and "R" rating from the following chart:
NOTE: The following formulas are designed for both metric and standard computations. The two factors needed to calculate application rate are arrived at separately. |
|
AG,OUO6023,1156 -19-21JUL00-6/8 |
|
· Weight Factor: Multiply weight kg (lbs) of collected sample by the appropriate K-Factor by row spacing in cm (inches) to arrive at weight factor. Select K-Factor based on tire size and "R" rating. Refer to chart on previous page. Weighed Sample kg (lb) x K-Factor for cm (K-Factor for in.) x Row Spacing cm (in.) EXAMPLE: 5.74 kg (12.65 lb) x 358.6 (1519) x 30.5 cm (12 in.) = 62780.1 (230584.2) · Area Factor: Multiply crank turns used to collect sample by seeding tool width to arrive at area factor. Machine Width (ft) x Crank Turns EXAMPLE: 12.5 cm (41 ft) tool width x 80 turns = 1000 (3280) · Application Rate kg/hectare (lb/ac): Divide weight factor by area factor to calculate application rate in kg/hectare (lb/acre). Application Rate kg/hectare (lb/acre) = Weight Factor ÷ Area Factor. EXAMPLE: 62780.1 (230584.2) ÷ 1000 (3280) = 62.8 kg/hectare (70.3 lb/ac) 13. If calculated application rate is above or below target rate: NOTE: See your John Deere dealer for assistance, if desired.
|
AG,OUO6023,1156 -19-21JUL00-7/8 |
|
14. Perform rate verification again to see that corrective action had the desired results and the application rate meets requirements. |
AG,OUO6023,1156 -19-21JUL00-8/8 |