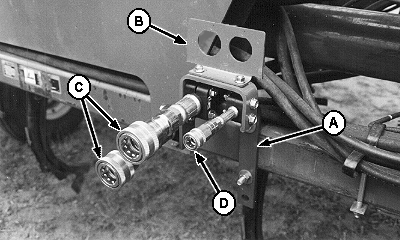
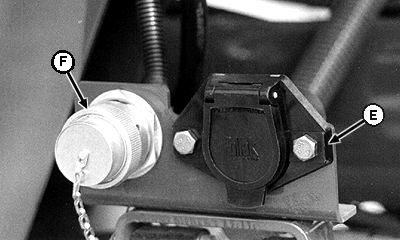
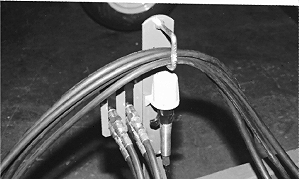
Install Tillage Bracket, Hoses and Harnesses-Tow-Behind CartNOTE: Hose and harness connection bracket is installed on rear bar of seeding equipment, inside of the hitch brackets. Put bracket on the same side as hose/harness support tube is installed on hitch for convenient access by the operator. 1. Install hose bracket (A) on rear bar using U-bolt and M16 flange lock nuts. 2. Attach harness connection plate (B) using M10 x 16 cap screws and nuts. 3. Attach pressure and return hoses (C) (with female disconnect couplers) to inside and outside of bracket using two-piece clamps, M8 x 60 cap screws and flange lock nuts. 4. Attach drain hose (D) (with female quick disconnect coupling) to inside of bracket using two-piece clamp, M8 x 60 cap screws and flange lock nuts. 5. Route hoses along seeding frame, onto hitch, placing tractor hose ends in storage slots. Retain hoses away from moving parts using tie straps. 6. Attach cart power harness (E) (7-terminal plug) and CAN communications cable (DEUTSCH ™ connector (F) to connection plate. IMPORTANT: Run harness and cable where they will not be pinched, pulled or snagged by moving parts during normal operations. 7. Route harness and cable along seeding frame, onto hitch, placing tractor ends in storage position. Retain harness and cable away from moving parts using tie straps. 8. Route power harness seeding lighting leads to right-hand and left-hand sides and attach to amber warning and red tail lights. Retain lighting leads with tie straps. |
|
|
DEUTSCH is a trademark of Deutsch Co. | AG,OUO6023,1248 -19-21JUL00-1/2 |
|
9. Refer to Attaching and Detaching Section, make all connections to tractor and perform fit and function checkout. If fan motor does not turn in response to control, hose connections are reversed and need to be corrected. |
AG,OUO6023,1248 -19-21JUL00-2/2 |