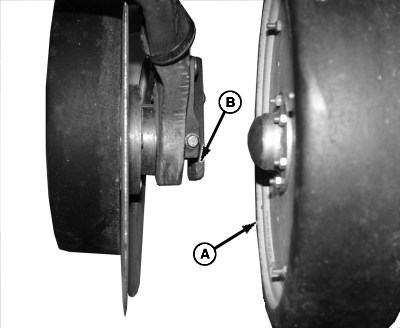
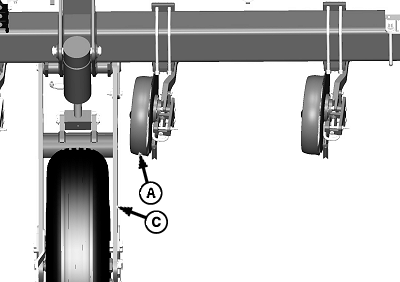
Align Disk OpenerIMPORTANT: Avoid crop injury. Inspect fertilizer opener depth and offset from seed furrow before operation. Fertilizer openers are set at a nominal distance off of the seed furrow at the factory. Verify fertilizer opener offset on every row before operating the planter. Improperly placed fertilizer has the potential to cause crop injury, depending on fertilizer product and application rate. Discuss fertilizer placement with the fertilizer supplier to determine the optimum offset for the rate and product applied. IMPORTANT: Avoid machine damage. Perform duplicate adjustments to opener alignment on both sides of the machine. Use caution when folding the machine the first time after adjustments. Fold machine very slowly to ensure fertilizer openers do not contact anything. IMPORTANT: Adjustment ranges vary according to opener location. See table below for recommended adjustment ranges. Any fertilizer opener alignment change made on one side of the machine must be exactly duplicated on the opposite side of machine. This must be done to prevent openers from contacting each other when folding. Use caution when raising, lowering, and folding the machine for the first time after any adjustment to fertilizer opener alignment. Make sure depth gauge wheels (A) do not hit opener castings (B) on opposite side of machine when folded or contact wheel modules (C) throughout full range of motion during operation. |
|
OUO6435,0001F98 -19-06AUG07-1/3 |
|
||||||||||||||||
OUO6435,0001F98 -19-06AUG07-2/3 |
|
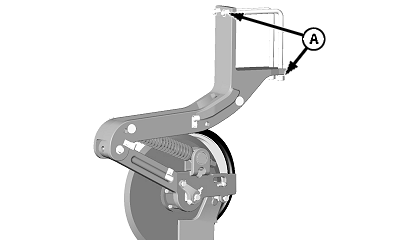
1.
To change alignment of fertilizer opener, loosen L-bolt nuts (A) and slide opener to right or left until opener disk is at desired location.
2. Snug L-bolt nuts (A) until opener is square with and touching the bottom of tubular frame. Tighten L-bolt nuts (A) to specification. Specification
|
|
OUO6435,0001F98 -19-06AUG07-3/3 |