Attaching Machine to Tractor (With Quick-Coupler)
IMPORTANT: Before attaching machine to tractor, be sure hitch pins and spacers are assembled to match tractor hitch configuration. See POSITIONING ROCKSHAFT HITCH PINS in Preparing the Machine section.
-
Set the hitch load/depth control to “position” to prevent unexpected hitch movement. See Preparing the Tractor section.
-
 CAUTION: Do not stand between tractor and machine unless tractor
transmission is in “PARK”.
CAUTION: Do not stand between tractor and machine unless tractor
transmission is in “PARK”.NOTE: Place rockshaft control lever fully forward when operating in the field. This will allow machine to follow ground contours.
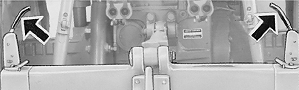
R29519-UN-09FEB9050—60 Series Tractors Illustrated
Raise both latch control levers. -
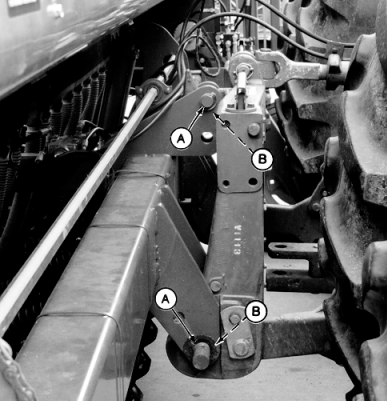
A41368-UN-29AUG97A - Hitch Pins
B - Hooks
Lower rockshaft to allow quick-coupler hooks to pass under mast pin and hitch pins (A). -
Back tractor to machine; raise rockshaft to engage hitch pins in hooks (B).
-
Push both latch control levers down to lock machine to quick-coupler.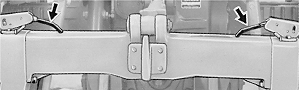
R29521-UN-09FEB90 -
CAUTION: Escaping hydraulic fluid under pressure can cause bodily
injury. Place SCV lever in FLOAT and stop tractor engine.
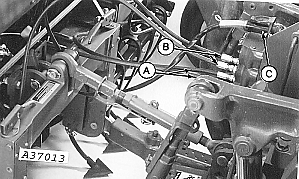
A37013-UN-06JUN95A - Hydraulic Downforce Hoses
B - Marker Hoses
C - Seven-Pin Harness
Attach hydraulic downforce hoses (A). -
Attach marker hydraulic hoses (B).
-
Connect warning lamp seven-pin harness (C) to tractor outlet.
-

A44890-UN-05MAY98
A44891-UN-05MAY98A - Parking Stand
B - Pin
Raise parking stand (A) by removing lock pin and pin (B). -
Raise machine slowly and check for any interferences. Lower machine to ground and make any necessary adjustments.
|
OUO6074,00004C8-19-20020201 |