Change Row Spacing From 76 cm (30 in.) To 38 cm (15 in.) DB60 47 Row
Check List for Following Procedure:
□ Drawbar in center position.
□ Remove seed from CCS tanks and row units.
□ Remove and install correct seed disks.
□ Manually unlock and lower rear rank row units.
□ Connect meter drives on rear rank row units.
□ Remove yellow plugs from all rear rank row units (vacuum and seed delivery hoses).
□ If equipped, set pneumatic pressure on rear rank rows.
□ Adjust vacuum level.
□ Adjust CCS tank pressure.
□ Configure seed monitor to read all rows.
□ Adjust seed population.
□ Adjust markers to proper length.
-
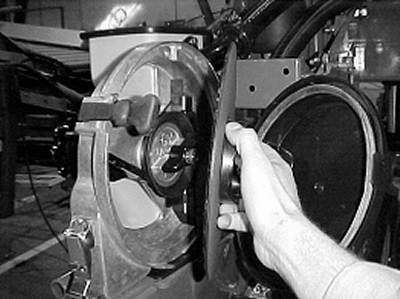
A50391-UN-26SEP02Seed Disk
Drawbar hitch in center position. -
Empty seed from all row unit meters. See CLEAN OUT PRO-SERIES XP™ SEED HOPPERS AND METERING UNITS in Operate Machine section.
-
Clean out CCS tanks. See CLEANING OUT CCS TANKS in Pro Series XP CCS Seed Delivery section.
-
Install identical seed disks in all meters.
-
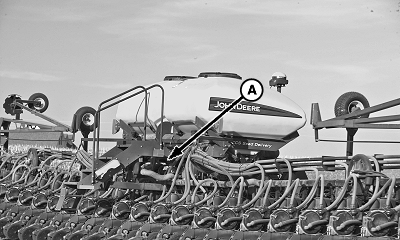
A62715-UN-24JUN08A - Location
Remove row unit lock-up bar from storage location (A) under rear CCS tank steps. -
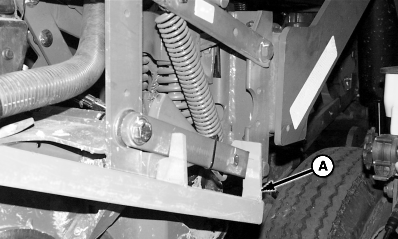
A51033-UN-08NOV02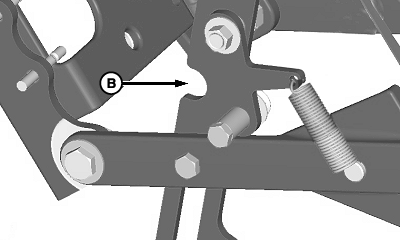
A60505-UN-26JUL07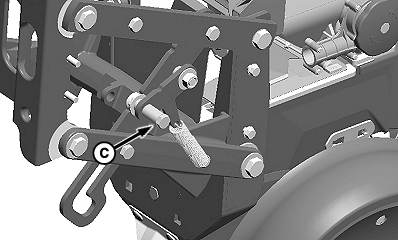
A60517-UN-26JUL07A - Lock-Up Bar
B - Notch
C - Lock-Up Latch
Place row unit lock-up latch (C) in notch (B) as shown. -
NOTE: On machines with the rear hitch option, there is not enough clearance for lock-up bar (A) to attach to row unit nearest hitch. Extend drawbar cylinder and slowly lower frame until remaining row units unlocks.
Unlock row units on rear rank using lock-up bar (A) as shown.
-
Machines with rear hitch, raise hitch and slowly lower frame until row units are at full length of travel.
-
Raise machine and confirm row units are in unlocked position.
-
Engage meter drive on all rear rank row units. See ENGAGE METER DRIVE in Operate Machine section.
-
NOTE: Save all vacuum and seed delivery plugs for future use.
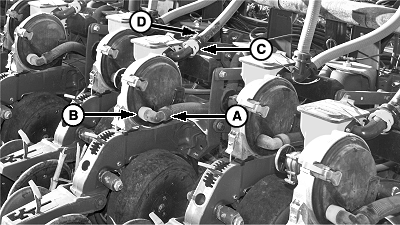
A62717-UN-24JUN08A - Vacuum Hose
B - Plug
C - Seed Delivery Hose
D - Plug
Remove vacuum hose (A) from row unit meters. Remove plug (B) from meter vacuum ports, and reinstall vacuum hoses to meters. -
Remove seed delivery hose (C) from row unit meters. Remove plugs (D) from meter inlets and reinstall seed delivery hose to meters.
-
A50391-UN-26SEP02Seed Disk
Install proper seed disk in rear rank row units. -
Pressurize all rows. (See INTEGRATED PNEUMATIC DOWN FORCE in your SeedStar 2™ and SeedStar XP™ Monitor Operator’s Manual.)
-
Reset vacuum level.
-
NOTE: See your SeedStar™ Monitor Operator's Manual.
Change monitor settings to match number of rows planting.
- Select Menu >> Planter button >> Rates softkey >> Select crop name for crop to be planted, and check appropriate check box for number of rows planting.
-
Make necessary adjustments to front rank row units for correct seed placement and seed trench closing.
-
Adjust marker to correct length for desired row spacing. See ADJUST MARKERS in this section.
|
OUO6064,0000478-19-20110419 |