Bleeding the Brakes (6820, 6920 and 6920S Tractors)
NOTE: To avoid oil foaming while bleeding, the procedure should not be started after fast driving, working with hydraulic implements or carrying out hydraulic tests. After such operation the tractor should be allowed to stand for one hour to allow the oil to lose any accumulated foam. Bleeding points: Without trailer brake: 1.
Left rear brake
With hydraulic trailer brake: 1.
Left rear brake
With air brake system: 1.
Trailer control valve, rear bleed screw
With air brake system and FWD with brake: 1.
Left front brake
With hydraulic trailer brake and FWD with brake: 1.
Left front brake
|
 CAUTION:
Always follow the steps described here precisely. This is the only way of assuring the tractor brakes have been correctly bled.
CAUTION:
Always follow the steps described here precisely. This is the only way of assuring the tractor brakes have been correctly bled.
OU12401,0000961 -19-01MAY01-1/3 |
|
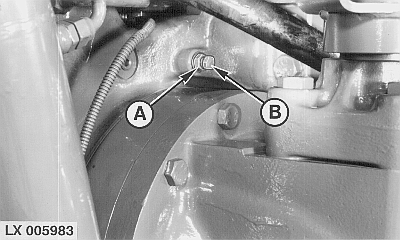
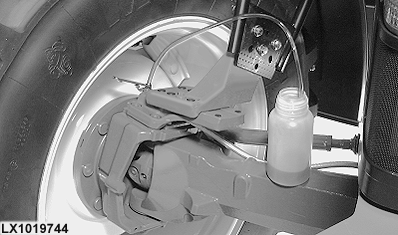
Bleeding procedure: 1. With the engine running, turn the steering wheel slowly and evenly two or three times from left full lock to right full lock and back again. This fills the brake valve housing via the steering valve return line. Shut off the engine.2. Tractors without trailer brake: On both rear brakes, slacken off lock nut (A) and open bleed screw (B) by one-and-a-half turns. Tractors with hydraulic trailer brake: On the left-hand rear brake, slacken off lock nut (A) and open bleed screw (B) by one-and-a-half turns. Slide a transparent bleed tube over the bleed screw on the trailer brake valve. Put the other end of the tube in the filler neck. Open the bleed screw by half a turn. Tractors with air brake system: Slide two transparent bleed tubes over the bleed screws. Place the other ends of the two bleed tubes in the oil filler neck. Open the bleed screws by half a turn. Tractors with FWD with brake: Slide transparent bleed tubes over the bleed screws (refer to Bleeding Sequence). Place the other ends of the bleed tubes in a suitable container to trap the oil. Open the bleed screws by half a turn. 3. Start the engine. 4. Couple the brake pedals together. Depress the pedals and hold them depressed for at least 15 seconds. 5. Then depress the pedals briefly and release. Repeat this a few times. This should flush out any air bubbles left in the fluid. 6. If necessary, repeat step 4.
|
|

OU12401,0000961 -19-01MAY01-2/3 |
|
7.
Hold the pedals in the depressed position and close the bleed screws. Tighten lock nut (if equipped).
8. Shut off the engine and actuate the brake pedals several times each (separately!) with the engine shut off. This bleeds the last of the air out of the brake valve. There must be perceptible (increasing) resistance before each pedal reaches its limit of travel. IMPORTANT: If pedal does sink noticeably after resistance has been reached, leaks in the brake system may be the cause. |
|

OU12401,0000961 -19-01MAY01-3/3 |