General Operating Instructions and Entering Program ModeDiagnostics with digital display |
|
| General operating instructions | ||
|---|---|---|
| Tractors with digital display but without HMS II | Tractors with digital display AND with HMS II | |
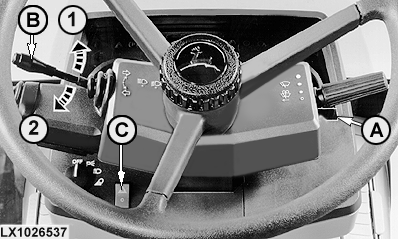
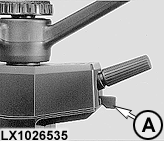
| Entering program mode | Move the main switch to the "on" position, wait for at least 4 seconds and then pull roll-mode switch (A) and hold it | |
| Selecting the control units | Move turn-signal lever (B) once in direction 1 or 2, and pull it back again | Move turn-signal lever (B) twice in brief succession in direction 1 or 2, and pull it back again |
| Confirming the control units | Switch the hazard flasher switch (C) on and off | |
| Leaving the control unit | Pull turn-signal lever (B) towards the steering wheel (flash-to-pass) for at least 2 seconds | |
| Selecting addresses (in increments of 1) | Move turn-signal lever (B) once in direction 1 or 2, and pull it back again | Move turn-signal lever (B) twice in brief succession in direction 1 or 2, and pull it back again |
| Selecting addresses (in increments of 10) | Move turn-signal lever (B) to 1 or 2, and leave it there | |
| Selecting addresses (interrupting an increment of 10) | Switch off turn signal lever (B) | |
| Calling up input addresses (INP) | Pull turn signal lever (B) briefly towards the steering wheel (flash-to-pass) | |
| Accessing input addresses (INP) | Switch the hazard flasher switch (C) on and off | |
| Selecting information (data in figures) | Move turn-signal lever (B) once in direction 1 or 2, and pull it back again | Move turn-signal lever (B) twice in brief succession in direction 1 or 2, and pull it back again |
| Switching from one item of information to the next (data in figures) | Pull turn signal lever (B) briefly towards the steering wheel (flash-to-pass) | |
| Saving information | Switch the hazard flasher switch (C) on and off | |
| Aborting a procedure | Pull turn-signal lever (B) towards the steering wheel (flash-to-pass) for at least 2 seconds | |
| Clearing the diagnostic trouble codes | After "CLr?" appears on the display, switch the hazard flasher switch on and off | |
OU12401,00009B2 -19-02FEB02-1/1 |
|
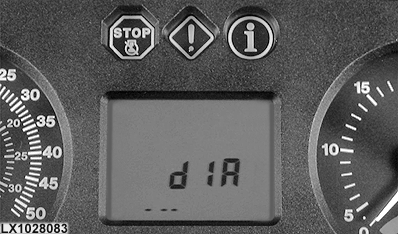
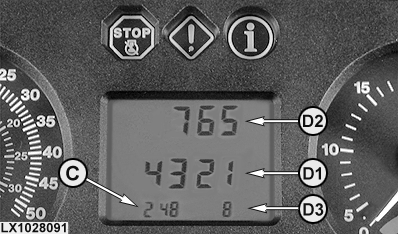
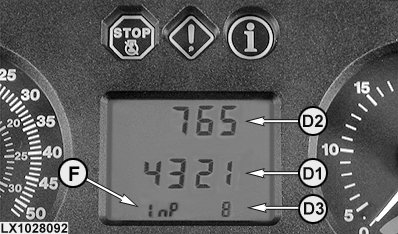
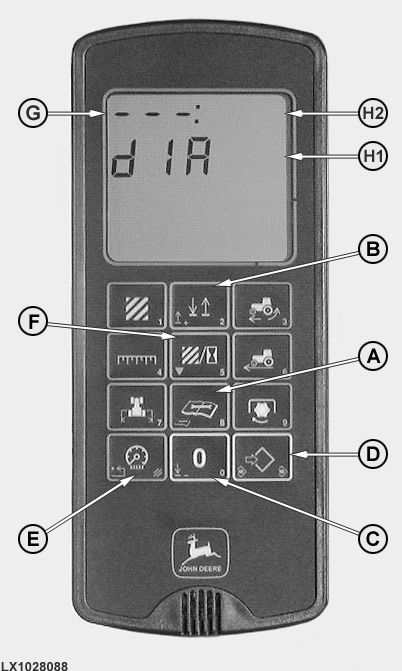
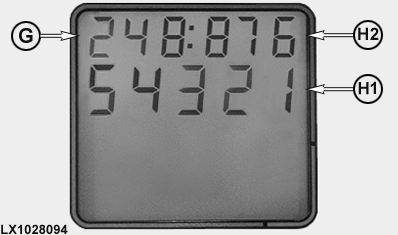
Dual Gauge II The digital display shows "diA" first. The display changes when a control unit is selected and confirmed. The left end of the bottom line (C) on the digital display indicates the address. If the address is an input one, the display alternates between the address and "InP" (F). Information is shown in the middle line (D1). If four figures are not enough, the three figures in the top row (D2) and one figure in the bottom row (D3) may be used as well. A diagnostic trouble code consisting of 8 figures (6 before the full stop, 2 after it) is displayed as follows:
|
|
OU12401,00009B2 -19-02FEB02-1/1 |
|
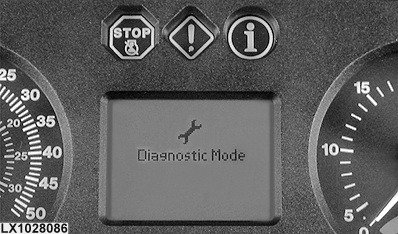
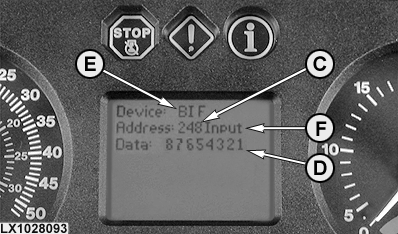
Dual Gauge Plus II Dual Gauge Plus II first shows "Diagnostic Mode". The display changes when a control unit is selected and confirmed. The control units (Device) are shown on the top line (E) of the digital display. Addresses are shown on the middle line (C). If it is an input address, the word "Input" (F) appears after the address. Information (Data) is shown on the bottom line (D).
|
|
OU12401,00009B2 -19-02FEB02-1/1 |
|
|
|
OU12401,00009B2 -19-02FEB02-1/1 |
|
Diagnostics with the performance monitor
|
| General operating instructions | |
|---|---|
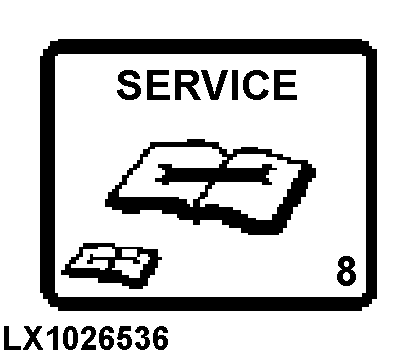
| Entering program mode | Move the main switch to the "on" position, wait for at least 8 seconds, then press the "Service" button (A) and hold it. |
| Selecting the control units | Press the "2" button (B) or the "0" button (C) |
| Confirming the control units | Press the "set/save" button (D) |
| Leaving the control unit | Press the "Clear" button (E) |
| Selecting addresses (in increments of 1) | Press the "2" button (B) or the "0" button (C) |
| Selecting addresses (in increments of 10) | Press the "2" button (B) or the "0" button (C) for a long time |
| Calling up an input address (INP) | Press the "5" button (F) |
| Accessing input addresses (INP) | Press the "set/save" button (D) |
| Inputting information (data in figures) | Press the numbered buttons |
| Saving information | Press the "set/save" button (D) |
| Aborting a procedure | Press the "Clear" button (E) |
| Clearing the diagnostic trouble codes | After "CLr?" appears on the display, press the "set/save" button (D) |
OU12401,00009B2 -19-02FEB02-1/1 |
|
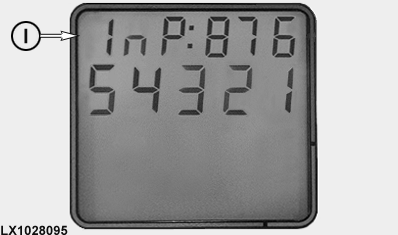
Display The top row on the display is divided by a colon. Address (G) is shown by three figures on the left of the top row. If the address is an input one, the display alternates between the address and "InP" (I). Information (H1) is shown on the bottom line. If five figures are not enough, the three figures on the right of top row (H2) may be used as well. A diagnostic trouble code consisting of 8 figures (6 before the full stop, 2 after it) is displayed as follows:
|
|
OU12401,00009B2 -19-02FEB02-1/1 |
Entering program mode
- - -1/1 |
Entering program mode via the digital display |
|
OK: GO TO: Calling up addresses and diagnostic trouble codes. NOT OK: See your dealer. |
||||||
- - -1/1 |
Entering program mode via the performance monitor |
|
OK: GO TO: Calling up addresses and diagnostic trouble codes. NOT OK: See your dealer. |
||||||
- - -1/1 |