Lighting System - Worklights
Switch worklights on and off
 CAUTION: It is not permitted to use worklights (light switch
in position D) on public roads.
CAUTION: It is not permitted to use worklights (light switch
in position D) on public roads.

LX1057055-UN-22JAN14
Side Console
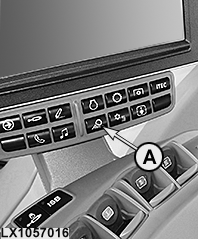
LX1057016-UN-21JAN14
CommandARM™
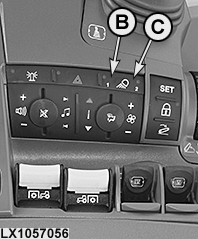
LX1057056-UN-22JAN14
CommandARM™
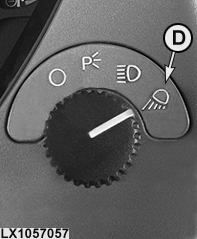
LX1057057-UN-12JUL13
Switch Worklights On
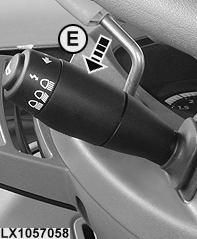
LX1057058-UN-12JUL13
Switch High-Beam Headlights On
LX1057059-UN-11JUL13
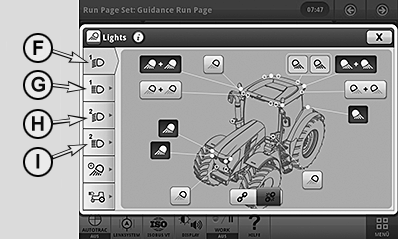
Low Beam Headlight Combination 1 Shown
A - Light Button
B - Button for Light Combination 1
C - Button for Light Combination 2
D - Light Switch, Worklights ON
E - Switch for High/Low-Beam Headlights
F - Low-Beam Button, Light Combination 1
G - High-Beam Button, Light Combination 1
H - Low-Beam Button, Light Combination 2
I - High-Beam Button, Light Combination 2
Turn the light switch to position (D) to switch the worklights on. The most recently selected combination of lights comes on again, and the relevant indicator light (B) or (C) lights up.Up to four different light combinations can be activated. Pressing selection button (B) or (C) and additionally switching on the high-beam headlights enables the relevant light combination.
NOTE: Every time a combination of lights is switched on or changed, the relevant light page for the combination of lights appears for approximately 10 seconds on the CommandCenter™. The operator can directly access the page and modify the settings. If he does not access the page, the display will return to the monitoring screen after approximately 10 seconds.
Select worklights
LX1057055-UN-22JAN14
Side Console
LX1057016-UN-21JAN14
CommandARM™
LX1057056-UN-22JAN14
CommandARM™
LX1057059-UN-11JUL13
Low Beam Headlight Combination 1 Shown
LX1057062-UN-12DEC13
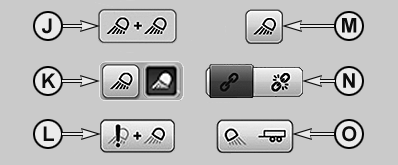
A - Light Button
B - Button for Light Combination 1
C - Button for Light Combination 2
F - Low-Beam Button, Light Combination 1
G - High-Beam Button, Light Combination 1
H - Low-Beam Button, Light Combination 2
I - High-Beam Button, Light Combination 2
J - Pair of Lights, Linked and Activated
K - Pair of Lights Unlinked, Deactivated/Activated
L - Pair of Lights, Linked and Deactivated, Fault at Light
M - Pair of Lights that Cannot Be Unlinked, Deactivated
N - Link/Unlink Pair of Lights
O - Trailer Lights Deactivated
NOTE: Worklights can be selected regardless of whether lights are switched on or not.
Access the light page via button (A) and then access the relevant worklight selection page via buttons (F) to (I).
Content depends on how the tractor is equipped.
CAUTION: Promptly replace or repair damaged or lost light equipment.
Activate or deactivate the desired combination of lights, unlink or link a pair of lights and activate or deactivate the trailer lights. The combinations of lights are saved automatically when closing the page or going to another page.
NOTE: If all worklights are switched off via the page, the standard setting of the worklights is loaded and enabled automatically when the worklights are switched on again.
|
OULXA64,0002E76-19-20131206 |