DirectDrive — Settings
Set travel speed
LX1057178-UN-28AUG13
LX1057179-UN-29AUG13
LX1057183-UN-28AUG13
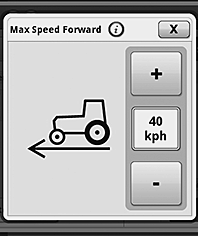
Max Speed Forward
LX1057184-UN-28AUG13
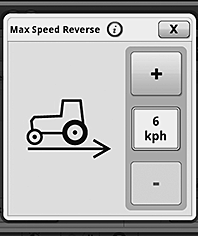
Max Speed Reverse
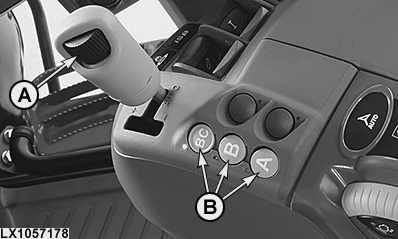
A - Speed Wheel
B - Range Selection Buttons
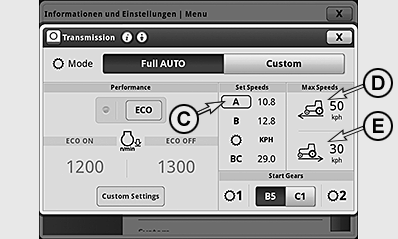
C - Range Selection Marker
D - Maximum Forward Speed
E - Maximum Reverse Speed
Maximum travel speed is regulated using speed wheel (A).
NOTE: The maximum speed setting is shown on the instrument panel by means of the LEDs on the circumference of the speed display.
On the transmission page, a frame appears round the range selection (C) that is currently activated, and the set maximum speed is displayed.
The set maximum speed can be overwritten in manual mode.
Set the maximum speed by moving the reverse drive lever out of the park position. Use buttons (B) to select the desired range and set the desired travel speed using speed wheel (A).
NOTE: In range BC, the maximum travel speed possible in reverse is 30 km/h (18.64 mph).
NOTE: When the PTO is switched on, priority is given to PTO speed. To increase or reduce travel speed, the tractor's transmission shifts automatically.
Limit maximum speed for forward and reverse travel
Maximum speed for forward and reverse can always be limited on the transmission page. These set maximum travel speeds cannot be changed using speed wheel (A) or overridden using the accelerator pedal or hand throttle.
To adjust, press the transmission button and access the transmission page.
The maximum speeds for forward and reverse are displayed in boxes (D) and (E). To change maximum speed for forward and reverse, actuate display box (D) or (E). In the context menu, enter the desired settings by means of the +/— buttons and close the menu. Increasing the speeds does not change the dynamic behavior of the tractor. The maximum speed set in boxes (D) and (E) always takes utmost priority, even if a higher speed has been selected in another setting.
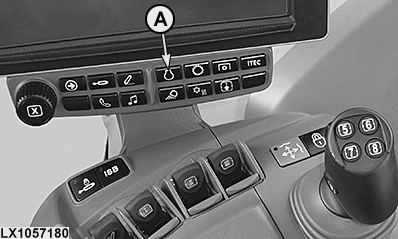
FieldCruise™, Using Cruise Control
LX1057180-UN-22JAN14
LX1057090-UN-22JUL13
LX1057091-UN-22JUL13
LX1057129-UN-01AUG13
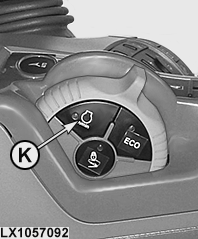
LX1057092-UN-14OCT13
A - Engine Button
B - Button, FieldCruise™ 1 On/Off
C - Button, FieldCruise™ 2 On/Off
D - FieldCruise™ Speed 1 (Status, Activated)
E - FieldCruise™ Speed 2
F - FieldCruise™ Indicator Light, Speed Switched On
G - Button, Increase Speed
H - Speed Setting
I - Button, Reduce Speed
J - FieldCruise™ Indicator Light, 1 or 2
K - Button, FieldCruise™ ON/OFF
By means of the FieldCruise™ function, the engine speed can be limited to a range from 1050 to 2100 rpm. Changes to cruise control take effect immediately.
Using cruise control in light load situations may reduce fuel consumption.
FieldCruise™ may be used in some applications such as operating the rear PTO while baling.
Two different FieldCruise™ speeds can be set, enabling the operator to toggle quickly from the one to the other.
• Set a FieldCruise™ speed
-
Press engine button (A).
-
Press button (D) or (E) and set the desired speed using button (G) or (I).
• Switch FieldCruise™ on or off
-
Press engine button (A).
-
Press button (B) or (C) to switch FieldCruise™ 1 or FieldCruise™ 2 on or off.
NOTE: If FieldCruise™ has been activated, FieldCruise™ remains active when the engine is restarted.
When FieldCruise™ is switched on, indicator lights (F) and (J) light up together with the figures “1” or “2”. On the CommandARM™, the indicator light in button (K) also lights up.
Button (K) allows FieldCruise™ to be switched on and off directly. When FieldCruise™ is switched off, the previously used speed is highlighted and automatically reselected whenever FieldCruise™ is switched on at button (K) on the CommandARM™.
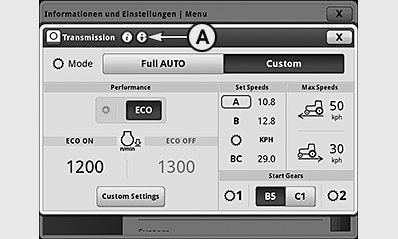
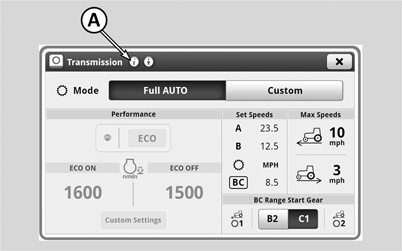
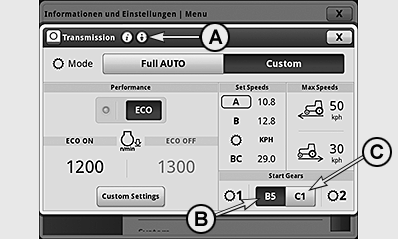
Set operating modes
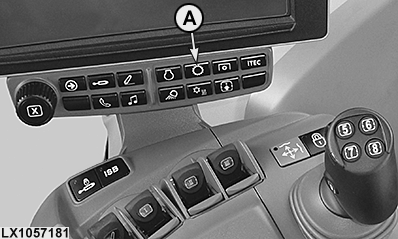
LX1057181-UN-22JAN14
Transmission Button
LX1057182-UN-30AUG13
Transmission Page
A - Transmission Button
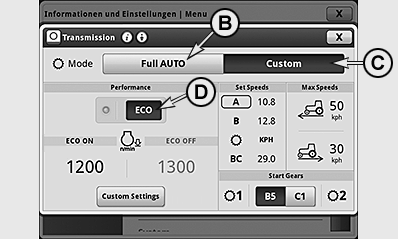
B - Auto
C - Custom Settings
D - ECO Mode
Press transmission button (A) and access the transmission page.
The DirectDrive transmission offers two operating modes to get the most fuel efficiency and load control from your tractor.
NOTE: The active mode is shown on a dark background and the inactive modes and display boxes on a light gray background.
B — Full Auto
In Full
Auto mode, settings are automatically adjusted to suit various operational
conditions.
Engine speed is automatically reduced when there is a slight
load.
Engine Speed Droop is automatically set for use of
full engine torque when the tractor is operated under full load.
C — Custom
The operator
can select the limitation of the engine speed, the engine speed droop,
and the expected load.
|
B — Auto |
C — Custom |
|---|---|
|
|
|
*Applies only when front and rear PTOs are switched off. When a PTO is on, load-dependent engine speed reduction is inactive, as achieving PTO speed has priority. |
|
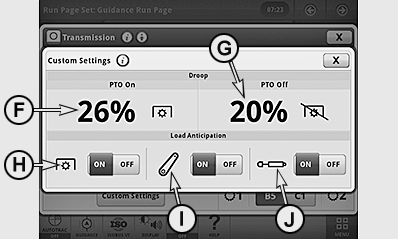
Custom settings
NOTE: All settings pertaining to this page are only applicable when DirectDrive transmission is in custom mode.
LX1057198-UN-30AUG13
LX1057185-UN-28AUG13
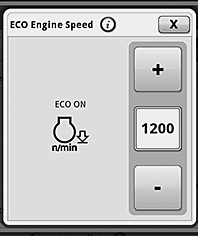
Minimum Engine Speed ECO ON

LX1057186-UN-28AUG13
Minimum Engine Speed ECO OFF
LX1057199-UN-30AUG13
LX1057200-UN-30AUG13
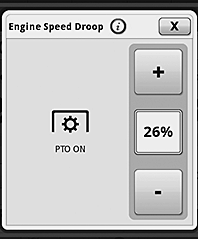
Engine Speed Droop with PTO ON
LX1057201-UN-30AUG13
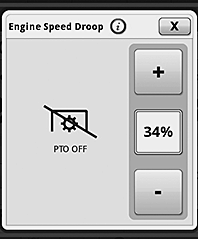
Engine Speed Droop with PTO OFF
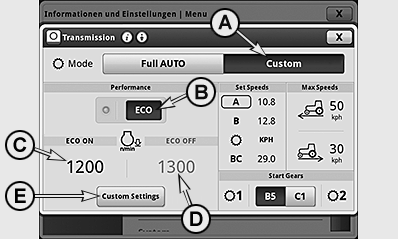
A - Custom Settings
B - ECO ON/OFF
C - Minimum Engine Speed: ECO ON
D - Minimum Engine Speed: ECO OFF
E - Custom Settings
F - Engine Speed Droop with Front and Rear PTO ON
G - Engine Speed Droop with Front and Rear PTO OFF
H - Load Anticipation (Front and Rear PTOs)
I - Load Anticipation (Front and Rear Hitches)
J - Load Anticipation (SCV)
Reduction of engine speed:
This function allows fuel economy to be improved. If the speed commanded by the accelerator pedal or hand throttle has been reached, the engine speed that is required to maintain travel speed will be reduced automatically. Input boxes (C) and (D) allow a minimum engine speed to be selected which will not be reduced any further by the engine speed reduction function. Selecting ECO (B) allows the operator to toggle between the minimum engine speeds in boxes (C) and (D).
NOTE: The value can be incrementally configured from 900 rpm to 2100 rpm.
To adjust minimum engine speed, actuate transmission button and button (A) to activate Custom Settings. Use the following procedure to change the speeds.
• Change minimum engine speed with ECO ON:
-
Use button (B) to switch on ECO.
-
Actuate input box (C) and access the context menu.
-
Use the +/— buttons to set the desired speed.
-
To save, close page.
• Change minimum engine speed with ECO OFF:
-
Use button (B) to switch off ECO.
-
Actuate input box (D) and call up the context menu.
-
Use the +/— buttons to set the desired speed.
-
To save, close page.
Engine Speed Droop:
If engine speed is reduced under load, an adjustable automatic control ensures that e.g. a lower gear is selected to keep engine speed at a constant level when operating a rear PTO. Engine Speed Droop intensity depends on the setting which corresponds to a percentage of the current speed.
Example: If Engine Speed Droop is set to 10 % at a preset engine speed of approx. 1930 rpm, transmission will shift down one gear if speed drops to approx. 1740 rpm. This would correspond to a drop in PTO speed from 540 to about 490 rpm accordingly.
Engine Speed Droop also influences the shifting behavior when upshifting in Auto mode. The higher the value set for engine speed droop, the sooner the tractor will shift up.
NOTE: Engine speed droop percentage with rear PTO on can be set from 6 % to 40 % or with rear PTO off can be set from 20 % to 40 %.
To adjust Engine Speed Droop, actuate button (E) and access the Custom Settings context menu. Use input boxes (F) or (G) to access the Engine Speed Droop settings for PTO ON and PTO OFF, and use the +/— buttons to set the desired values. To save, close page.
Adjusting the engine speed for the expected additional load:
This setting is used to select an additional anticipated load created by the use of front and rear PTOs (H), front and rear hitch (I) or SCV (J).
If the engine speed is reduced due to the load and the front and/or rear PTO is switched on, the engine speed is increased again permanently. When the hitch or the selective control valves is activated, the engine speed is increased briefly.
To activate or disable the relevant function, press the ON or OFF button. To save, close page.
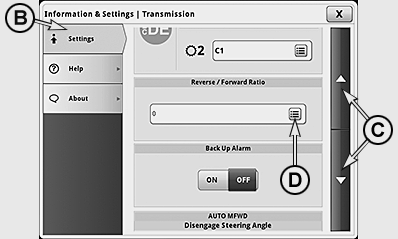
Set the reverse/forward speed ratio
LX1057187-UN-29AUG13
LX1057188-UN-30AUG13
LX1057202-UN-30AUG13
A - Advanced Settings Icon
B - Settings Tab
C - Arrow Buttons
D - Input Box, Forward/Reverse Speed
E - Set the Forward/Reverse Speed
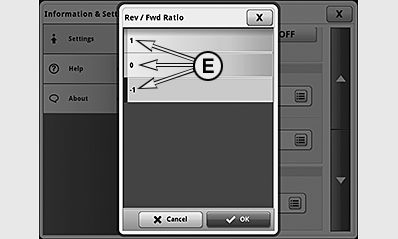
This function allows a different travel speed to be selected automatically when direction of travel is changed. This will be achieved by shifting gears. The ratio between forward and reverse speed can be set between +3 and -3. When changing the direction of travel, there is a shift of gears up or down by one, two, or three stages, depending on the setting, however only within the engaged range.
To change, press the transmission button and actuate icon (A; advanced settings) in the first line of the transmission page.
Select tab (B) and use arrow buttons (C) to select the desired input box and set the desired forwards/reverse speed (E). To save, close page.
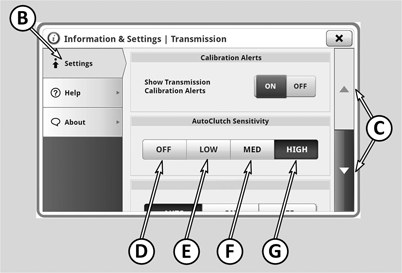
AutoClutch settings
AutoClutch is an automatic clutch function. When AutoClutch is switched on, the clutch pedal does not need to be pressed to stop the tractor.
If both brake pedals are depressed when driving the tractor, the speed will be reduced or the tractor stops. When the brakes are released again, the tractor automatically accelerates up to the speed currently commanded by the hand throttle or accelerator pedal.
 CAUTION: When AutoClutch is switched off, the clutch pedal needs
to be pressed to stop the tractor.
CAUTION: When AutoClutch is switched off, the clutch pedal needs
to be pressed to stop the tractor.
IMPORTANT: The AutoClutch function operates only when the brake pedals are coupled together. Actuating a pedal individually (e.g. to steer) does NOT actuate the automatic clutch function.
NOTE: For driving maneuvers using the turn brake (only one brake pedal is actuated), the engine speed should not drop below 900 rpm, because otherwise the AutoClutch function becomes active again.
LX203982-UN-14MAR14
LX203981-UN-14MAR14
A - Advanced Settings
B - Settings Tab
C - Arrow Buttons
D - Select/Deselect AutoClutch
E - Low Sensitivity
F - Medium Sensitivity
G - High Sensitivity
Switch AutoClutch on and set sensitivity:
- Press the transmission button and actuate icon (A) for advanced settings in the first line of the transmission page.
- Select tab (B) and use arrow keys (C) to select the AutoClutch input box.
- Various possible selections (D) to (G) are displayed.
- Make the desired selection by pressing the button.
IMPORTANT: AutoClutch remains switched on after start-up. If AutoClutch is switched off by the operator, it switches on again automatically the next time the tractor is started.
NOTE: If desired, the sensitivity setting can be displayed directly on the CommandCenter™ status monitor.
|
Meaning of buttons (D) to (G) |
|
|
(D) |
Switch off the auto coupling function by pressing the OFF button. When "OFF" is marked (dark background) then AutoClutch is switched off. It can be switched off only if the brake pedals are NOT pressed. |
|
(E) |
Low: is recommended for driving downhill with a trailer, particularly if ground conditions are difficult. |
|
(F) |
Medium: is primarily for driving with a trailer in moderately hilly terrain. |
|
(G) |
High: is primarily for driving without a trailer or with a trailer on level ground. |
Set the start-up gear
LX1057189-UN-29AUG13
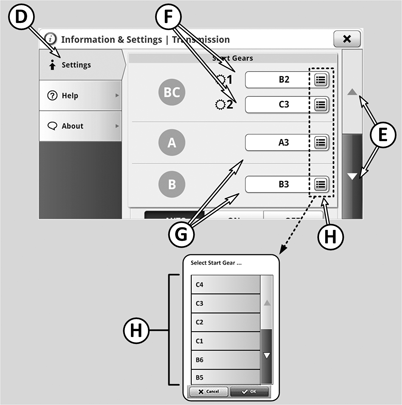
LX203980-UN-14MAR14
A - Advanced Settings
B - Start-Up Gear “1”, Activate/Disable
C - Start-Up Gear “2”, Activate/Disable
D - Settings Tab
E - Arrow Buttons
F - Setting Start-Up Gears “1” and “2” for Range BC
G - Setting Start-Up Gear for Ranges A and B
H - Start-Up Gear Choice Box
The start-up gear determines how far the transmission automatically shifts down the gears when the tractor stops.
For groups A and B, one start-up gear can be set for each. When group A or B is engage, the set start-up gear is displayed by means of a large button (B). Pressing the button (B) activates the displayed start-up gear.
For group BC, two start-up gears can be set. With buttons (B) and (C), the current start-up gears are displayed. The button with the dark background shows the currently active start-up gear. Pressing button (B) or (C) activates the displayed start-up gear.
When a start-up gear has been activated, the transmission automatically shifts to the selected start-up gear after a stop. While driving, shifting to the displayed start-up gear can thus occur - this can cause the travel speed to increase.
NOTE: The system only switches to the start-up gear after a stop if the currently engaged gear is larger than the selected start-up gear.
Select and save the start-up gears:
- Press the transmission button and actuate icon (A) for advanced settings in the first line of the transmission page.
- Select tab (D) and use arrow keys (E) select the start-up gear input box.
- Ranges BC, A and B appear on the display, each with a start-up gear choice box (H) to the right. This is where the possible start-up gears appear.
- Select the desired start-up gear and press OK to save the choice.
In range BC, on the transmission page it is possible to toggle between the start-up gears by selecting button (B) or (C). To enable the operator to toggle quickly between two start-up gears, the two buttons (B) and (C) can be displayed and activated directly on the status monitor of the CommandCenter™.
NOTE: If the symbols are selected next to the start-up gear indications (B) or (C), the drop-down menu (H) will appear.
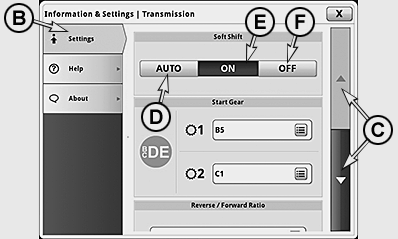
SoftShift when Changing Gears
LX1057187-UN-29AUG13
LX1057193-UN-30AUG13
To adjust, press the transmission button and actuate icon (A; advanced settings) in the first line of the transmission page.
Select tab (B) and use arrow keys (C) to select the relevant input box. Select the desired operating mode. To save, close page.
Engine speed can then be matched in the following ways:
D - AUTO — On, but off if front or rear PTO is in operation
E - ON — Always on
F - OFF — Always off
|
OULXA64,0003048-19-20160316 |