RTP - Set the Return-to-Position Function
Set setpoints for the rocker
-
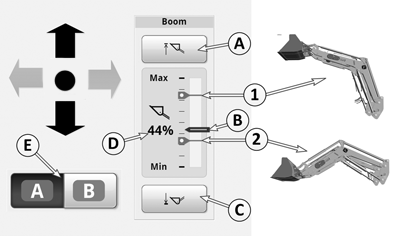
LX211116-UN-19MAY14A - Setting the Top Setpoint
B - Position Indicator
C - Setting the Bottom Setpoint
D - Percentage Indicator
E - Softkey for Toggling Between Two Ranges of Setpoints
1 - Top Setpoint Mark
2 - Bottom Setpoint Mark
Use softkey (E) to select one of the two setpoint ranges, A or B.NOTE: Two separate ranges of setpoints may be edited for each implement. A range consists of one top and one bottom setpoint each for boom and bucket. On the display, different colors of the setpoints indicate which range is currently selected (A = blue and B = green).
-
Specifying the Top Setpoint: Push the multi-function lever forward or pull it back until the boom reaches its desired height. Press softkey (A) to save the top position. The top setpoint is indicated by mark (1).
-
Specifying the Bottom Setpoint: Push the multi-function lever forward or pull it back until the boom reaches its desired height. Press softkey (C) to save the bottom position. The bottom setpoint is indicated by mark (2).
IMPORTANT: For 4-cylinder tractors with front loader 640R/643R. If stops are mounted on the piston rod of the rocker, the lowest reachable percent point "0" cannot be reached. Refer also to the operator's manual of the front loader.
-
Value (D) always shows the percentage height of the rocker in relation to the maximum travel.
Boom at top endpoint = 100%
Rocker at bottom stop = 0%
-
Position indicator (B) always moves to show the current height of the rocker.
NOTE: The top setpoint always has to be above the bottom setpoint. The bottom setpoint must always be below the top setpoint
Set setpoints for the bucket
-
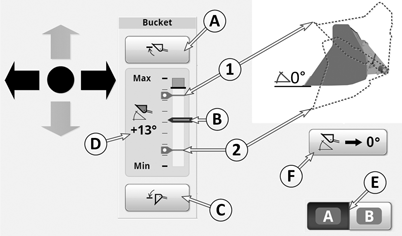
LX211117-UN-19MAY14A - Setting the Top Setpoint
B - Position Indicator
C - Setting the Bottom Setpoint
D - Bucket Angle Indicator
E - Softkey for Toggling Between Two Ranges of Setpoints
1 - Top Setpoint Mark
2 - Bottom Setpoint Mark
Use softkey (E) to select one of the two setpoint ranges, A or B.NOTE: Two separate ranges of setpoints may be edited for each implement. A range consists of one top and one bottom setpoint each for boom and bucket. On the display, different colors of the setpoints indicate which range is currently selected (A = blue and B = green).
-
Determine setpoint for bucket angle upward: Move the multi-function lever right or left until the bucket reaches the desired angle. Press softkey (A) to save the top position. The top setpoint is indicated by mark (1).
-
Determine setpoint for bucket angle downward: Move the multi-function lever right or left until the bucket reaches the desired angle. Press softkey (C) to save the bottom position. The bottom setpoint is indicated by mark (2).
-
Softkey (F) is used to mark any desired zero point within the bucket's range of movement. This permits a frequently required bucket position to be found again. Movement towards this point must be made manually.
Reset to 0: Move the bucket to any desired position and press softkey (F) to change the angle on the display to 0°.
-
Angle indicator (D): Always indicates the current bucket angle in relation to a freely selectable zero point (0°). If the bucket moves above this point, values appear with a positive sign (+). If the bucket moves below this point, values appear with a negative sign (—).
NOTE: The top setpoint always has to be above the bottom setpoint. The bottom setpoint must always be below the top setpoint
|
OULXBER,00023C6-19-20151207 |