Hydraulic Pick-Up Hitch (Mechanically Actuated)

LX1056729-UN-19JUL12
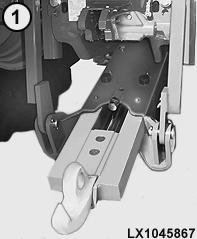
LX1045867-UN-15FEB11
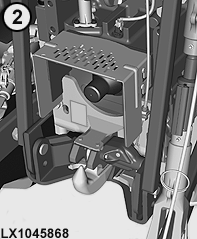
LX1045868-UN-15FEB11
B - Release Lever
1 - Hitch in Position for Attaching Trailer
2 - Hitch in Stored Position
This type of hitch can be operated using the hitch controls and one selective control valve.
-
Raise draft links to maximum height and use SCV to retract the hitch hook fully.
-
Pull release lever (B) and lower the draft links. Hold the release lever until the hitch hook has moved from the stored position (lever remains in open position).
-
Extend the hitch hook fully by actuating the selective control valve.
-
Lower draft links/hitch hook to desired height.
-
Raise the draft links so that the hitch hook engages in the towing eye of the implement; then fully raise the trailer hitch.
-
Retract the hitch hook fully by means of selective control valve until it is fully locked (lever B returns to its starting position).
-
Lower the draft links.
-
Check that the hitch is locked correctly. If this is the case, it will not lower when the draft links are lowered and not extend when the selective control valve is operated.
IMPORTANT: If the unlocking is sluggish or the detenting does not function automatically (point 2 or 6 in the aforementioned list), then have the setting of the lift links or the hook of the wagon hitch checked by an authorized dealer.
 CAUTION:
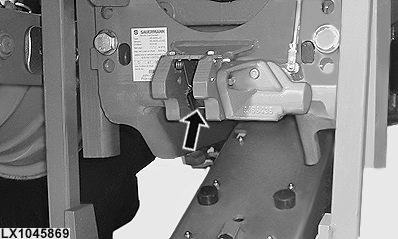
LX1045869-UN-15FEB11
When the trailer hitch is down, DO NOT reach into the opening (see arrow). Risk of injury!
NOTE: Inspect components of the wagon hitch that may be subject to wear according to the Maintenance Plan (refer to Lubrication and Periodic Service). Replace them if necessary.
Maximum permissible static vertical loads and towed loads are stated in the Specifications section.

LX1045870-UN-15FEB11
The part not required can be stored in a holder on the side-frame.
|
OULXA64,0002B34-19-20160107 |