Three-Piece Front Axle (Version 1) — Notes on Adjusting the Fenders
LX245282-UN-27MAY15
“IN” Position Shown
LX245283-UN-27MAY15
Installed Position of Fenders
|
Installed Position of Fenders |
|
|---|---|
|
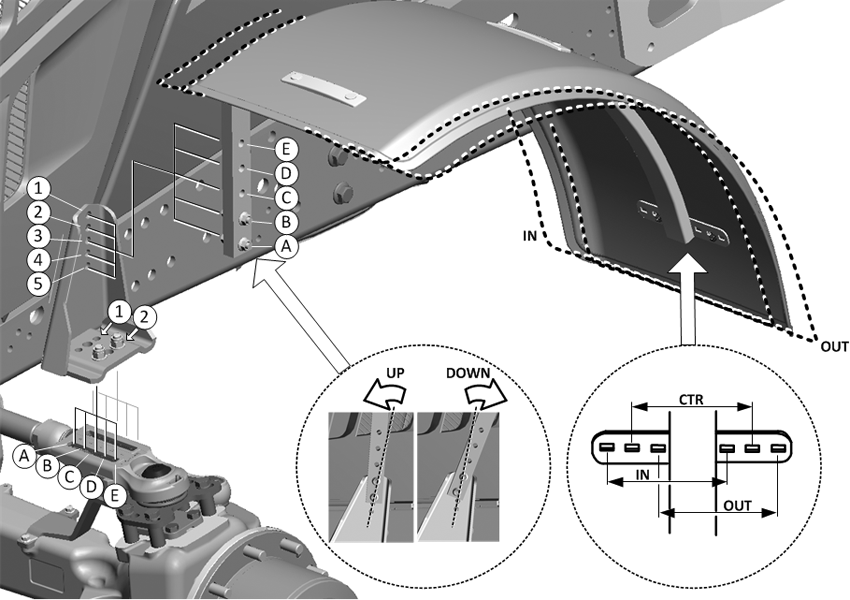
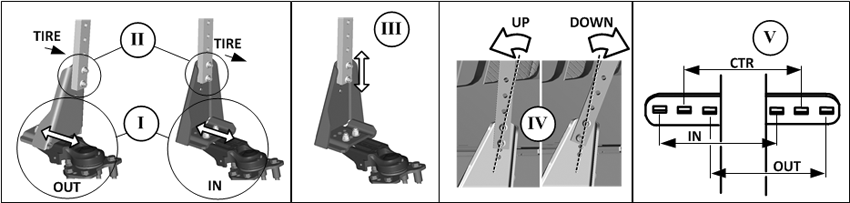
I |
Console on outside of base plate - (OUT) Console on inside of base plate - (IN) |
|
II |
Fender base support to console - to wheel (TIRE) |
|
III |
Height adjustment, fender base support to console |
|
IV |
Tilt, fender base support to console - (UP/DOWN) IMPORTANT: The fender base support must always point to the rear. |
|
V |
Fender on fender base support - inside/center/outside (IN/CTR/OUT) |
IMPORTANT: If the position at which the console is installed is to changed from “IN” to “OUT”, the fender base supports and consoles must be removed on both sides. Then, on the opposite side of the tractor, install the consoles on the base plate at position “I” (without turning the consoles). Then install the fender base supports on the consoles at position “II” and “III”.
IMPORTANT: The required setting values of the fenders can be found in one of the following tables:
• “Three-Piece Front Axle (Version 1) — Adjust the Fixed Fenders and Steering Stop”
• “Three-Piece Front Axle (Version 1) — Adjust the Pivoting Fenders and Steering Stop”
See corresponding front axle model on the following pages.
IMPORTANT: Additional setting options are not available.
Adjust the fenders according to the drawing and to the specified tire sizes and tread widths as well as the steering stops required for this.
Move the fenders to the recommended position; this will prevent damage to the fenders caused by them coming into contact with the wheel or the engine hood.
IMPORTANT: The positions listed below are merely recommendations. Depending on tire size, fender size and the position of the steering stops, it may be necessary to move the fenders to positions different from those listed below.
IMPORTANT: Settings listed are approximate, due to variations in tire size.
The fenders are set correctly if a sufficient clearance can be ensured between the tires and frame and tractor components when steering is fully turned and the axle is oscillated to its full extent. See also “Prevent Front Wheel or Fender Contact with Tractor Components” in this Section.
After adjusting the fenders, tighten the attaching screws to the following torques:
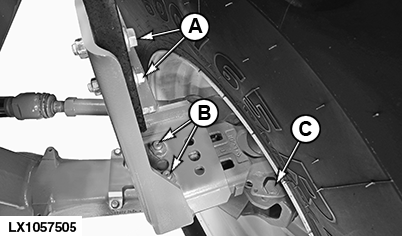
LX1057505-UN-26MAY15
Console Shown in “IN” Position
A - Cap Screws, Fender Base Support to Console
B - Cap Screws, Console to Base Plate
C - Cap Screws, Base Plate to Knuckle Housing
|
Screws (A) .............. |
90 N·m (65 lb.-ft.) |
|
Screws (B) .............. |
160 N·m (120 lb.-ft.) |
|
Screws (C) .............. |
170 N·m (125 lb.-ft.) |
|
OULXA64,0003775-19-20161010 |