Three-Piece Front Axle (Version 2) — Notes on Adjusting the Steering Stop - 750 and 755
IMPORTANT: Settings listed are approximate, due to variations in tire size.
IMPORTANT: Steering stop kit AL225331 for the three-piece front axle (version 2) can be used for setting the steering stop for narrower tread widths.
IMPORTANT: The required setting values of the steering stops can be found in one of the following tables:
• “Three-Piece Front Axle (Version 2) — Adjust the Fixed Fenders and Steering Stop”
• “Three-Piece Front Axle (Version 2) — Adjust the Pivoting Fenders and Steering Stop”
See corresponding front axle model on the following pages.
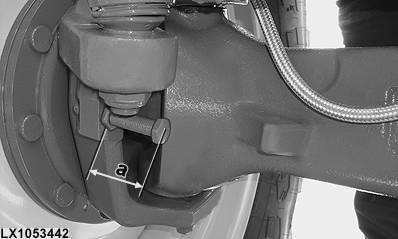
LX1053442-UN-23MAY12
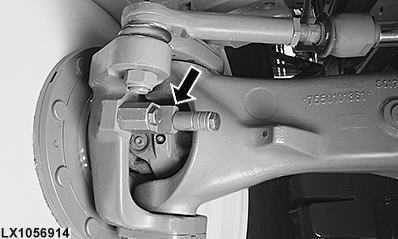
LX1056914-UN-27JUN13
Steering Stop Kit AL225331 for Narrower Tread Widths
-
Adjust fenders (if equipped) and tread widths before setting steering stop positions.
-
The correct position of the steering stops for the tire size and tread width are listed in the table “Three-Piece Front Axle (Version 2) — Adjust the Fenders and Steering Stop” of the relevant front axle.
-
Measure the length of screw (a) as shown; this will bring the steering stops to their correct position. It must be ensured that the steering stops can be screwed in to a depth of at least 10 mm (0.4 in.).
If the length of the steering stops is not sufficient, a stop extension can be used. Contact an authorized dealer for this.
IMPORTANT: Keep the following in mind when adjusting the steering stops:
Length of the stop screw (M16)
Up to 80 mm
(3.1 in.)From 85 mm
(3.3 in.) and largerSteering Stop Kit
without
with AL225331
Height of nut (M16)
H = 13 mm (0.51 in.)
—
Torque Specifications
120 ± 10 N·m
(89 ± 7 lb-ft)—
-
Tighten the retaining nuts of the steering stops to the specified torque.
-
Turn wheel fully to the right. Impact the knuckle housing against the steering stop five times. Repeat for left side.
-
Tighten the steering stop retaining nuts to the specified torque once again.
-
Turn steering wheel fully to the left and then fully to the right to check clearance.
IMPORTANT: After every setting, observe the following:
• Set the shut-off angle for the automatic engagement and disengagement of the front-wheel drive. See “Engage Front-Wheel Drive” in Section 50A.
• Check whether the required clearances are maintained; see “Prevent Front Wheel or Fender Contact with Tractor Components” in Section 80.
|
OULXA64,00040AB-19-20190927 |