Rack-and-Pinion Axles, Hub Diameter 86 mm / 92 mm - Adjust Tread Widths for Steel Rear Wheels (without Adjusting Pinion)
 CAUTION: Avoid personal injury. Never run engine with transmission
in gear and rear wheels off ground. MFWD wheels could pull rear wheels
off support. MFWD has to be disengaged and transmission in NEUTRAL
to rotate axle.
CAUTION: Avoid personal injury. Never run engine with transmission
in gear and rear wheels off ground. MFWD wheels could pull rear wheels
off support. MFWD has to be disengaged and transmission in NEUTRAL
to rotate axle.
-
Raise tractor on level ground and turn wheel so rack on the axle is upward.
RXA0063068-UN-14OCT02
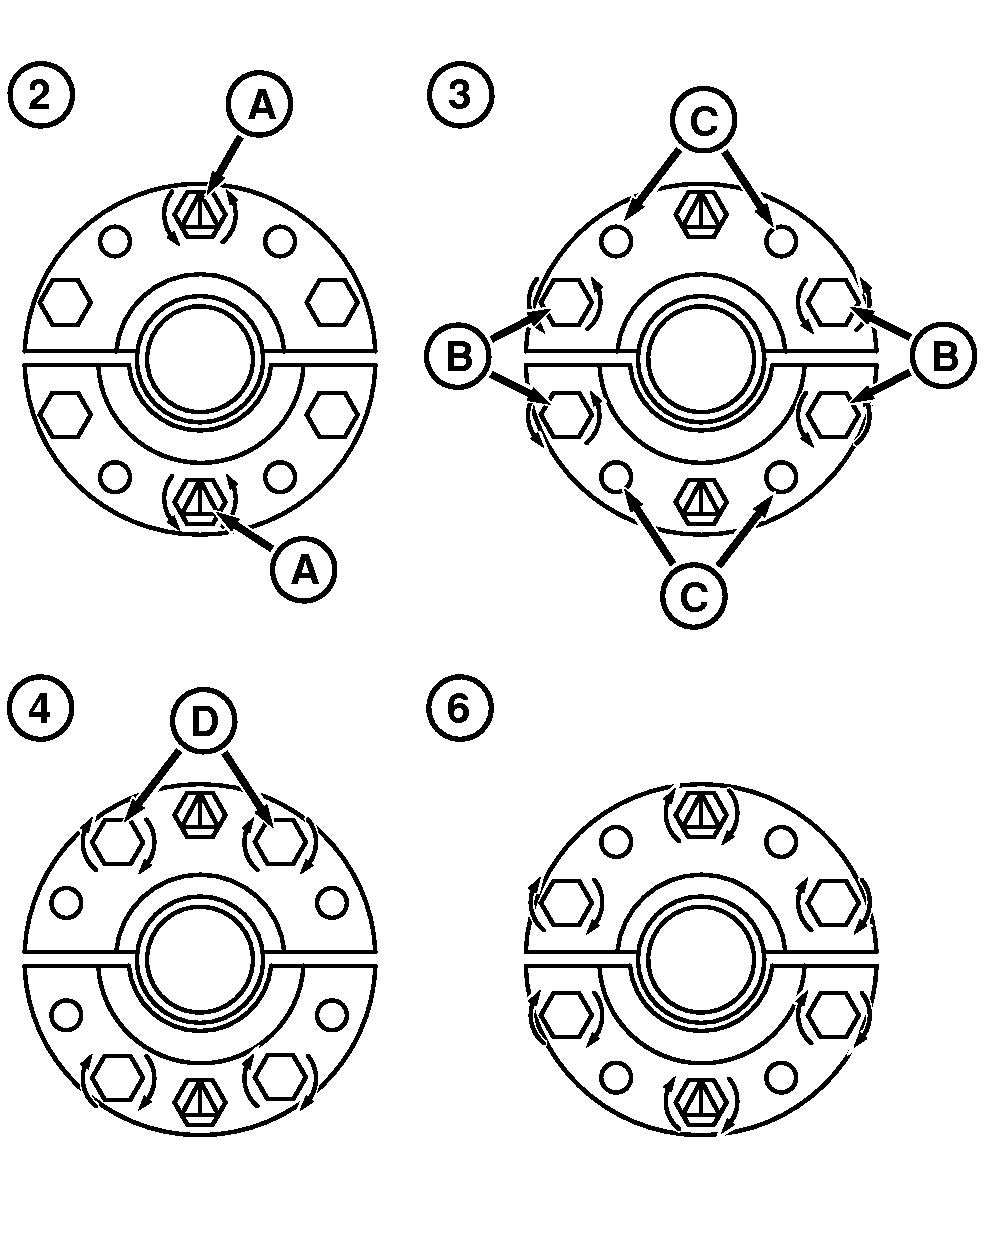
RW21374-UN-28JUL92A - Middle Attaching Screws of the Half-Shells
B - Attaching Screws of the Half-Shells
C - Jack Screw Holes
D - Jack Screws
-
Loosen the middle attaching screws (A) against the retaining nuts.
-
Remove screws (B).
-
To loosen or push off the half-shells, install the screws in holes (C) for jack screws. If necessary, tighten the jack screws (D) up to 550 N·m (405 lb-ft).
NOTE: If half-shells are difficult to break loose, use penetrating oil and strike the end of the axle with a heavy hammer.
-
Remove jack screws (D). Attach the wheel adjustment tool JDG667A1 with the removed jack screws in holes (B) for the attaching screws of the half-shells. Move wheel to desired position. Observe tread width limitations.
-
Remove adjusting tool and the screws.
CAUTION: Never operate tractor with a loose rim, wheel, or hub.IMPORTANT: Keep the faces of half-shells even to prevent the hub from breaking or the screws coming loose.
-
Make sure the half-shells are seated properly and tighten the attaching screws as follows.
-
Position the attaching screws of the half-shells in holes (A) and (B).
-
Tighten the center screws (A) and then screws (B) crosswise to 204 N·m (150 lb.-ft).
-
Retighten screws to 410 N·m (300 lb-ft) using the same sequence.
-
Drive tractor a minimum of 100 meters (100 yd) and tighten bolts to 550 N·m (405 lb-ft).
IMPORTANT: After 3 operating hours and 10 operating hours, retighten all screws daily during the first week of operation and then every 250 operating hours thereafter.
-
|
1 Available from an authorized John Deere dealer
|
OULXA64,0004BB4-19-20191114 |