Operating Radio With Or Without Compact Disc Player-Late Model Tractors
|
|

|
|
|
|
|
Radio can be operated in any one of three modes; 1.
Radio ON with tractor running.
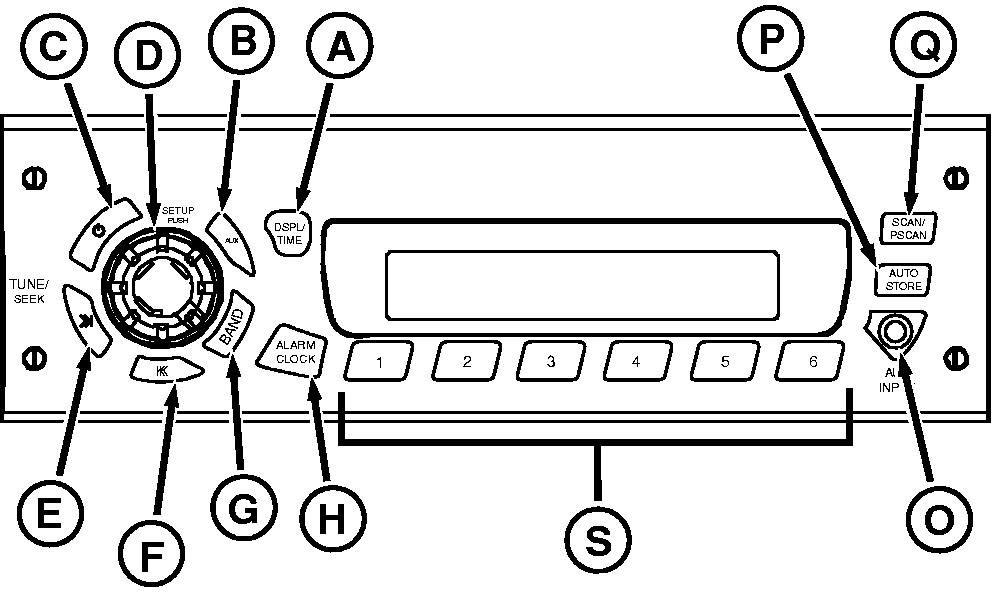
Operating Radio Press On/Off (C) to turn radio on or off. Change display clock function to 12 or 24 hour mode. The 12 hour mode distinguishes between AM and PM and 24 hour mode operates as military time. 1.
To change mode press and hold the "DSPL/TM SET" button until clock display digits begin to flash (approximately 2 seconds).
|
Display change option to dwell on time or station frequency: 1.
Press and hold DISPL/TIME (A) button for 3 seconds.
Press BAND (G) to switch between AM, FM1, FM2, FM3 or WX (Weather) bands. Press AUX (B) to play an external device like your iPOD or MP3 player that is connected via auxiliary input jack on front of receiver. Press SETUP (D) to adjust volume, bass, treble, fade, and balance by pressing and releasing SETUP button repeatedly until desired function appears on display. Rotate knob for adjustment. control volume/adjusts bass, treble, balance, fade, seek sensitivity, dim and speakers. Adjust brightness of display by pressing SETUP until "DIM" appears on display. Rotate knob to adjust. |
OURX935,0000458 -19-12MAR09-1/2 |
|
NOTE: Quickly pressing the TUNE/SEEK button causes radio to "tune" or search for the next higher or lower frequency and radio will stop on that frequency even if no station is there. Holding TUNE/SEEK button longer than half a second initiates the "seek" function. The "seek" function stops at the next higher/lower frequency with a strong radio signal and will stop at that station. Press TUNE/SEEK (E or F) quickly to go to the next higher/lower frequency respectively. To switch to a radio station on the next higher/lower frequency, press TUNE/SEEK (E or F) respectively and hold briefly. Press ALARM CLOCK (H) to enter alarm set mode. Press AUX INPUT (O) for external audio devices. Press AUTO STORE (P) to preset strongest stations. Pressing SCAN/PSCAN (Q) quickly or "Scanning" results in locating next station. Pressing SCAN/PSCAN and holding more than half a second or "P-Scanning" results in locating next preset station. Scanning/P-Scanning will continue until SCAN/PSCAN is pressed again. Storing Preset Stations (S) or button #4 (L) for radios with compact disc: |
1.
Select FM1, FM2, FM3, AM or WX.
Press AUTO STORE (P) until "AUTO" and the "AS" icon appear to automatically store the six strongest stations of a selected band. Press AUTO again to restore original presets. Playing Preset Stations: Press appropriate button 1-6. For radios with a CD player only:
|
OURX935,0000458 -19-12MAR09-2/2 |