Removing Engine Air Filters

CQ280162-UN-13FEB08
CM023500074-UN-07FEB05
Service the engine air filters when the Diagnostics Gauge Warning Indicator Light comes on and the Diagnostics Trouble Code (DTC) 107.0 is displayed.
-
Inspect and clean filter housing before removing filters.
-
Open the six clips (A) of the filter housing and remove cover.
-
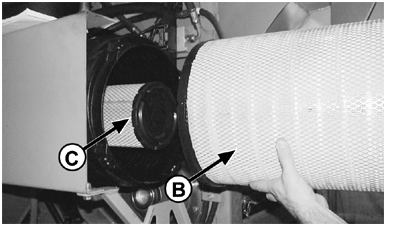
Remove the primary filter (B), as gently as possible, by slightly moving it from side to side while pulling outward. Accidentally bumping it while still inside the housing will create dirt and dust that may contaminate the engine. If the safety filter (C) is going to be changed, remove it using the same method used with the primary filter.
-
Always clean the inside of the housing carefully. Dirt left inside the air cleaner housing can ruin the engine. Use a clean damp cloth to wipe all surfaces clean. Check the inside area visually before installing a new filter.
-
Always clean the gasket sealing surfaces of the housing. An improper gasket seal is one of the most common causes of engine contamination. Make sure all hardened dirt ridges are completely removed from both top and bottom of the housing.
-
Check for uneven dirt patterns on the old filter. A pattern on the old filter's clean side is a sign that it was not firmly seated or that a dust leak exists. Make sure that any leak is identified and eliminated before installing a new filter.
|
GB52027,0000541-19-20090305 |