Forming a Bale
Do not attempt to feed crop or twine into baler or unplug feed area while baler is running. The baler feeds material faster than you can release it. Disengage PTO and shut off engine. Prior to forming a bale, prepare the machine for baling as described in "Preparing the Baler" Section. Set the monitor to the desired values under the appropriate tying mode (twine or net). See "Operating ELC Plus Monitor in Twine/Net Tying Mode" in this section. Adjust desired bale full-size. See "Adjusting Bale Full-Size" in "Operating the Baler - General Purposes" Section. Operate tractor at PTO rated speed. Move selective control valve lever to close gate, then shift lever to neutral. Check that both bale shape indicators (A)-(B) are in downward position (red lines must be at bottom of bale shape windows). If not, gate is not correctly closed. Check for obstructions. Engage PTO, then start to feed the baler as described in "Feeding the Material" in "Operating the Baler - General Purposes" Section. Glance back and check movement of bale shape indicators (A)-(B). |
|
 CAUTION:
DO NOT TAKE CHANCES! To avoid injury or death by being pulled into the machine:
CAUTION:
DO NOT TAKE CHANCES! To avoid injury or death by being pulled into the machine:
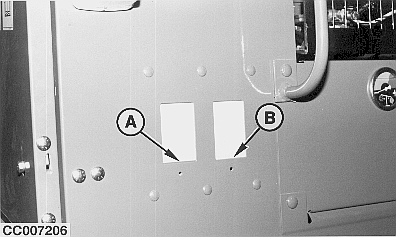
OUCC006,0000738 -19-01AUG02-1/3 |
|
Weaving to the right: If left-hand bale shape indicator (A) remains in the down position while right-hand indicator (B) has risen, weave to the right over windrow to bring more material to left-hand side of pickup.
|
|
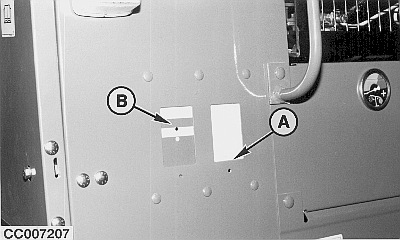
OUCC006,0000738 -19-01AUG02-2/3 |
|
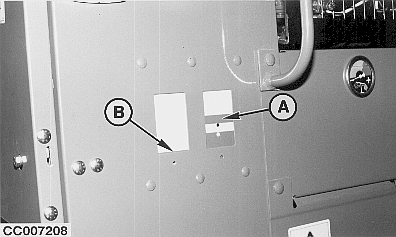
Weaving to the left: If right-hand bale shape indicator (B) remains in the down position while left-hand indicator (A) has risen, weave to the left over windrow to bring more material to right-hand side of pickup. Continue to feed material up to the desired full-size bale. At that time a short sound alarm (about 1 second) is emitted as the tying cycle is starting. IMPORTANT: At the end of bale formation, the two red zones of bale shape indicators (A) and (B) will be at the top of bale shape windows. This corresponds to the maximum bale size accepted by the baler. NOTE: If tying cycle must be started before that desired bale full-size is reached, tie the bale as described in "Starting Manually an Automatic Tying Cycle" or "Tying a Bale Manually" in this section. |
|
OUCC006,0000738 -19-01AUG02-3/3 |