Adjust Needles (Twine Baler)
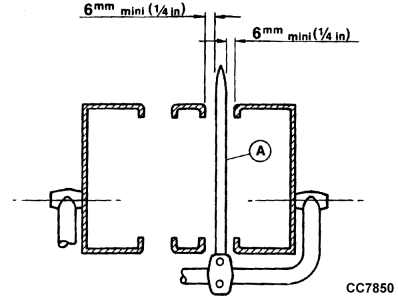
CC7850-UN-05OCT98
A - Needle
During the free portion of needle stroke (before needles enter knotters), each needle (A) must clear right and left edges of lower and upper bale case slots by more than 6 mm (0.23 in.).
Trip knotting mechanism by hand to raise needles.
Loosen the four needle mounting screws.
Move needle sideways to obtain proper clearance.
Slightly tighten needle mounting screws.
-
Adjust Needle Pressure
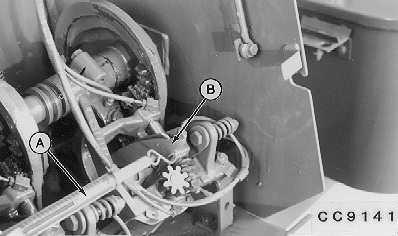
CC9141-UN-23SEP98A - Spring Balance
B - Needle
Attach a spring balance (A) to needle (B) as shown.
Move needle sideways until right-hand side exerts a pressure of 14—27 N (3—6 lb.) on knotter frame.
NOTE: It is advisable to adjust this pressure closer to 14 N (3 lb.) rather than to 27 N (6 lb.).
-
Obtain Proper Pressure
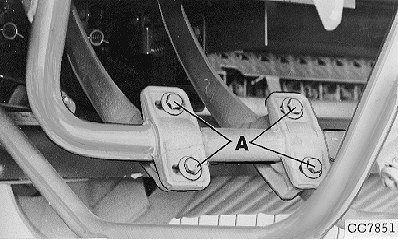
CC7851-UN-23SEP98A - Screws
Loosen four mounting screws (A) and tap needles sideways until proper pressure is obtained.
-
Adjust Needles with Twine Cleaner
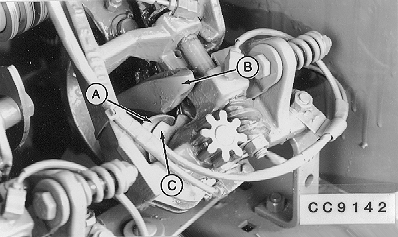
CC9142-UN-23SEP98A - 1.5—3 mm (0.06—0.12 in.)
B - Needle
C - Twine Disk
Needle (B) must clear twine cleaner or twine disk (C) by 1.5—3 mm (0.06—0.12 in.) (A) at the closest point. Measure this clearance at the level of rounded section of needle eye by pressing twine cleaner up and to left.
Each needle may be adjusted forward or rearward by loosening one of the needle mounting screws and tightening the other, or it may be shifted sideways by loosening both mounting screws.
When needles are properly adjusted, tighten all screws to 70—110 N·m (50—80 lb.-ft.). Recheck the needles through their cycle.
|
OUCC002,0002310-19-20100331 |