Adjust Needles (Wire Baler)
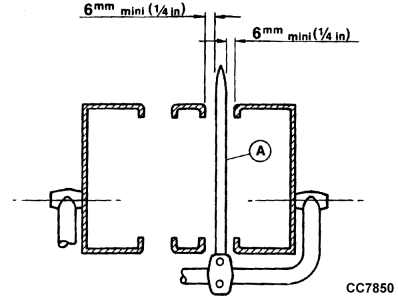
CC7850-UN-05OCT98
A - Needle
During the stroke, each needle (A) must clear right and left edges of lower and upper bale case slots by more than 6 mm (0.23 in.).
- Trip twisting mechanism by hand to raise needles
- Loosen the four needle mounting screws
- Move needle sideways to obtain proper clearance
- Slightly tighten needle mounting screws.
-
Adjust Needle Position
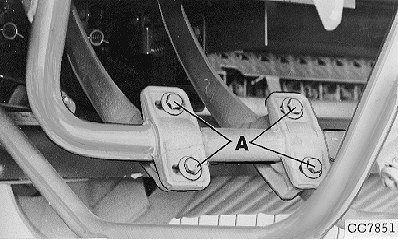
CC7851-UN-23SEP98A - Screws
Needle mounting screws (A) control position of needles in relation to center and rear wire guides, slots in twister mounting plate and wire grippers.
Each needle may be adjusted forward or rearward by loosening one of the needle mounting screws and tightening the other. Or it may be shifted sideways by loosening both mounting screws.
-
Align Needles
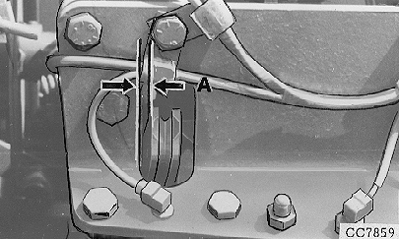
CC7859-UN-05OCT98A - 3—8 mm (0.12—0.31 in.)
In highest position, each needle must be 3—8 mm (0.12—0.31 in.) (A) from left-hand side of its respective slot in twister mounting plate.
To align needles with wire guide pulleys and the slot in twister mounting plate, trip measuring arm and raise needles. Loosen both needle mounting screws and move needle sideways until it is aligned (see in this Section).
Tighten the needle mounting screws to 88 ±20 N·m (65 ±15 lb.-ft.).
-
Adjust Needle to Gripper
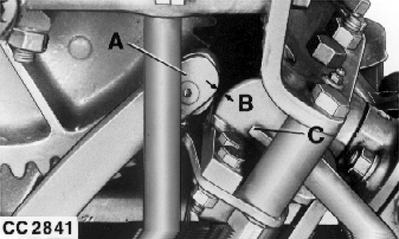
CC2841-UN-23SEP98A - Needle
B - 1.5—4 mm (0.06—0.15 in.)
C - Wire Gripper
As needles pass through the twisting mechanism, each needle (A) must clear front of wire gripper (C) by 1.5—4 mm (0.06—0.15 in.) (B) at the closest point (when checked without wire in the grippers).
To increase the distance between needles and grippers, slightly loosen front needle mounting screws and tighten rear screws. Reverse this procedure to reduce the distance.
With the needles properly adjusted, tighten all screws to 70—110 N·m (50—80 lb.-ft.). Recheck needles through their cycle.
|
OUCC002,000231B-19-20100323 |