Calibrate System
Calibrate system when:
- First using the system.
- If batteries have been disconnected (beginning of the season).
- If options have been added or removed from crop dividers.
- If crop divider pin position has been changed.
- Crop divider or base cutter sensors have been serviced.
-
 CAUTION:
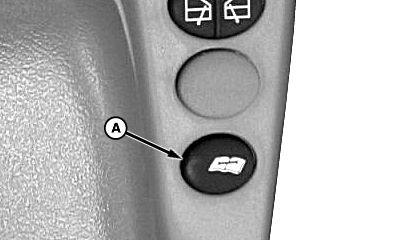
T8T641-UN-19JUN14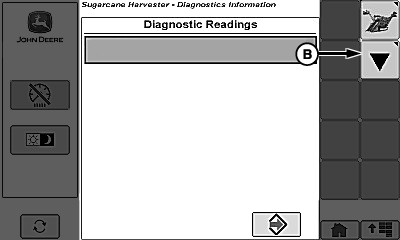
T8130002609-UN-29OCT13Diagnostic Readings Page
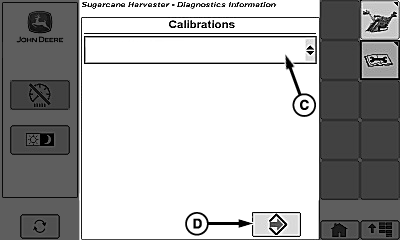
T8130002610-UN-29OCT13Diagnostic Calibrations Page
A - Diagnostic Switch
B - Calibration Softkey
C - Calibrations Menu
D - Enter/Accept Softkey
Alert others around machine to stay clear while calibrations are being performed. Sound horn to alert others around machine before performing calibration.Machine components raise and lower automatically during calibration.
Machine MUST be parked on a hard, level surface.
Operator MUST remain in operator seat through entire calibration procedure.
NOTE: Verify that crop dividers are in field configuration with desired options installed before continuing with calibration.
Run engine at fast idle.
-
Fully lower crop dividers to ground.
-
Raise crop dividers.
-
Engage harvesting function switch.
-
Verify that hydraulic oil is warmed to normal operating temperature before continuing with calibration.
-
Disengage harvesting function switch.
-
Touch diagnostic switch (A), calibration softkey (B), then calibrations menu (C).
-
Touch “Basecutter Height” calibration.
-
Touch enter/accept softkey (D) and follow instructions shown on display to calibrate base cutter height.
-
NOTE: See Digital Cornerpost Display section for more information.
Fully raise base cutter and verify Base Cutter Actual Height on cornerpost display shows “99”.
-
Fully lower base cutter and verify Base Cutter Actual Height on cornerpost display shows “0”.
NOTE: If Base Cutter Actual Height does not display correct reading, run calibration again.
-

T8120001379-UN-20SEP12
T8130002611-UN-31OCT13Diagnostic Readings Page
A - Diagnostic Switch
B - Readings Menu
C - Enter/Accept Softkey
Fully raise base cutter. -
Fully raise crop dividers then fully lower crop dividers to ground.
-
Adjust crop divider tilt to desired harvest position.
-
Touch diagnostic switch (A) then readings menu (B).
-
Touch “Floating Crop Divider” calibration.
-
Touch enter/accept softkey (C).
-
Verify that “LH Crop Divider Position Voltage” and “RH Crop Divider Position volts” fall between 0.7—4.6 V.
NOTE: If voltage readings do not fall between 0.7—4.6 V, then sensor linkage must be adjusted before continuing calibration.
-
If voltage reading is above 4.6 V, sensor rod dimension must be shortened.
-
If voltage reading is below 0.7 V, sensor rod dimension must be lengthened.
-
-
T8T641-UN-19JUN14
T8130002609-UN-29OCT13Diagnostic Readings Page
T8130002610-UN-29OCT13Diagnostic Calibrations Page
A - Diagnostic Switch
B - Calibration Softkey
C - Calibrations Menu
D - Enter/Accept Softkey
Touch diagnostic switch (A), calibration softkey (B), then calibrations menu (C). -
Touch “Left Crop Divider Position” calibration.
-
Touch enter/accept softkey (D) and follow instructions shown on display to calibrate left-hand crop divider position.
-
Repeat procedure for “Right Crop Divider Position” calibration.
-
Touch diagnostic switch (A), calibration softkey (B), then calibrations menu (C).
-
Touch “Left Crop Divider Pressure” calibration.
-
Touch enter/accept softkey (D) and follow instructions shown on display to calibrate left-hand crop divider pressure.
-
Repeat procedure for “Right Crop Divider Pressure” calibration.
-
NOTE: “Basecutter Height, Left Crop Divider Position, and Right Crop Divider Position” calibrations must be ran before calibrating “Basecutter Target Height”.
Touch diagnostic switch (A), calibration softkey (B), then calibrations menu (C).
-
Touch “Basecutter Target Height” calibration.
-
Touch enter/accept softkey (D) and follow instructions shown on display to calibrate base cutter target height.
|
WM05597,0001164-19-20141119 |