Loading Procedure
 CAUTION:
T8120002577-UN-18DEC12
T8T1910-UN-27JAN15
Left-Hand Side Of Machine Shown
T8T2454-UN-08MAY15
Right-Hand Side Of Machine Shown
T8T559-UN-13JUN14
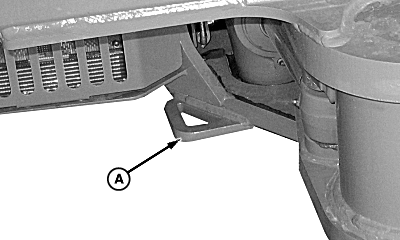
A - Rear Tie Down Point (2 used)
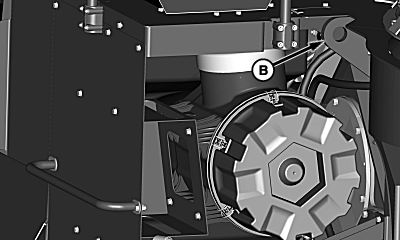
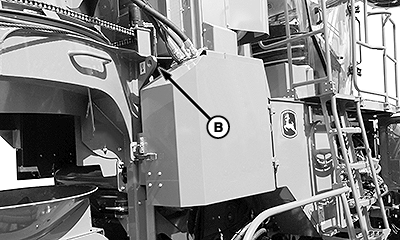
B - Upper Tie Down Point (2 used)
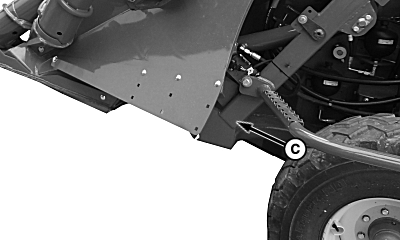
C - Front Tie Down Point (2 used)
KNOW THE MAXIMUM HEIGHT AND REACH OF YOUR MACHINE.Serious possible injury or death by electrocution may occur if the machine or its attachments are not kept at a safe distance from electrical power lines. Keep distance of at least 3.05 m (10 ft.) plus an extra 100 mm (3.9 in.) for every 1,000 V over 50,000 V. Local and state regulations or job site opening devices may require greater distance for safety reasons.
Be aware of local laws regarding height regulations during transport. Remember to add height of trailer to height of harvester.
- Keep trailer bed clean.
- Use a strong, low angle ramp, or loading dock when loading harvester onto trailer.
- Be sure to load and unload harvester on a level, firm surface.
- Use as many signal persons on the ground as needed when loading and unloading. Coordinate hand signals before starting the harvester.
- Drive harvester onto the trailer at a slow speed.
- The centerline of the harvester must be over the centerline of the trailer.
- When the harvester is in place on the trailer, turn park brake switch ON to engage the park brake.
- Lower the topper and elevator. Level the harvester.
- Apply safety stops to base cutter cylinders to prevent harvester from lowering.
- Turn OFF engine and turn battery disconnect switch to OFF position.
- Fasten chains or cables to the proper tie-down points (A—C). Do NOT put chains or cables over or against hydraulic lines or hoses.
IMPORTANT: Cover the exhaust outlet when harvester is facing rearward during transportation. This protects the turbocharger from being damaged.
|
WM05597,00012E9-19-20150508 |