Adjusting Twine Cutter Tension-Electric
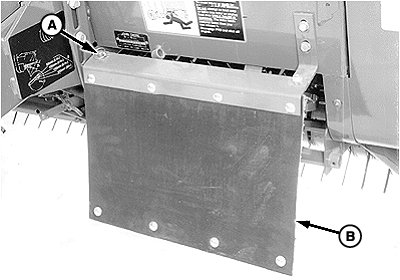
NOTE: 447; Perform this adjustment before adjusting twine distance from right sidesheet. 1. If equipped with MEGATOOTH ™ pickup; Remove quick-lock pin (A) and rotate left-hand curtain (B) away from front frame.
|
|
|
MEGATOOTH is a trademark of Deere & Company | OUO6059,0000079 -19-04OCT00-1/6 |
|
If there is crop material which is holding twine arm(s) from moving freely during twine arm cycle, it is recommended that twine arm(s) be manually positioned to release any "hold" they may have on the crop material. Turn off power to twine arm(s). This will help to make the unplugging operation easier and prevent twine arm(s) from moving unexpectedly while your hands may be in the path of the twine arm(s). Stay out of the path of twine arm(s) at all times when power to twine arm(s) is ON. 2. Turn tractor key to ON position. Do not start tractor engine. |
|
 CAUTION:
Twine arm(s) can move unexpectedly when twine arm power is on. Stay out of the path of twine arm(s) at all times when twine arm power is on. During service or adjustment procedures for twine arm(s) or twine cutter mechanism, turn off power to twine arm(s) BEFORE placing your hands in the path of twine arm travel.
CAUTION:
Twine arm(s) can move unexpectedly when twine arm power is on. Stay out of the path of twine arm(s) at all times when twine arm power is on. During service or adjustment procedures for twine arm(s) or twine cutter mechanism, turn off power to twine arm(s) BEFORE placing your hands in the path of twine arm travel.

OUO6059,0000079 -19-04OCT00-2/6 |
|
3. Move twine arms behind knife (C) using toggle switch on twine wrap controller. 4. Turn tractor key to OFF position. Remove key. Disconnect twine wrap controller power plug from tractor convenience outlet.
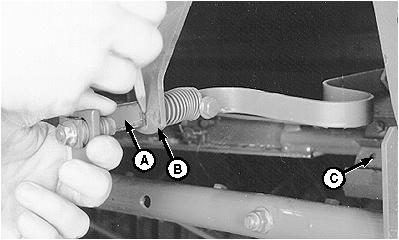
5. Pull cutter strap (A) gently forward until knife (C) lightly contacts hex anvil. Remove slack, but DO NOT deform strap. 6. Mark along cutter strap (A) at support (B), as shown.
|
|

OUO6059,0000079 -19-04OCT00-3/6 |
|
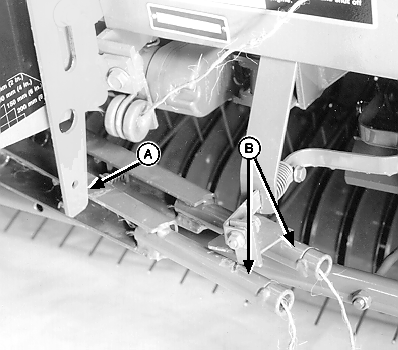
7. Make sure twine arm stop (A) is in the down position. 8. Connect twine wrap controller power plug to tractor convenience outlet. Turn tractor key to ON position. 9. Return twine arms (B) to "home" position using toggle switch on twine wrap controller. 10. Turn tractor key to OFF position. Remove key. Disconnect twine wrap controller power plug from tractor convenience outlet. 11. Distance (C) between mark on cutter strap and strap support should be within specifications. Specification
If electric actuator has been removed or replaced, or if twine cutter adjustment cannot be made by moving washers on cutter strap, refer to TWINE ELECTRIC ACTUATOR INSTALLATION in this section.
|
|
OUO6059,0000079 -19-04OCT00-4/6 |
|
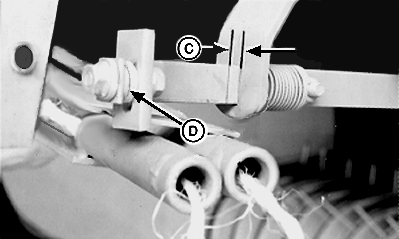
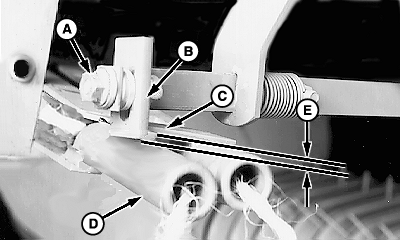
12. If washers have been moved, check overlap dimension (E) between bottom edge of tab (B) and bottom edge of strap (C). Dimension (E) should be within specifications. Specification
To check overlap dimension: a. Connect twine wrap controller power plug to tractor convenience outlet. Turn tractor key to ON position. b. Move twine arms, using toggle switch on twine wrap controller, until twine arm (D) lightly contacts tab (B) and strap (C). c. Turn tractor key to OFF position. Remove key. Disconnect twine wrap controller power plug from tractor convenience outlet. d. Loosen nut (A) and adjust tab (B) to obtain overlap dimension (E) between bottom edge of tab (B) and bottom side of contact strap (C). Keep tab (B) vertical and tighten nut (A). e. Connect twine wrap controller power plug to tractor convenience outlet. Turn tractor key to ON position. f. Move twine arms completely forward, using toggle switch on twine wrap controller. g. Turn tractor key to OFF position. Remove key. Disconnect twine wrap controller power plug from tractor convenience outlet. h. Check overlap dimension (E). Front twine arm must pass under tab (B). If necessary, adjust tab (B). Light contact between tab (B) and front twine arm (D) is acceptable. i. Make sure distance between mark on cutter strap and strap support is within specifications. |
|
OUO6059,0000079 -19-04OCT00-5/6 |
|
Specification
13. If equipped with a MEGATOOTH™ pickup; Rotate left-hand curtain toward front frame and secure with quick-lock pin. |
OUO6059,0000079 -19-04OCT00-6/6 |