Threading Net Wrap and Routing Through RollsNOTE: It is recommended to use approved net wrap available from your John Deere dealer.
NOTE: If using (shorter) roll of net wrap, see your John Deere dealer for instructions to position roll of material in the CoverEdge™ net wrap unit. 1. Open net wrap cover. NOTE: Remove all package material (staples, tape, etc.) from net wrap roll before installing. 2. Swing lower tension arm out, place net wrap roll (A) at loading position. 3. Place free end of net wrap from top of roll between net frame cross-member and rubber roll. 4. Lift lower tension arm, placing roll of net in operating position. |
|
OUO6039,0000008 -19-17OCT00-1/5 |
|
5. Thread net wrap (A) through rolls (C and D) as illustrated. NOTE: Maximum length is one inch any longer may cause wrapping.
|
|
OUO6039,0000008 -19-17OCT00-2/5 |
|
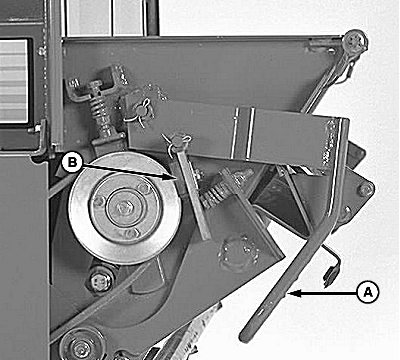
6. Pull lever (A) out and back to disengage roller brake pad (B).
|
|
OUO6039,0000008 -19-17OCT00-3/5 |
|
IMPORTANT: Do not thread more than 25 mm (1 in.) of loop between the two rolls or it may cause material to wrap around the rolls. IMPORTANT: Avoid knife contact with rubber roll. Any knife cuts in the rubber roll covering may result in more frequent wrapping around the rolls and may require roll replacement. NOTE: If net wrap is not being pulled off the front face of roll, the net roll has been installed backwards. (Refer to Step 1 for correct installation.) 7. Gather the loose ends of net wrap together. Twist material (B) and make a loop. Thread the loop between rolls. Cut excess material off. Reengaging the brake lever (A) will turn rubber roll and start net wrap between two rolls. Engage and disengage brake lever about three times to advance net through feed roll. |
|
OUO6039,0000008 -19-17OCT00-4/5 |
|
8. Pull lever (A) out and push forward toward front of machine. Make sure brake pad (B) contacts belt pulley. 9. Close net wrap cover. 10. To avoid wrapping rubber roll, release brake lever and reset brake before using the baler at the beginning of each day. 11. Adjust net wrap feed roll brake tension. (See CHECKING AND ADJUSTING NET WRAP FEED ROLL BRAKE in Service-Net wrap section.)
|
|
OUO6039,0000008 -19-17OCT00-5/5 |
 CAUTION:
Avoid injury from net wrap system cycling and entanglement in moving rolls. Disengage PTO, shut off tractor engine and disconnect monitor-controller power plug from tractor convenience outlet before servicing.


