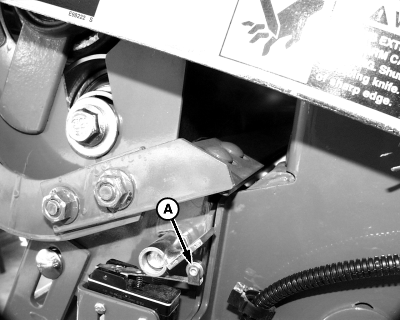
Checking and Adjusting Net Wrap Switch
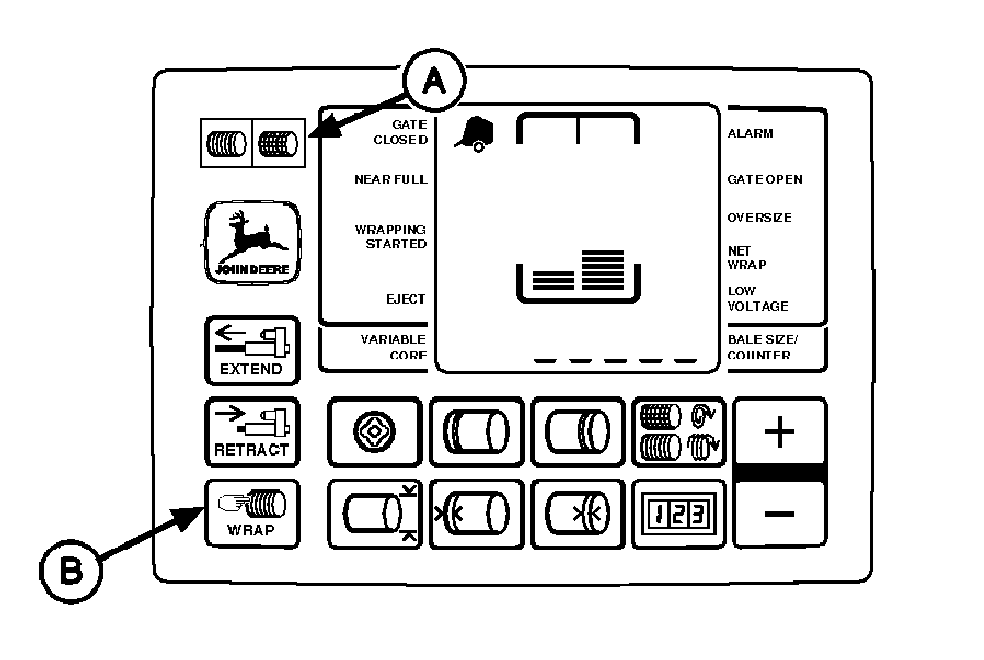
1. Turn tractor key to ON position. Do not start tractor engine. Set monitor-controller selector switch to NET symbol to turn monitor-controller ON. 2. Press WRAP key to cycle net wrap actuator. Net wrap cut-off arm at home (downward) position. 3. Set monitor-controller selector switch to OFF (centered) position. Turn tractor key to OFF position. Remove key. Disconnect monitor-controller power plug from tractor convenience outlet. 4. Open net wrap cover. 5. Clean area around switch. 6. Push switch arm (A) fully down and listen for switch to "click." Release switch arm and listen for another "click." |
|
 CAUTION:
Knife is extremely sharp and net wrap cut-off arm can move with out warning. Shut off all power before servicing knife. Keep hands clear of sharp edge.
CAUTION:
Knife is extremely sharp and net wrap cut-off arm can move with out warning. Shut off all power before servicing knife. Keep hands clear of sharp edge.

OUO6059,000143F -19-05FEB02-1/3 |
|
7. Initially adjust switch as shown. Move actuator flap (B) horizontal to the seam between net wrap frame and gate frame. 8. Hold flap in position. Loosen mounting screws, adjust switch clearance (A) between switch arm and body of switch to within specifications. Specification
9. Tighten screws. 10. Release actuator flap slowly. Switch arm should be fully released with flap released. If flap is holding switch arm down, check for cause and correct. 11. If not within specifications;
12. Check net switch signal to monitor-controller. (See TEST NET WRAP SWITCH-MONITOR-CONTROLLER ASSISTED TEST [CHANNEL 10] in TM, Section 50, Group 38). |
|

OUO6059,000143F -19-05FEB02-2/3 |
|
13. Close net wrap cover. 14. Connect monitor-controller power plug to tractor convenience outlet. Turn tractor key to ON position. Set monitor-controller selector switch to NET symbol (A) to turn monitor-controller ON. 15. Press WRAP key (B) to cycle net wrap actuator. Net wrap cut-off arm must be at home (downward) position. IMPORTANT: If this procedure is not followed, net will be fed continuously during the next bale. 16. Turn monitor-controller selector switch to OFF (centered) position. Turn tractor key to OFF position. Remove key. |
|
OUO6059,000143F -19-05FEB02-3/3 |